We don’t typically list fire as one of the “top three survival priorities,” but I can’t think of too many survival scenarios I’d want to face, without fire.
Granted, if you’re in a lifeboat on the ocean, you’re not going to be able to have a campfire to keep you warm; but there are few other situations like that. Fire is so essential to survival, that if you take an actual “survival course,” you’ll spend more time learning ways to fires, than you will anything else.
We use fire for heat, light, comfort, purifying water and protecting ourselves from predators. That means we’re actually using it for all three of the top three survival priorities, as well as other important needs.
With that being the case, it’s no wonder that survival instructors spend so much time and effort teaching people how to start fires. Yet many of those methods will never be used, as there are simpler things we can use.
It’s important for us to realize that the KISS principle is critical in survival. For those who aren’t familiar with that, KISS stands for “keep it simple stupid.”
It’s the idea that we should seek simple solutions to our problems, rather than complicated ones. With all that we have to do in a survival scenario and how time and energy all that will take, it makes sense to keep it simple.
That especially goes for fire starting. There is absolutely no reason to use a complicated or difficult means to start a fire when an easy one exists.
The time and energy saved by using a simple means of starting a fire can be used for other survival tasks, such as making sure we’ll have enough fuel to keep our fire burning through the night. That’s why matches and lighters are considered “primary fire starters,” while everything else is a “secondary fire starter.”
Related: How to Store and Stack Firewood The Right Way
How we build our fire can end up being more important than the actual method we use to start it. It is important to have the fuel laid in such a way that the fire will spread readily from tinder through kindling to the fuel. Many a fire has been started, but burned out before it got to the point where the fuel can be burning well.
Pyramid Fire
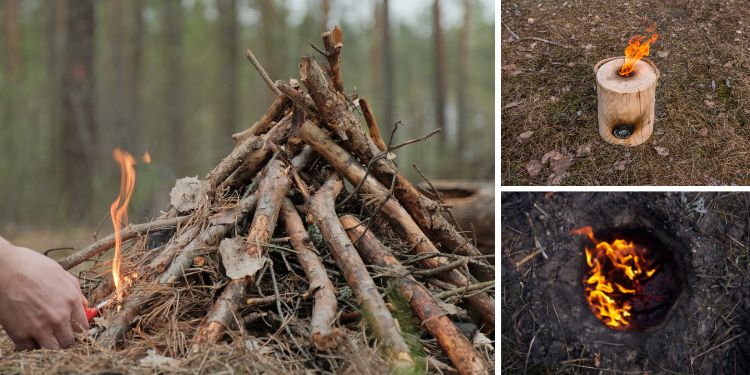
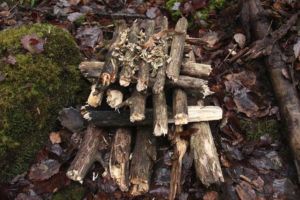 The most typical way of laying a fire is in the form of a pyramid.
The pyramid allows a lot of open space, so that air can get into the fuel, helping it to burn. It also puts the tinder under the kindling, which in turn is under the fuel, helping the fire to spread by natural convection.
The biggest key to making a pyramid is having relatively consistent kindling and fuel, cut to about the same diameter, so that it is easy to build the pyramid.
Start by making a mound of tinder and then building a pyramid of kindling over it. That means putting two pieces opposite each other, parallel, on the ground.
For the next layer, lay the pieces of kindling perpendicular, making a square. Continue adding layers, with the crossing until the desired pyramid height is reached. The same is done with the fuel, over and around the kindling pyramid.
Teepee Fire
A simpler design than the pyramid, a teepee fire is quicker and easier to lay.
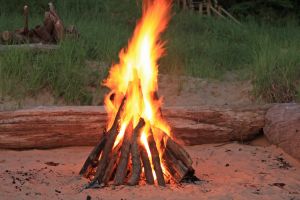
Formed as an inverted cone, it also has an inner cone of kindling and an outer cone of fuel, allowing the fire from the tinder do spread upwards and outwards until the whole of the fuel is burning.
Since it is formed as a teepee, the length and thickness of the individual pieces isn’t as critical as it is with a pyramid.
But you will need to replenish the wood faster, as you won’t have as much fuel in the originally laid fire.
One thing that is critical with a teepee fire is leaving an opening in the teepee, allowing you to light the tinder and get the fire started. It does not naturally have the openings that the pyramid does, making it easy to get the initial flame to the fire.
Dakota Fire Hole
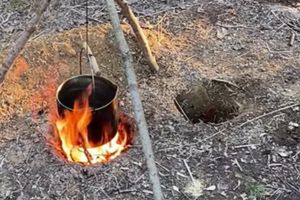 The Dakota fire hole is a great option to use if you need to keep your fire hidden from view or you need to protect the fire from wind.
What makes it different, is that the fire is literally made in a hole in the ground. Actually, you need two holes, connected together, with one larger than the other.
The fire hole starts out by digging a hole in the ground to put your fire in. You’re not going to be stacking wood in that fire, like with a pyramid or teepee, so the hole doesn’t really need to be all that big around. Still, to keep the fire burning a while, you’re probably going to need a hole that’s about a foot in diameter and a bit more than a foot deep.
Dig a second hole about a foot from the main one. this one is an air hole, ensuring that there’s oxygen to help the fire burn. Therefore, it doesn’t have to be all that big, roughly four to six inches in diameter. Make it as deep as the first hole and connect the two at the bottom.
Rather than actually building the fire, it is started by putting tinder in the hole and igniting it. Then tinder is dropped in the hole, on top of the burning tinder, to ignite it. As the tinder begins to burn, add fuel, until your fire reaches the point you want.
You may also like:
 Veggies You Only Plant Once and Harvest Forever
10 Things Cowboys Carried With Them in the Wild West to Survive (Video)
Knock Knock! It’s FEMA, We Need Your Stockpile







This will even scar Lisa Blake!!
Tucker Carlson Interview: Bret Weinstein at the Darien Gap.
It’s a little long but most folks will be glad they listened.
I watched the Interview, gained alot of information! Everyone should watch it and share. People need to be informed of this serious situation and plan accordingly.
Is there a trick on having a fire without the excess smoke?
Please stick to the subject. Most here already know what they are going to do.
For those of us prior military have known this stuff. It’s not entirely the military’s fault it is the DEEP STATE behind the Biden puppet strings making deals mostly with China CCP.
Many voters are either dumb and stupid or don’t care about who gets into presidential office as seen with Let’s Go Brandon in charge.
Those vets who have been to central and south America know these are potential explosive time bombs erupting into our porous southern border.
You decide who will lead us for the next 4 years.
Good deal. Teepee and log cabin, I just add wood to the fire where it makes sense so it’s a juxtaposition of those two.
The Dakota fire hole is one I need to get familiar with – minimizes the amount of visibility of the fire.
All the fires will make smoke that smells, however, besides any food smells that come from cooking.
The Dakota also is for dropping your cast iron dutch oven in for baking. If you know how much wood you need for baking below and on the lid you can do that and the sides warm as well. It really keeps is like an oven. If you dirt ring around the hole you can place your boots there to dry in the heat. Depending on what you want to do with the fire, expand the size or make it just larger than your pot. The only thing that gives it away if you are trying to be invisible is the smell. I have dug a pit on either side of the air airhole. I stewed and baked at the same time.
Hi Wood Stock
Next time ya see a little chunk of 3 inch steel pipe laying in a dumpster, grab it if in usable shape and connect the burn pit hole to the air intake hole using that pipe.
I have a Kamodo smoker and find the inch by inch or so lighter squares work GREAT for starting any fire, and work in the drizzle. 144 to a bx for like $12 and worth stashing away a couple boxes for a rainy day. Easy to cut in half with a sharp stiff blade too. Menards has em for less $ than Amazon. Other big hardware stores likely carry them too.
Can also hook up the back yard solar power to a Traeger grill via the power converter, and it works perfectly to cook using solar power to run the hot rod, fan and auger. I didn’t have my Kill-A-Watt meter to measure power draw then, but will next time I try that. Excellent if both power and natural gas go out and ya want to preserve the propane for boiling water on the grill side tray burner.
No rocket stove honorable mention ?
I often worry about the smell of cooking, and wonder if burning manure (animal or human) would be enough to mask the smell of cooking food? Thoughts?
lol: Want to mask food try burning feathers… but seriously the dakota fire will smoke the least and that may help you out.
We use fire every day in the wintertime here. We use our wood stove for heat. I was hoping that you would mention the different types of ways of starting fires. Lighters and matches aren’t always going to be available so it helps to know other methods of ignition such as bow drills and flint and steel.
Right. (Besides convenience items like lighters and matches) Bow drills. Flint and steel – includes ferrocerium. Fire piston. Magnifying glass. Parabolic reflector lens. Potassium permanganate and sugar. Electricity and steel wool. Brake fluid and pool shock.
I have several methods of fire starting available and practiced. My heat and atleast half the year cooking stove is a gravity fed Pellet stove that can just as easily burn wood chips, chunks, and 3 ft long branches. On top I keep water hot in a 3 gallon pot or an old tea kettle. I can fry a pan of potatoes or cook a whole meal on the 16″ top surface. I often keep a coffee cup warm set alongside the heater. I have a double heat activated fan that if set on top when hot will help circulate heat. on really cold night I have used two of those fan facing two ways to circulate heat to a wider area. I bake on top with a castiron pot tented with foil. It bakes my sourdough bread perfectly. I used to have a camp oven that worked well but it was stolen. I may fabricate a metal box to hold the pot. or as a cloche over the pot. either would work fine. I cook in warm weather on a home made BBQ. Half a metal barrel in a frame made from bed frames with expanded metal over the burn area. I put sand or dirt in the barrel and build a fire on that to keep from burning out the barrel. Sometimes I make a dakota fire hole just to keep in practice, mostly to bake bread.
I have flint and steel, Fire strikers, lighters, and a bow drill that can start fires or drill stones or pinion nuts to make Jewelry. I copied an ancient bow drill that was found here on my land.
My power is 100% solar run through batteries and an inverter. I also have a homemade solar generator set up to run 12v items or through an inverter. I have found a lot of things recharged or powered by USB Ports so I have several ports on the generator to run lights, recharge batteries, recharge flashlights, recharge phones and a laptop, even 12v lights I use when camping, I have USB charged blender and more. It is amazing what is now 12v or USB chargable. My reading area is straight 12v lights made for a van interior, I even have a long lighter that is recharged on the USB Port. I have a fan that runs on 12v direct from a small panel and my garden shed has 12v lights and USB Ports on a small panel. I have to cover the sensor when I want the lights inside as it was made for outside lights that run a few hours on the panels internally stored power. I light the rabbit shed with solar security lights that are motion activated. Panel on the outside wall, wire through a tiny drilled hole in the wall, lights will shine if I wave my hand when I enter. I have it set for the longest time setting so during feeding time I have to wave a hand a time or two more to finish up. I have 4 more of those ready to install other places. and I have a small solar powered battery charger for my AA rechargable batteries. A tiny investment and $0 expense for the last 3 years. Makes me happy and I can use those at home or on camping trips.
For canning I have a 3/8 ” thick 20″x20″ sheet of steel I set over the fire on the BBQ to protect my pressure canner and build and feed the fire to keep up the needed pressure. I bet the Dakota hole would work also. I’ll have to try that.
I burn brush when I’m cleaning up the place- in an old washing machine tub I use as my fire pit. I have a metal piece covering the opening, so the fire doesn’t blow around. The ashes go on parts of the garden or into the compost. I can have a fire pit but not a trash burning barrel…. go figure.
Any suggestions anyone on how to print the comments?
I’ve tried everything and I can print them, but there’s always unwanted pictures covering most of the words.
I’ve never tried to print the comments, but one way I can think of off the top of my head might be to copy and paste the text into a word (or other word processing app – or even an email text box). Then print THAT document. Prolly not the answer you were looking for, but just in case…
Try copying, and then paste onto a Word Document, then printing. As for the ‘Comments’, Do ‘Ctrl C’, then paste. I do find the comments useful and informative. They even cover items the author missed, or didn’t consider.
Tada1925,
Thank you for your suggestion. That has been how I’ve done it with Survivopedia comments and it works well. But, when I highlight the comments on Ask A Prepper articles, and then right click, it doesn’t allow the “Copy” option! It only allows Print or Save As.
I have been printing out the article and downloading them, but have had this problem trying to print or save the comments forever.
Many times, there are super valuable suggestions and experiences from the readers that I would love to include with the article.
Use MWSnap from mirekw.com and take a screenshot. It’s an old free program but works well. You can print the images