There was a time when you could purchase good jerky, but not anymore. Today it is illegal to sell jerky unless it has been raised to a temperature of 160 deg. for “health” reasons. The FDA has mandated that the meat used for jerky must be cooked to a state of “well done” before it is dried.
Unfortunately, this turns something that was once a basic highly nutritious food source for Native Americans, Trappers, Prospectors, and Explorers into not much more than flavored shoe leather.
I grew up in farm country and we made jerky every summer. We cut and seasoned our meat and then pinned the thin strips to the clothes line in the hot summer sun to let it dry. The whole process was a family affair with mom sternly warning us that “that stuff better be off the line come wash day or there’ll be heck to pay!” It took about 4 or 5 days before the jerky was ready, but to a 10 year old that was an eternity.
This project came about from my desire to turn back the clock and create the jerky that I grew up loving. No soy sauce, no sugar, no genuine artificial Smoke Flavoring, and no preservatives other than a bit of salt. I wanted to dry the meat at a low temperature (under 120 F.) like we did when I was a kid, but we are not allowed to have a clothes line where I live lest the neighbors complain.
I looked at all the commercial food dehydrators and they seemed to be rather limited – toys really. They used little trays that would hold 5 or 6 strips of meat, they were noisy little affairs with their fans and fancy thermostats, and boy were they expensive. I wanted something quiet, efficient, and inexpensive – no, I wanted it CHEAP.
I wanted to make enough jerky at one time to last a couple of weeks. Nothing I found even came close to what I wanted, so I set to work to build my own. The simple dehydrator from here is the result.
Related: How To Build A Solar Dehydrator
Some of the major features are:
- It can be built by anyone who can use a screwdriver, pliers, and a pair of scissors.
- The heat source is a standard 100 watt incandescent light bulb available at just about any store for a couple of dollars.
- Though it only takes up one square foot of floor space it will easily dry 8 or more pounds of meat at one time.
- As long as it is used in an area where the daytime temperature averages between 65 and 90 deg F. it will safely and efficiently dry the jerky without cooking it.
- The cost to build this wonderful device is between $10 and $15 – quite a bargain.
The parts list suggests a box from Staples, but any box of the same dimensions is fine. I’ve even used a very heavy-duty box from U-Haul.
Start by laying the box flat on a table. Do not fold any of the flaps until told to do so. Orient the box so that the flaps are at the top and bottom.
- On the bottom set of flaps, using a pencil or marker draw a line 2” up from the bottom edge.
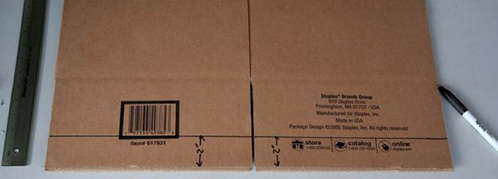
- Measure in 3” along the bottom from each corner of the box and draw a vertical line as shown in the photo below. This will partition the bottom edge into 3 parts on each flap.

- Cut out the 6” wide section in the center between the 3” corners. Since all sides of the box are the same size, you can leave the box folded flat and use the markings on one side to cut through both sets of flaps.

- Move to the top set of flaps. Draw a line 2” below the point where the flaps fold. Turn the box over and do the same on the other side.
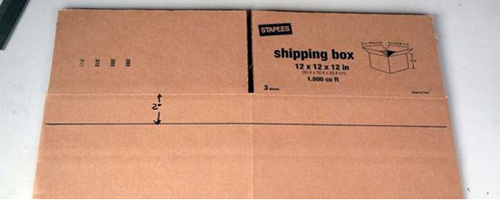
- Open the box and fold the top flaps to the center of the box like you are closing it to help hold the box square. Using a strip of 2” wide heavy-duty packaging tape about 8” long, tape all four corners of the bottom flaps. The bottom flaps will act as the legs of the jerky drier.
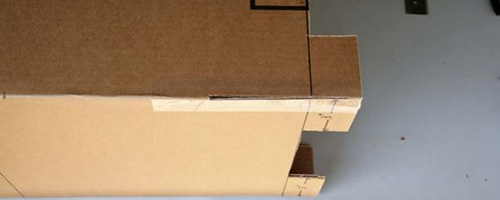
- After all 4 corners have been taped along the vertical corners of the box, cut a 9” or 10” length of 2” wide tape and wrap it around the 3” corners trying to maintain about the same amount of excess tape on each end.
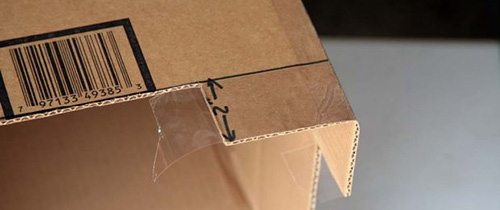
- Fold the loose ends of the tape over the edges and press to the back side of the 3” legs. This will reinforce the corners so that it will support a significant amount of weight. Repeat step 6 and 7 until all 4 corners have been reinforced.
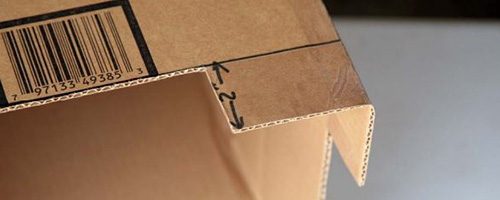
- At the top of the box, use a length of the ½” PVC pipe to mark a circle just below the 2” line that you drew in step 4, and as close to the edge of the box as possible.
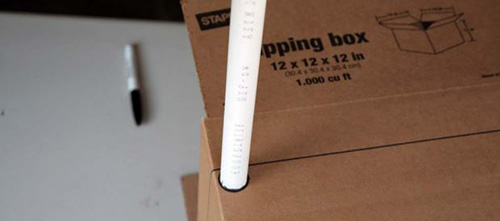
- Mark both edges of the side of the box then turn the box to the side opposite the one you just marked and mark the same circles on this side also. Then cut out the circles, staying inside each circle. You should end up with 4 holes in the box, two on the front and two on the back that are directly across from each other.
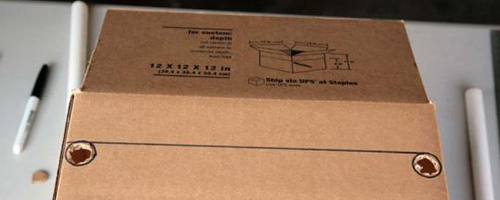
- Push the two 15” lengths of PVC pipe through the holes you just cut in the above step. Make sure that there is an equal amount of excess pipe sticking out of each side of the box. These will be used to support the skewers that hold the jerky as it dries.
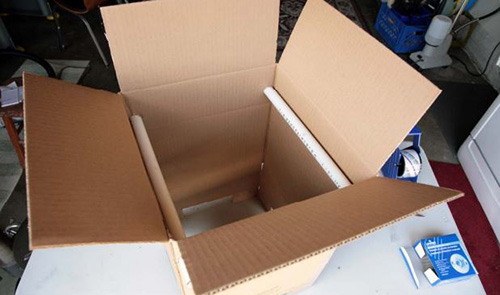
- Close all 4 flaps of the box. Draw a 4” diameter circle in the center on top of the box. Using a sharp knife, cut out the circle on the top flaps you just marked.
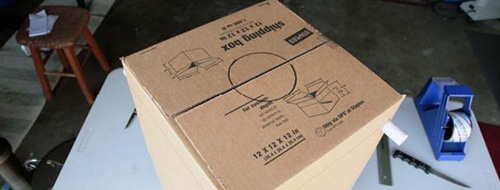
- Now close the top flaps again and use the circle you just cut to mark and cut the inner flaps.
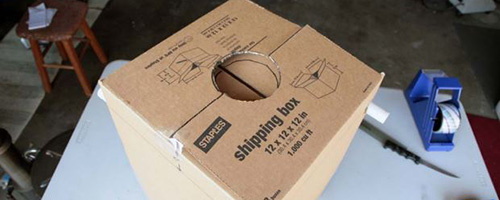
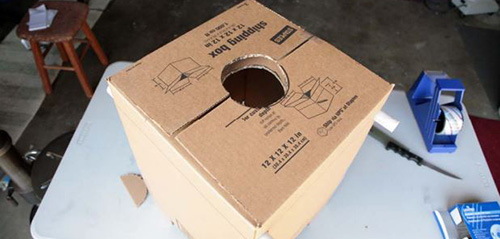
- This completes the construction of the box.
Any low temperature heat source will work, however, it is convenient to use a regular incandescent light bulb as a heat source. A 100-watt light bulb is the best choice for this size of drier if it is to be used indoors or when the daytime temperatures are averaging between 65 and 90 deg F. It is best if the light bulb used as the heat source is horizontal rather than vertical.
This will leave more clearance between the drying meat and the heat source so that the meat that is hanging directly over the bulb is not cooked. The easiest way to do this is to use a “Trouble Light” or “Work Light”. These are available for around $10 from Home Depot, Lowe’s, or just about any hardware or automotive supply store.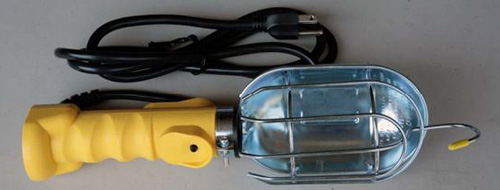
If you choose to use a Work Light like the one shown, try to find one with a metal cage and reflector rather than plastic. It will stand up better. Also, make sure that it is designed for incandescent light bulbs and not Florescent lamps. You want the heat generated by the hot filament in the incandescent bulb.
If you can’t find a Trouble or Work Light like the one shown above, or you are feeling adventurous you can make your own inexpensive heat source from off the shelf parts available from Home Depot or Lowe’s hardware centers.
Place your heat source on a cookie sheet, foil, or newspaper to catch any drips. I’m using a 12”x 18” commercial style ½ sheet baking pan which works well for the size box we are using.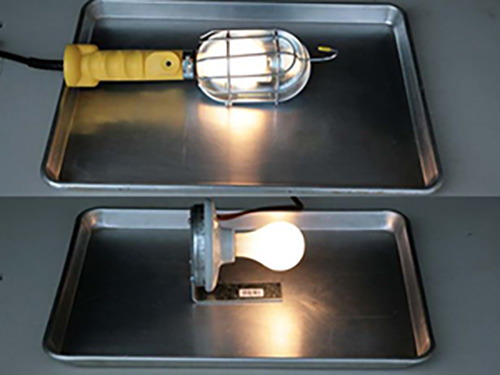
Place your box assembly over the heat source which should be centered in the bottom of the box. 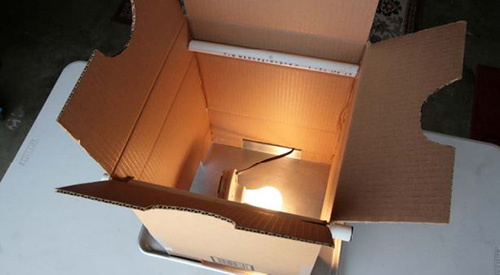
Now hang your skewers of meat between the PVC pipe supports.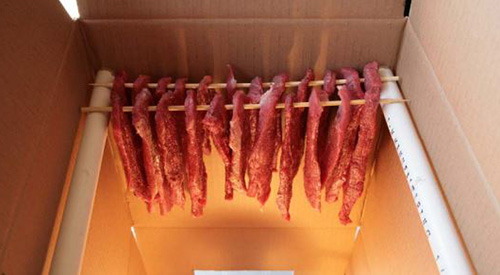
Continue hanging meat until the box is full or you run out of meat. Try to keep the meat slices from sticking together. It is OK if the edges touch here and there, but it’s best if the warm air is free to circulate freely around every piece. This is a very efficient way to make jerky. The amount of meat shown below is about 8 lbs. You could probably squeeze in another pound without much problem.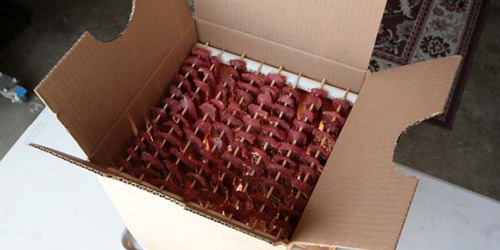
Close the box and put a small weight on the top to keep it closed. In the picture below I’m using a paper clip to hold the upper and lower flaps together to keep the box closed rather than a weight. The Jerky will take 48 to 72 hours to dry depending on how thick the meat was cut and how many pounds of meat you are drying. Thinner slices will dry faster. Drying fewer pounds of meat at a time will also speed up the process somewhat.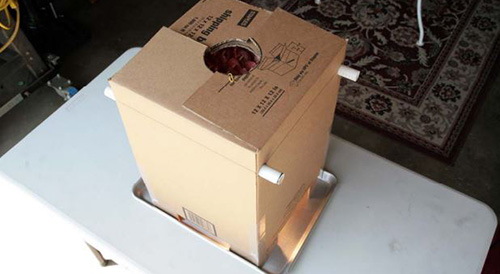
Finished jerky.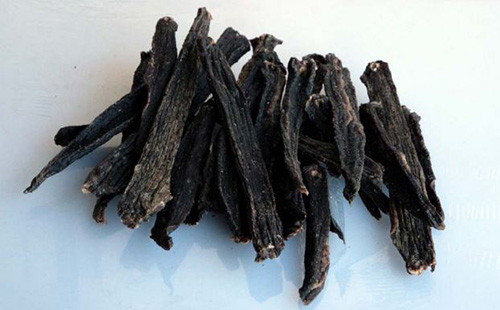
I’ve always preferred a simple dry seasoning mix and that is what is used here. It always tastes wonderful and I find that I never really tire of the flavor. This is also the best approach if the jerky is to be used to make pemmican. Since pemmican is usually used as the primary source of nutrition while backpacking, you want a simple flavor that you will look forward to eating every day.
I’ve tried the soy sauce and brown sugar recipes, but find that they are often a bit overpowering – OK for snack now and then, but not something you can eat day-in and day-out with relish. Jerky recipes abound on the internet.
I encourage you to experiment and find what you like best.
This article was written by Lex Rooker and first appeared on justmeat.co .
You may also like:
10 Plants You Should Never Plant Together (Video)
50 Foods to Dehydrate for Your Stockpile




I would really like you simple recipe for jerky. I have never been a jerky lover because it is always too spicy.
Fweety: For me, it’s all that salt. Jerky is what you make it. Plain dried is all right. what do you like on roast beef? Use that. niio
What is the seasoning mix recipe please?
Thanks for sharing. Think I’ll try it out this weekend.
What is your seasoning mix and how do you apply it?
Mrn: None or whatever we like. What do you like on jerky? Marinade overnight in the fridge, then hang it. niio
Natives here dry deer meat hanging in the summer sun with no salt or seasoning. It is wonderful to snack on or make a stew with. I also like to dip the slices in salt water and then rub on dry green chili powder and dried powdered cilantro. A good snack abd a go I d stew base also.
Won’t the meat droppings drip onto the light bulb? Even if I use lean cuts there will be some.
Newbie here, hoping I missed the obvious
A million years ago , my Dad and I made a chicken egg incubator out of a cardboard box and light bulb of a very similar design for a science project. It worked well. Out of 10 fertilized eggs 7 hatched. Perfect for my project. Showing embryo development every few days by preserving developed embryos. (yes, in preserve dishes)
This works, Girl Scouts have been doing this for years making brownies and cakes at camps! You don’t need a light bulb. Just look up “Girl Scout Box Oven”, It uses the sun to cook and we do it every year at camps!
The PVC Pipe under the Heat, may Emit some slight Plastic Fumes ! I would Suggest a 3/4″ Wood Dowel in place of the PVC ! Just a Thought !
the problem is now finding that elusive 100 watt lightbulb. I have a smoker/dehydrator from my children a few years ago and i do like it… i like this idea too…. fun project for the grandkids
In Europe I have heard that they are called 100W Heaters.
I replaced my 100 watt incads with LEDs and put the incads aside.
Agreed, good project.
Should be modifiable for fruit and veg drying as well.
i’d think that LED’s are energy efficient, hence lots light but not enuff heat for this purpose ? thx
Precisely correct. LEDs bulbs would not work at all for this. They create very little heat compared to the inefficient filament light bulbs.
While the incandescent llight bulb is rapidly being replaced with LED’s, you can still buy “heat lamps”
Yeah, that’s a good dryer. But, my concern is parasites. When American Indians dried meat, it was in heavy smoke over a steady fire. It was cooked. I spent a lot of years raising and butchering, then processing. I know of blood drinkers who died of trichinosis, and all animals can carry that. Tapeworm eggs will float in blood, and fleas can carry them. Just drying does not sterilize anything.
red, what if you made an insect cover out of window screen mesh in a box shape that is a little larger than the dryer, and just slid it over the top? would that help keep out parasites?
if you did not smoke the meat, are there other natural ways to kill parasites? maybe soak in a salt and sage brine before drying?
How long, wide and thick should you strips of meat be for this size box?
GG: As long as you want, wide as you want, and no more than a half-inch is you live in a dry area. Quarter inch in other areas. niio
I would add fly screen strips, taped to cover the vents for air flow at the top and bottom of the box.
Dave: aluminum of you can’t get steel or copper. copper is the best. It’s toxic to insects and rodents. niio
I make a lot of jerky but it’s like candy to my grand kids they go wild and eat it in a day or two but its fun and better then candy
A useful bit of frontier wisdom was never eat jerky in the dark because it commonly it often came with extra protein, the wiggly kind.
I agree, you can’t buy good jerky in the store. We have always used one of the little dehydrators they sell at the hunting store, you can dry a lot of jerky with one of those toys, using your own recipe. Truth be told, I hate jerky, my Sweety makes it for friends and is well loved for her jerky, but I hate to see any cut of meat going to waste in a dehydrator.
Mike: We always hung it in smoke to cook and dry. Nothing is perfect. Even hams hung out of smoke bet beetles in them. Chilis and black pepper were used to deter insect and rodents. Jerky is the main ingredient in pemmican. Chopped dried fruit includes a lot of chilis 🙂 I got a bushel of red, ripe Hatch in September that dried nicely in a shed. niio
My Grandfather raised Chilis in the desert, every day he came home at 12 for the main meal, he’d pick a few chilis and roast them in the oven, there is no aroma more unforgettable. Wish i could dry them in East Texas, I have a couple bushels of jalapenos and serranos still on the plants, they also turn brilliant red in the fall, been making hot sauce, canning them, pickling them, fire roasting them, but I’d have to dry them in a dehydrator and then vacuum pack them, it just isn’t the same. Red ripe Hatch is the best flavor i can think of. Carne Adovada and blue corn tortillas!
Mike: Carne Adovada! Man, good food!
‘Kay, you like chipolte morita? They originated in Tabasco, MX, a definite wet lands. The jalapeños are smoke dried; longer in the smoke and you have meco. I have to add water to the wood (soak some of it) to get the same taste as a morita. To me, the best way to store them is in the freezer. We used to buy bushels of jalapenos from a cousin in Penna, smoke dry them, and sold them to bros from Mexico. Favorite way to use them, make adobo sauce and can them. The Chimayo are covered in buds, even the one that died back while I was gone (just add water, it sprouted anew like it does in the spring 🙂 Then walls, but probably the best chili I ever roasted. Hatch is a buck a pound, raw, at Hatch, and 25 a pound dried. Chimayos are like 5 a pound and 45 a pound dry.
Serranos, ai, no, chili pequino! 🙂 niio
Our environment here is too humid for outside air only drying. Wish I lived in the high desert far away from a coast where low humidity is the rule rather than the exception.
Lemon juice and lite salt (low potasium), just a tad is flavor enough.
jrg: No, you don’t. The grass is always greener till you live there. I don’t know your situation, but me, I wanted to get home to Arizona for decades. I said I’d rather die in Arizona than live anywhere else. I’m back, love it, but I’m an old desert rat. this is home! I have family that ranches in the high desert. the main crop is rocks. But be glad the rocks are there. they keep the chronic devil winds (20-40 mph, single digit humidity, 100+F degrees) from burning out the soil too fast. I live in the middle range. Almost no rain for over a year. Bighorn fires stopped barely 6 miles south of us and had eaten up 140,000 acres of brush. Fires up in north Kali-fornia are still sending smoke here, not far north of Tucson.
Gardening, do like Tohono and dig down, under the caliche. Nothing will root in it, it’s lime. That means cactus down in the brush are dying. Mesquite and other legumes are growing mistletoe, which kills them. Back fill garden trenches with brush and soil. mound it up well, because it’ll sink in as brush decays. buy sulfur and duct the ground now and then because every drop of water, even rain, has mineral.
Be prepared to make friends with rattlers. That’s all that keeps prairie rats, pack rats, and ground squirrels from eating the garden roots. Use shade cloth and wire to keep birds from destroying the tops and to keep plants from burning up in the sun and wind. Make good fences to keep out rabbits, javelina pigs, and so on from rooting out what’s left.
this is home. I know what’s here because I lived it. I lived in the swamps of Pennsylvania, too, and was sick all the time. Here, I do very well because it’s home.
If you can, try it in the desert for a year or two. Make certain you have either a certified well or town water. If you can adapt, then you’ll see all the years in the swamps as wasted time. Benefits here are fantastic if you know the land and the people. If you know what to forage for that’s good, what needs to be cooked first, and what will kill you if you don’t cook it. niio
We have ours in the box right now. How long of a shelflife does it have after it’s done? How would you store it?
Linda: Dried meat and jerky are supposed to have an indefinite shelf life. If it contains much blood, donno. There are beetles that specialize in dried meat, but smoking helps against them as does storing packed and in nitrogen or CO2 (dry ice).
American Indians never kept it longer than 6 months unless it was in smoke. Most was taken in a winter hunt, dried, and made into pemmican, which was hung in smoke, as well.
We keep ours in the freezer but should build a smokehouse (which will go in just off the kitchen to prevent sticky fingers). When the weather chills enough to stop flies, cooked hams will be sliced and dried. Some cure is all right, but that would need to be soaked first, anyway, before using. Freeze all you can and it’ll keep well. Shelf life is about like well stored meat. Best to you! niio
My next exercise in food preservation will be to learn how to air dry and cure a full ham. I seem to recall neighboring farmers wrapping it in burlap and/or cheesecloth…?
Any sites or ideas to suggest I can learn from will be very appreciated and helpful.
Thank you everyone!!!
Mark
Unfortunately unless you have incandescent bulbs already you are out of luck. Due to the Biden’s federal lamp laws you can only get fluorescent and LED lamps(light Bulbs) now.