A few essential knots are staples in the prepping, bushcraft, and survival communities. The simple bowline is one of them.
The bowline knot forms a loop at the end of a rope and keeps about two-thirds of the rope’s strength. Most other knots reduce a rope’s strength by half.
The drawbacks to the bowline are that it can loosen when not under load and form a slipknot under certain circumstances.
Despite these drawbacks, the bowline is a reliable knot that belongs in your knot-tying toolkit.
History of The Bowline Knot
In nautical terms, the bowline is the line that secures the square sail to the ship’s bow. John Smith’s work “A Sea Grammar,” published in 1691, mentions a knot by the name of the Boiling Knot, which is thought to be what we consider today to be a bowline knot.
Archaeologists even found evidence of the bowline on Pharaoh Khufu’s solar ship, excavated in 1954, suggesting the knot is thousands of years old.
Bowline Knot Uses
A bowline know is useful whenever you need a fixed loop at the end of a line. Here are a couple of ways I personally use it:
- I like to use a bowline for the loop at the starting end of a ridgeline. I can run a line around a tree and through the bowline, creating what is referred to as a ‘running bowline”.
- I’ll often use a bowline to secure a line to a ring or other lifting hardware.
- Bowline knots are securing the throwlines on both the bow and stern of my canoe.
- In most instances where I will lift an object with a rope, I tie the line to that object with a bowline.
- To secure loads, I will use a bowline on one end and a trucker’s hitch on the other.
Related: The Only 4 Knots That You’re Going To Actually Use In A Survival Situation
Knot Terminology
There is a couple of knot-tying terms that I will be using throughout this article which are defined below.
Standing End – This is the end of the line that is not involved in the tying of the knot. This portion of the line will largely remain stationary.
Working End – This is the end of the line that you are actively using in the tying of the knot.
Tag end – The tag end is the portion of the knot that’s the remainder of the working end. Tag ends can be trimmed or tied off using a half hitch or two.
Tying a Bowline Knot
The procedure for tying a bowline knot is very straightforward, and after practicing a few times, it will become almost second nature.
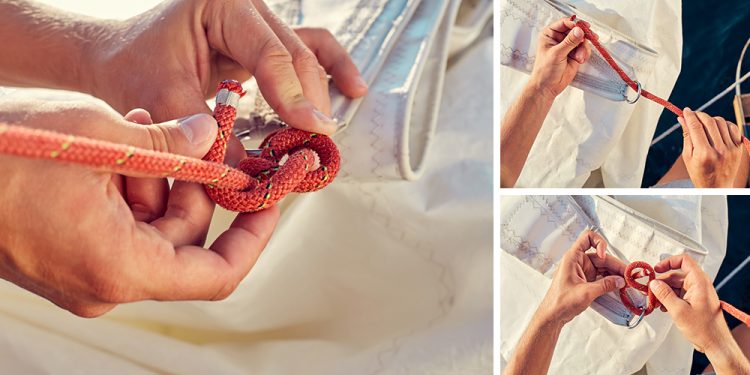
1. Start with an overhand loop in your line. Consider how large your loop is going to be and leave enough rope to form the loop.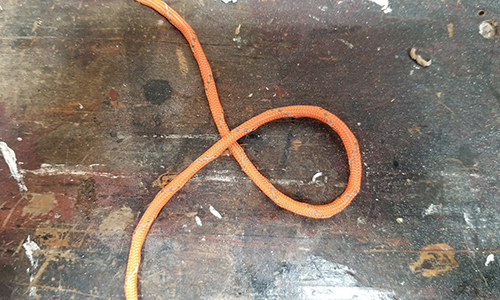 2. Pass the working end up through the loop like shown above.
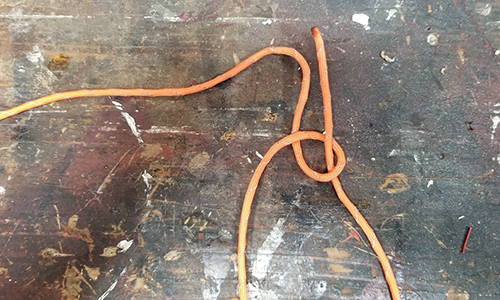
3. Bring the working end around the backside of the standing end.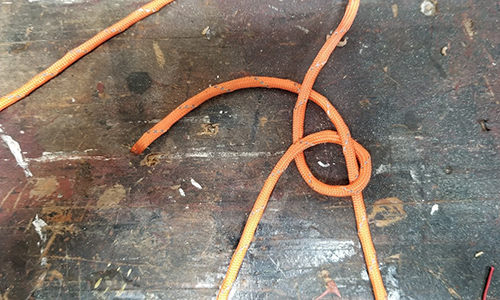
4. Pass the working end of the line down through the loop, as shown above.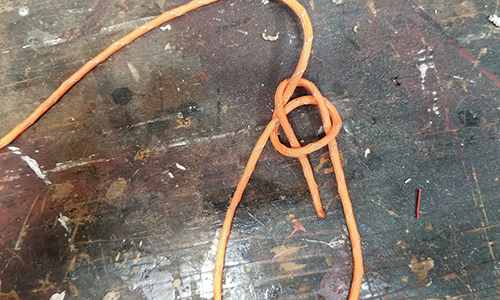
5. Tighten and dress up the knot.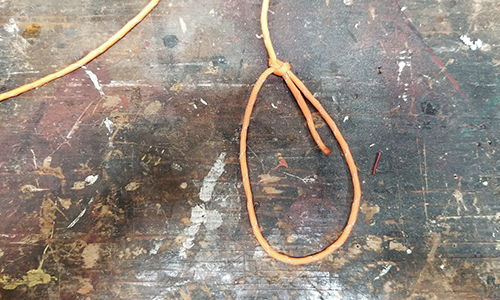
Bowline Knot Variations
There are a couple of variations that are worth mentioning.
The first is to simply tie a half-hitch or two with the tag end around the line below the knot. This is a redundancy that I like to use only if I find myself with more of a tag end than I’d like.
The next two variations are like the traditional bowline but need a few extra steps.
Related: 4 More Knots A Prepper Needs To Know For Survival
The Double Bowline Knot
The double bowline is a more secure knot than the traditional bowline and is often used by sport climbers. One of the advantages is that it is easier to untie after sustaining a weighted fall.
The disadvantage to using a double bowline to tie in while climbing is that it is a less secure knot than the traditional figure-eight knot.
To tie a double bowline, follow these steps:
1. Start with an overhand loop like the traditional bowline knot.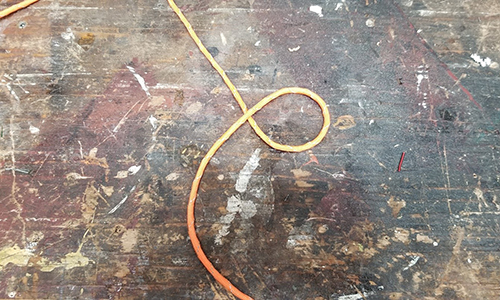
2. Then make a second loop over the top of the first one like shown.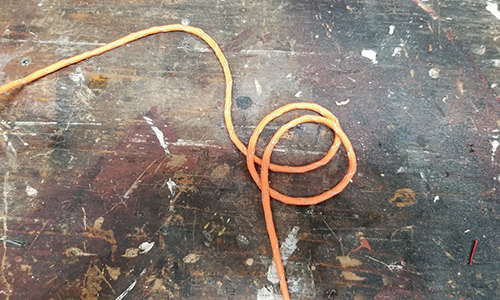
3. Pass the working end up through both of these loops.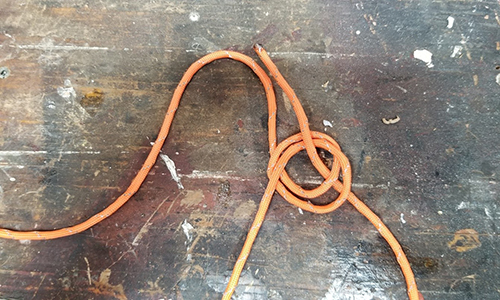
4. Bring the working end around the standing end.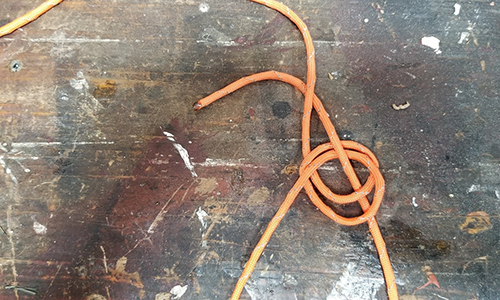
5. Pass the working end down through both of the loops.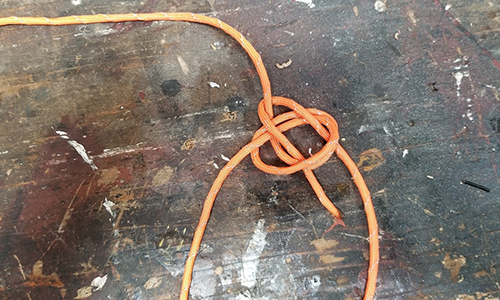
6. Tighten and dress up the knot.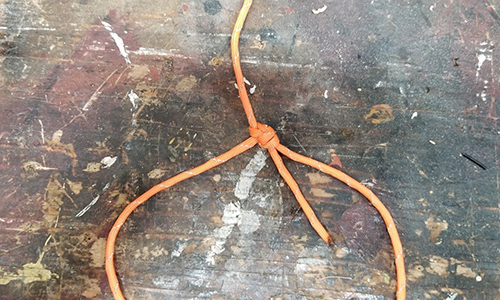
Yosemite Bowline
The Yosemite bowline is more of a method of finishing the knot than a separate knot. This is another knot that has found a place in the climbing community and is often referred to as the Yosemite finish.
This variation prevents the bowline from collapsing into a slipknot.
Tying the Yosemite Bowline is much the same as a traditional bowline, with the only difference being the finishing of the knot.
1. At the end of tying the bowline or double bowline, and before tightening and dressing the knot, pass the working end behind the portion of the loop directly below the knot.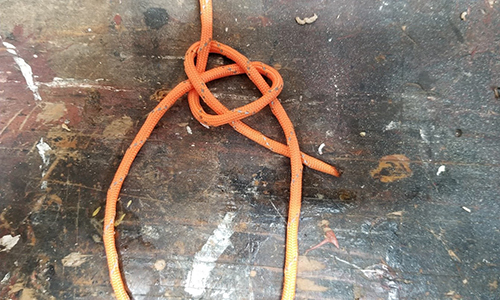
2. Wrap the working end around the front of the line below the knot.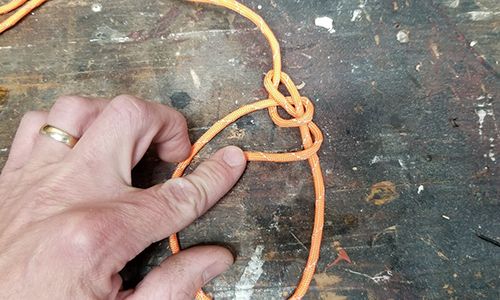
3. Pass the working end behind the knot as shown.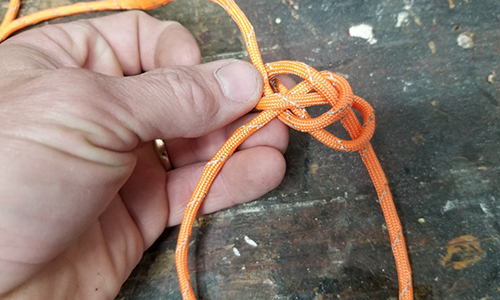
4. Bring the working end up through the uppermost loop, as shown above.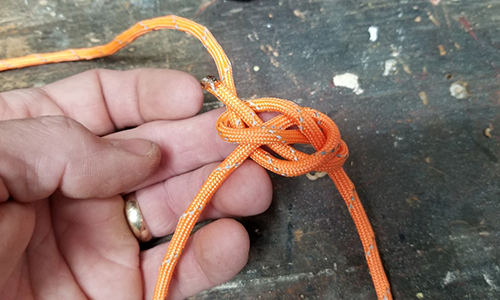
5. Tighten and dress up the knot.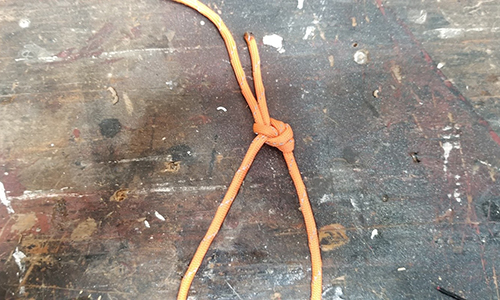
Considerations
Anytime that you are using cordage, inspect it to ensure that it is still in good condition. Check for excessive wear, fraying, or any other damage and dispose of any damaged cordage that you find.
Always check your knots to ensure they are tied correctly.
If there is any doubt about whether a knot is tied correctly or not, re-tie the knot and, if possible, get another person to check your work.
The bowline knot is one of those knots that once you have learned to tie it, you will be finding all sorts of scenarios in which to use it.
I have put this knot into use in the woods, at home, and at work on a regular enough basis that I can tie the bowline almost instinctively.
One of the biggest advantages of the bowline knot is that it’s easy to untie, even after bearing a heavy load. Unlike other knots that can tighten so much they become impossible to remove, the bowline maintains its shape, allowing you to easily release it when needed.
You may also like:
 Six Steps To Urban Self-Reliance and Freedom
70+ Ingenious Projects to Help You Survive the Upcoming Crisis (Video)
How To Build An Indoor Greenhouse
This Common Household Item Is One Of The Most Useful Survival Assets



…rabbit comes out of the hole, around the tree, and back into the hole…
Scouts
I made a whole display board for my knot tying patch. I started learning at 9 and earned the patch soon after I turned 10. My inspiration was a beautiful anchor Dad had tied for Mom and put a pin back on it. WWII Navy when they met. There was both usefulness and beauty in knots.
A bowling has some use of course but it is only one tool. Learn your knots. What eles you going to do when you’re sitting in front of the TV.
I’ve never left a comment here but have been a “sandbagger” on this site for a couple of years now and thoroughly enjoy the comments section more than the articles sometimes. This morning I saw the comment from Mike Ramsey and had to leave a comment today. My husband is a knot expert and knows many types of knots because his father was a sailor. I simply asked him if he knew how to do a Bowline Knot after reading the article and the first thing he said was ” through the hole, around the tree, and back into the hole again.” This is important knowledge worth passing on to the youth today, as you can see they will retain this and recite it when the need comes for a knot! Not to mention, this is also one of the strongest knots in the world. Great article! ?
Good article, useful for adults but with enough successive diagrams to allow children to learn from it. My six-year-old grandson needs to see this ? The more the youngest ones learn now, the less we have to teach them later in some much higher-stress situation. And even if the S never HtF, knowledge like this is still good for anyone of any age to have in their wheelhouse.
Learn to tie this knot around your waist/hips; make a rescue loop around yourself. Try to tie using one hand while hanging on the standing part of the rope (rescue rope) with the other hand — no cheating.
I use this knot all the time for all sorts of things. What I like best about it besides ease of tying is the fact that is also easier to untie after a load has been put on it. I have used my nylon rope using a bowline knot to pull cars out of snowdrifts, and have no trouble untying the knot after such a load. Great knot–everyone should learn and use it.
How quickly we forget! The bowline knot was also widely used to attach a bowstring to a bow (there’s that word again) , especially during the age of the famed English longbows. I’ve used this knot to quickly re-attach my bowstring to the bow when the loop in my Flemish bowstring has come undone. This knot also allows you to lengthen or shorten the bowstring’s length somewhat, making it possible to “tune” the longbow. It’s been a lifesaver on more than one hunt!
Question: where you able to successfully do this?
Answer: A Frayed Knot. ? ???
Sorry one of those days.
The good old square knot (right over left then left over right ) works so well, i rarely use anything else… doesn’t seem to slip at all,… not so hard to get loose after a heavy weight fall. looks kinda like a figure 8 when done correctly.
The saying I remember for the bowline knot is “the rabbit comes out of his hole, around the tree, sees a bear goes back in his hole “. I’ve never forgotten that one.
Great article. Two additions
1/ instead of the last action ‘the rabbit back in the hole again’ put through a loop so that the tail can be pulled to undo the knot
2/Back in the day of hessian ropes when they got wet they would expand and make the knot super tight and very difficult to undo. The old timers would put a tapered stick in the last part that could be removed first and thus loosen the knot.
This is not a criticism, just a minor detail since strength was mentioned. The knot shown is an inside bowline. An outside bowline has a slightly higher strength factor. It’s simply a matter of which direction the working end is threaded into and back out of the knot.
Comes in handy to tie the tether of a hot air balloon to the ground anchor.
Sheet Bends, taut lines, and sheep shanks come in handy at times too.
Wow this is really awesome to hear. This shows how popular your services are. And i am really glad to know about them while looking for reviews blogs . Even i am so enthusiastic to get your products for my personal care.