Food security is a top priority when preparing to survive any scenario, whether it be an end-of-time event or a natural disaster. It has been proven repeatedly that during a crisis, it is impossible to get everything you need for survival from a grocery store. In fact, your local supermarket can quickly become one of the most dangerous places to tread during such an event.
One way to provide a secure food source is to grow your own. There are many well-documented sources for growing and preserving food on both large and small plots of land. For most people, the most significant constraints on the amount of food you can grow are the length of growing season and space.
When laying out a garden plot, it quickly becomes evident that there is not enough time and space to grow everything you want or need for the entire year. Many crops only grow in cool seasons, while others must have a relatively high soil temperature to germinate.
It is difficult and expensive to acquire more tillable space. Even large plots of land have areas that are not conducive to growing food. Those areas are often dedicated to livestock or other activities.
But there is a straightforward project that costs under $100 and a few hours of your time that allows you to extend your growing season by planting earlier and harvesting later into the season, the hoop house.
Hoop House 101
Hoop houses have been around for centuries in many different variations. Modern hoop houses come in all shapes and sizes. Some are permanent structures that are large enough to drive tractors in and tall enough to house dwarf variety fruit trees. However, they are often small backyard structures that a single person can construct in just a few hours.
Most common backyard hoop houses are constructed by building a PVC pipe frame covered with either transparent or opaque plastic sheeting. If more thermal protection is required, the plastic sheeting can be applied to both the inside and outside of the frame.
Related: 36 PVC DIY Projects for Your Homestead
Hoop houses are often incorporated with small, raised beds such as the one pictured below. However, they can also perform many functions in your garden or berry patch.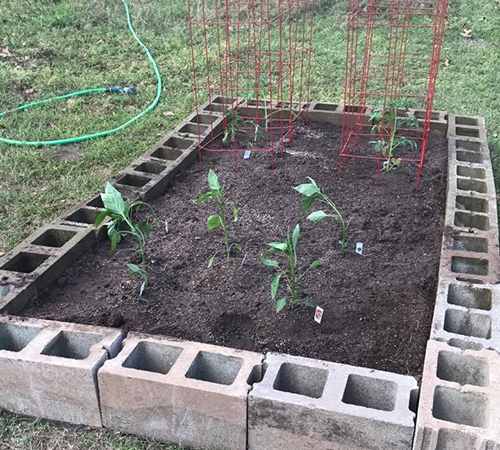
One of the main functions of the hoop house is to extend the outdoor growing season. Plants can be started or moved outside before the last threat of frost in the spring as the enclosed hoop house moderates the temperature inside. Temperature moderation is helpful to extend the season into the fall.
A small, portable hoop house can also be used to cover plants in other areas of your garden when an unexpected frost or freeze is predicted.
Related: 10 Ways To Keep Frost Away From Your Plants
Materials for Building a Back Yard Hoop House
The first step in building your backyard 4’x8’ hoop house is gathering the required tools and materials. The backyard hoop house project requires the following:
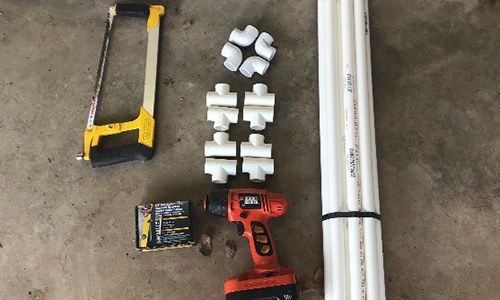 9 each – ¾” x 10’ PVC pipe (3/4” pipe is a good size providing strength and flexibility.)
- 8 each – ¾” PVC T-connector
- 4 each – ¾” PVC 90-degree elbow
- 12’ x 20’ 6 mil plastic sheeting (substitute mesh netting to prevent bird damage if desired)
- 25 each – #9 x 2” zinc plated screws with washers
- PVC cement (or other glue)
- Spray Paint (your choice of color)
- Saw or PVC cutter (a table or miter saw is preferred but a hack saw will work)
- Power drill with 1/8” pilot drill bit
- Screw gun or screwdriver
- 4 each – 12’ strap or rope
- Scissors or knife to trim plastic sheet
- 4 each – clamps to hold plastic sheeting (or an extra set of hands)
Assembling Your Back Yard Hoop House
To assemble your backyard hoop house, you need a flat surface measuring about 15 feet square. This flat surface can be a garage floor or a flat piece of ground.
Start by attaching T-connectors to both ends of four of your 10’ long PVC pipes. These pieces form the arched hoops in a later step.
These connections should be glued. Also, a screw can be inserted through the T into the pipe to allow disassembly at the end of the season if desired. To create the 8’ sides of the hoop house, cut 6 pieces of PVC pipe (3 for each side) at 31” in length.
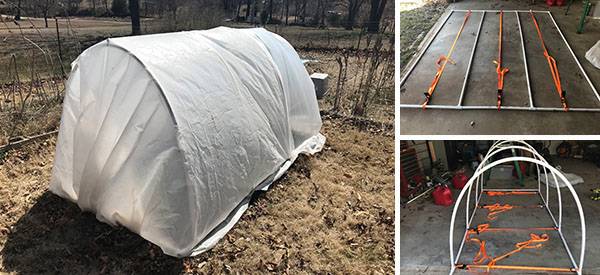
 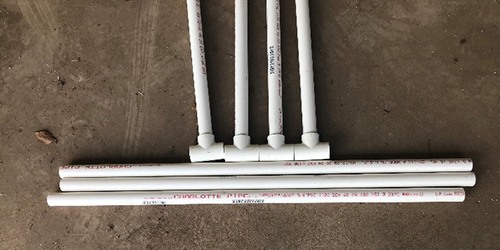 Insert one piece between each T-connector on both sides, creating an 8’ x 10’ square. These connections should be glued. The straps are shown in the picture aid in forming the arch in a later step.
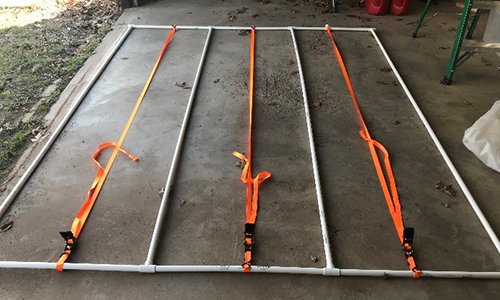
Before bending the long pipes to create the hoops, assemble the end pieces using two elbows, two 6” lengths of pipe, and a 54” pipe section. Assemble with glue in the configuration pictured below.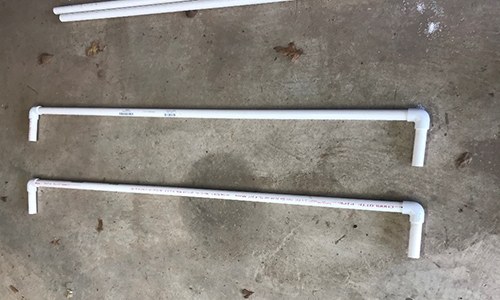
Begin bending the hoops. Take your time here and pull the sides in evenly a little at a time. Forming the hoops can be done with one person, but a little help at this point makes the job much easier.
As a caution: Bending the hoops creates stored kinetic energy that could be released if something were to slip, break or become disassembled, so be careful and keep children at a safe distance.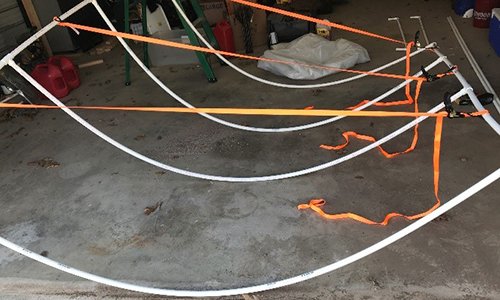
Once the sides are about 56” apart, insert the end piece assemblies into each end of the frame. Then, adjust the straps to ensure the frame is straight. These connections can be glued or screwed for disassembly if desired.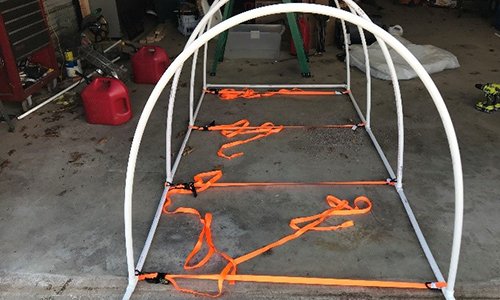
Cut a pipe 8’ long to secure across the top of the hoops using a 2” zinc plated screw at the top of each hoop. Inserting a 57” pipe brace at the T-connector of the two inner hoops and securing them with screws completes the frame.
At this point, the entire PVC frame should be painted to protect it from UV degradation from the sun. If left unpainted, it becomes brittle and will likely shatter by the end of the season.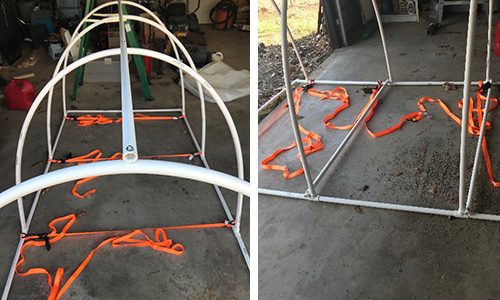
Putting the plastic on the backyard hoop house is a tedious process. Begin by draping the plastic sheeting over the frame and getting it centered. Once it fits the frame, secure it with clamps and turn the frame over to allow access to screw the plastic to the frame at the T-connecter.
Ensure the screws go into the hollow pipe so they are not exposed around the frame where someone could get injured by them.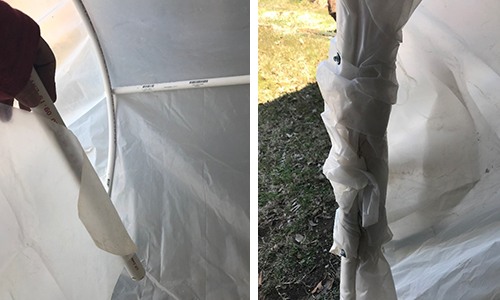
The plastic at the ends of the backyard hoop house is incredibly tedious. One easy remedy is to take a short piece of left-over PVC pipe and roll it up in the loose plastic. After taking up the slack, insert a couple of screws at each end through the frame to hold it secure.
Once the plastic is secure, trim off any excess to prevent it from laying on the ground in the planting area. The hoop house can be staked down or secured with a couple of large rocks or bricks.
Remember that the plastic keeps any rainwater from reaching your planting bed, so be sure to water accordingly.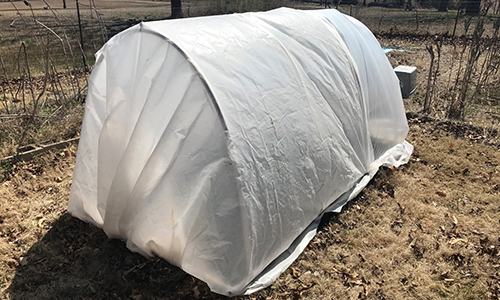
Using Your Backyard Hoop House
One person can move a backyard hoop house by lifting the side rails while standing inside of it. It would be much easier to move with two people. Protecting tender plants, fruits, and vegetables from frost is the most common use of the hoop house.
Typically, the hoop house is placed over a planting bed in the hours preceding a predicted frost or freeze and removed as soon as temperatures warm above freezing. With proper care, this simple project should protect your garden for years to come.
You may also like:
 How To Build A “Dirt” Cheap Sod House (Soddy)
Just Like Doxycycline: The Antibiotic That Grows In Your Backyard (Video)
What Really Happens When You Take Antibiotics After Their Expiration Date
His Neighbor Thought He Was Building a Swimming Pool, But His Idea Was Even Better






Of note, I found a six piece garden hoop (hoops pre-formed) on Amazon for $20. I also found a kit that would cover a 30 foot raised garden (and sheeting) for $33.
If you’re a bit pressed for time, you might consider that route.
Do you more information on the Amazon source(s) you cited? Thanks!
can you post the link?
I also found the $20 kit on Amazon plus a myriad of other garden hoop house kits for an equal variety of prices. Sometimes it just makes more sense to buy the product as opposed to expending long hours re-inventing the wheel and wind up spending close to the same amount of actual dollars of the DIY version that you struggled with for a whole weekend.
The magic words you want to search for on Amazon are: garden hoop house kit.
I imagine a google search or whatever search engine you use will reveal additional sources of garden hoop house kits.
Doing it DIY means you then have the skills/tools to alter the plan to fit your specific needs. My bed sizes fit my space, so I need the hoops longer than most of the standard kits.
Thanks, LCC! Those were the search words I used.
Nice article.
I use the PVC and some rebar to hook my pvc to. Pounded into the ground, then add pvc to the rebar,cover with plastic sheeting and use hoop house clips from Johnny’s to secure. ( bought them many years ago but you can find them on the big A or any greenhouse supply)
Not a permanent structure like the one in the article, but has worked for me for 15+ years.
Peace,
MadFab
Why not a green house?
Green Thumb,
Have one of those also, but sometimes my beds need a little extra protection be it from too cold to too hot.
Even in the PNW. The GSM is starting folks. Let’s be ready with MANY options to grow.
Peace
MadFab
I made a darkroom for my print company using pvc and black plastic garbage bags. I didn’t need a domed roof to shed rain/snow so it was flat. I used all tees for the connections, floor support plus roof. It worked for many years.
Here in SoCal where we are again is a series of drought years, a domed roof is not necessary. About a thousand years ago there was a 500 year drought in the southwest part of the U.S. We may be entering into such a weather pattern again, although I suppose the weather freaks will claim it is some man-made weather phenomenon, not realizing it is just history repeating itself in a continuing pattern of multiple century major weather changes.
The construction of this hoop house is very similar to the framework of a traditional Native American wickiup, common amongst tribes in the Northeast.
They used supple young saplings to make the framework and lashed them together with either wet rawhide or twine made from regional fibers. The post bases were dug into the dirt and filled with rocks, pebbles, etc. for stability.
Such a structure would last at least a year, and would be a good alternative to the pvc pipes if you can’t get them for some reason. Also a good use for trees you may be clearing out of your lot.
I have 2 small green houses with shelves for seed flats inside. I use them for hardening off flats of plants. Also I have a raised bed with a hoop over it that is great for early spring greens that are more cold hardy and replanted with tomatoes when its time for them to go out.. I can cover them as frost protection in the fall. It extends the growing season by weeks. 1/2″ pvc bends easily by slipping the ends over rebar or conduit driven in the ground. It isn’t a strong structure that I can leave up once snow comes but it stores easily till the next year.. I leave the posts in place to reuse each year. I have more pvc to make hoops to cover a hydroponics set up made with thin wall, 4″ pvc and elbows. A simple fill, drain and refill set up with a pond pump, solar panel, 2, 6v deep cycle batteries with a cheap charge controller and car type inverter. I’m serious about mm y gardening here in high mountain desert. Were still a month from average last frost. Fall frost will be here in September and most years nights are cool because of the altitude at well over 6,000 ft.
I look for faster crops and things like midget water melons or 45 day sub artic tomatoes. We eat a lot of green leafy vegetables and green beans that are quick. I plant root vegetables as quick as possible. Some years I cover then at night with old blankets. I’ve covers tomatoes with old blankets or quilts and harvested tomatoes from under the covers under snow. The last two summers we jumped from winter to record breaking heat. I used old bed sheets,found cheap, to create shade over tender parts of the garden.
My really new project this year is across fruit. Its getting scarce in the stores and at almost $2 a can its not in our retirement budget. I’ve ordered 10 blackberries, a dwarf mulberry tree, huckle berry seeds, raspberry roots, and 50 strawberry plants. Also 3 hazel nuts and 3 elderberries plants. I also have elderberry seed and seed for service berries that can be bushes to small trees. Those are long term investments.
A larger hoophouse may be done before winter but in still hoping to dig for a walking, pit greenhouse. That would actually give me a place to grow food through the winter. For now I from things on s g e lives infront of North and east windows.
Clergyman,
Huckleberry should do well at your high elevation. Always picked in the mountains when I lived in MT.
Now I am in PNW and still chuckle when I hear people planting blackberries. They are a nuisance plant here. To the point people find cars and houses when they clear their properties of them . Lol
I use old sheets and table cloths from thrift stores for my hoop houses also for shade.
I even take cheap sheets and table cloths and use them for deck covers for our home and camping.
Shade cloth is super expensive, but I find things at thrift store work great and I can get a ” new” set every year if I need for less than 5.00$.
I always enjoy your posts.
Wanted to ask for a long time, about your indoor.rocket stove with the.pellet hopper.
Is that a DIY or did you order that?
Thanks for the info. Hope you and your Hubby are doing well.
Peace,
MadFab
ClergyLady,,
That was supposed to be ClergyLady.
Grrr auto correct.
Sorry
Peace,
MadFab
the large paperwork binder clips from the office supply stores help with the plastic sheeting part of the job – of course spring clamps would also work if you want to sacrifice that kind of $$$$$ ….
Please note that if you use PVC it will degrade the plastic quickly. It voids the warranty on commercial greenhouse plastics. The only way to protect the plastic is to paint it thickly with latex paint. The same thing applies to pressure treated wood. Johnny’s seeds cells a real slick metal conduit bender that works great to make the bows.