Being able to repair your own home is important. But I’ll have to say; the ability to make them in the midst of a disaster is even more so. It’s not unusual for homes to be damaged in the midst of a disaster, and if we don’t know what we’re doing, making repairs to that damage can be quite costly.
But as we know, not all damage is due to disasters. The day to day use of our homes can wear things out and force us to make repairs. For most, that’s costly, as they have to call in specialists to do the work. However, there is very little that you can’t repair on your own home, if you know how. Learning how to make these repairs can not only save you a bundle of money, but can also make your home safer, as you won’t be waiting to make all those repairs, leaving your home in a less than safe condition.
One such area is electrical repairs. Few of us do those ourselves, preferring to leave that sort of work to an electrician. But since electricians are costly, we try to avoid hiring them. So what ends up happening, is that we let the need for those repairs wait until we have some more important need to call an electrician. For some, that day never comes.
But poor electrical connections are a very real danger, one that causes 13% of home fires and 18% of civilian deaths by fire. This is nearly 50,000 home fires per year, many of which can be attributed to faulty connections caused by worn out electrical outlets.
The truly sad part of this is that it’s not all that hard to change out an electrical outlet, protecting your family from such a happenstance. When should you do that? Whenever you encounter a loose electrical outlet (one which the plugs are loose in), one that sparks when you connect or disconnect from it, one that gets hot, or one where there is carbonization (black) around the holes in the outlet.
Safety First
If you’re going to work on your home’s electrical systems, you have to put safety first. Electrical shocks can be serious and you can get some really serious shocks from your home’s wiring.
The first thing to do is to shut off the appropriate breaker in your home’s breaker box. You will find that there are two types of breakers in there. The more common type takes up only one space. These are used for your home’s electrical outlets and wiring. Up near the top, there will be another type, which uses up two spaces. These are used for the HVAC, hot water heater and stove. Some homes may have one additional large breaker at the top of the panel, which shuts off the whole house; but these re rather rare.
Theoretically, there should be a label inside the door of the breaker box, showing which breakers are used for what; but those labels are rarely marked. Rather what you’ll have to do is to plug something in, like a light, and have someone else watch it, while you turn off the breakers one at a time, finding the one that will cause the light to go out. While you’re at this, you might want to take the time to fill out that label.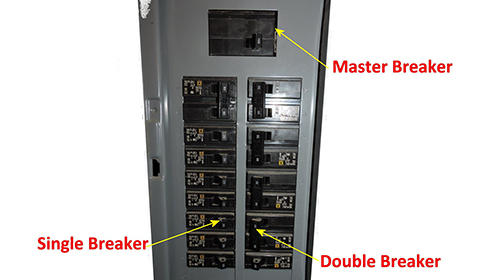 If you have a multi-meter or outlet checker available, verify that your electrical outlet is dead before proceeding. If not, try plugging a light or hair drying into the outlet to check it.
With the breaker off, it should be safe to touch the wiring in that room, without risk of electrical shock. However, just to be sure, it’s a good idea to use only tools with rubber handles, so that if the power is not off, you will be protected from shock.
Related: No Power? No Problem! Methods for Home Security When the Grid is Gone
Remove the Old Outlet
Before putting the new outlet in, we obviously have to remove the old one. Before that, we need to remove the cover plate, which is held in place by one screw, right in the center. Try to make sure you don’t lose that screw, as you’ll need it for reattaching the cover plate on the new outlet.
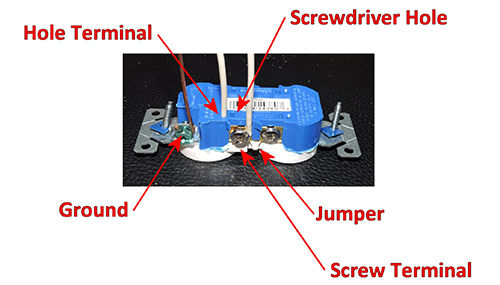
The working part of the electrical outlet is held in place with two screws; one at the top and the other at the bottom. Those screws are captive, so you shouldn’t lose them. Pull the outlet out as far as the wires allow. You will feel considerable resistance to pulling it out; that’s okay.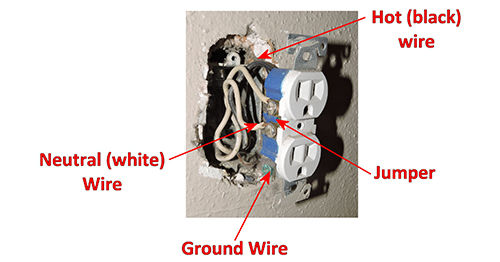 In most cases, there will be three wires attached to the outlet; a black one, a white one and one without insulation on it. They may be wrapped around a screw or pushed straight into a hole in the back of the outlet. You’ll need to disconnect all three. For wires attached to screws, just loosen the screws. For those pushed into the back of the outlet, push a small screwdriver into the rectangular slot, next to the hole the wire is going into. This will release the grip on the wire, allowing you to pull it out.
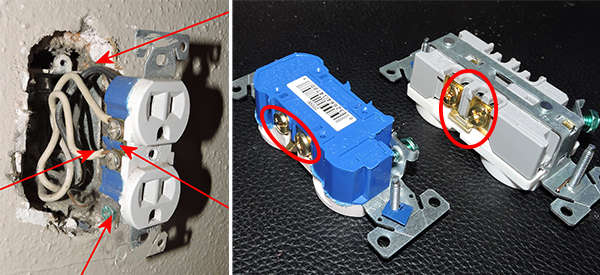
 You may encounter a situation where you have more than three wires attaching to the outlet. In that case, you’ll probably have two white wires and two black wires, as in the picture of the outlet in the wall above. This is done if one of the outlets is switched (turns on and off with a light switch on the wall) or where the outlet is being used as a junction, with the extra set of wires going on to another outlet.
In the case where one of the outlets is switched, you need to keep track of which set of wires is attached to the upper outlet and which is attached to the lower outlet. Wrapping a piece of tape around the wires, before disconnecting them, will suffice for identifying one pair of these wires.
Related: How To Hot-Wire A Car When The SHTF (with pictures)
Connect the New Outlet
Shown below are the back sides of two new outlets: a residential one (blue) and a commercial one (grey). They are essentially the same, with the exception that the commercial one is heavier duty than the residential one. It is also more expensive. You can use either in your home.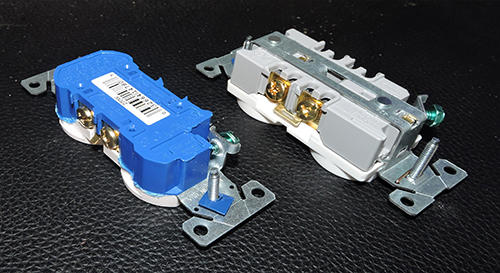 Both of these outlets provide the same connections, allowing you to wrap the wire around the screw post or push it into a hole. In the case of the commercial outlet, there are more holes available for the wire to be pushed into, but there is no slot for releasing the wire once it is in. Rather, the same screw that needs to be tightened if the wire is being wrapped around the screw will have to be tightened to capture the wire in the holes.
In both cases, there is a gauge molded into the plastic housing, showing you how much wire to strip off, if you are going to have to cut your wire off and strip a new end. This should not be necessary, if the wires are still in good shape. However, if the insulation around the wires is blackened or the wires themselves are brittle, you may need to cut off the existing ends and strip the insulation back for new ends.
Before attaching the wires to the new outlet, check the old one, looking to see if the jumper connecting the two screw contacts on each side has been broken. This is done when one of the outlets is being used as a switched outlet. If that is the case, you will need to break or cut the jumper. This can be done with diagonal cutters or needle nose pliers.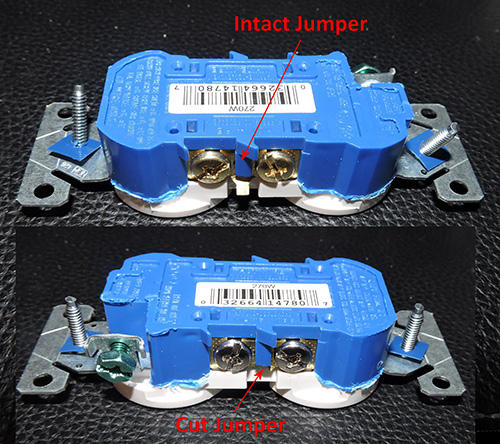 Attach the wires to the new outlet, so that the black wires (hot wires) are attached to the brass-colored screws and the white wires (neutral wires) are attached to the silver-colored screws. The bare wire should be attached to the green screw in the corner of the outlet. This is the ground wire. Make sure that you orient the outlet so that the ground will be at the bottom when the outlet is installed.
It doesn’t matter if you use the holes in the back of the outlet to connect the wires or wrap them around the screws; both will provide you with an adequate connection that meets code and is secure. However, if you are reusing the wire ends and those ends are already curved from being wrapped around the screw, there’s no way you can put them into the holes.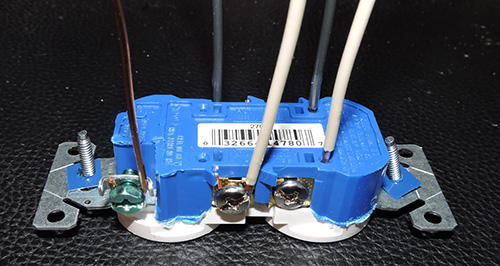 Double check that all the wires are secure. Tighten all the screws, even if there is nothing attached to them.
Finishing up the Job
Push the outlet into the electrical box. This may be difficult, as the wires in the box won’t want to cooperate. Just let them know that you’re the boss.
Tighten the two captive screws for the outlet, one at the top and one at the bottom. Run these screws into the holes in the box, tightening them snug, but don’t overtighten.
Reinstall the cover plate over the new outlet or install a new cover plate.
Turn the breaker back on and test your electrical outlet to see that it works properly. If one of the outlets was switched, be sure to check that the switching function works on your new outlet.
You may also like:
 How To Turn Used Car Batteries Into A Survival Power Bank
You Will Not Survive An EMP Strike Without This (Video)
Modern EMP Protection Upgrades



If your careful you dont need to turn off the breaker.
I disagree, Raven, unless you want to do the repair wearing insulated gloves and rubber boots while standing on a dry piece of plywood. Safety MUST always come first when working on anything electrical as accidents happen very quickly. Most people aren’t that careful. Getting shocked by 110 is unpleasant. 220 more so. If YOU want to do electrical repairs on a live circuit and take your life in your hands be my guest. I won’t do it. It doesn’t take much to either shut off the breaker to that particular circuit or if you’re unsure which breaker controls what just shut off the main switch to the house. Safety first. ALWAYS!
I wouldn’t recommend it for most (well, any) people, but I used to change outlets, switches, light fixtures, ventilation fans, and ballasts all the time without turning off the breakers. My supervisor was dumbfounded. I would take a jolt of 110 any day over a wasp sting. I’ve gotten hit countless times with 110 and although it wasn’t fun, it wasn’t particularly bothersome enough for me to walk all the way to the breaker box, as most of the repair work I did was in large dormitories where the breaker for each room was in a closet far away. Though countless, the percentage of strikes to the number of repairs/replacements I’ve made is very low–probably 3% or less. I would not do it at all in an old house, I would definitely not do it in a wet environment, not with the smaller metal electrical boxes, and definitely not with 240 volts. Those who can do this know who they are and do it with extreme respect; and the rest would be foolish to let their guard down and stray from safe habits. I should also add, I had a dramatic encounter with a high voltage cattle fence when I was about 6 yrs old, and routinely touch my garden electric fence to check that it is working properly.
I agree with you. Ben. Electrical circuits should always be handled with the greatest respect. Most people can handle getting shocked by 110. Not so much for 220. And then of course the 600 volt circuits are even more fun. These days if I were accidently shocked by even 110 it would probably blow out my pacemaker and then my cardiologist would be REALLY pissed. LOL! Everyone can do what they heck they want but I will NOT mess around with electrical circuits. With me safety always comes first. I don’t even want to be shocked by 110 any more. And as for touching an electrical fence. Forget it!
If you are well grounded 120 volts will kill
Raven tactical,
When you state:
I would have to agree; but, I started wiring houses with an uncle at age 10 and have two engineering degrees, so maybe I’m a bit overconfident.
I live in a very old house, with the oldest part (1920’s) having too many outlets and overhead lighting fixtures on too few circuits, so often, unscrewing a fuse (yes an Edison socket style fuse) turns off all of the outlets and overhead lights in a room, meaning you have to work in the dark, so often working on an energized circuit is just easier.
In the 1960’s someone added a breaker box; but, the old part of the house is simply marked Old House” on a 240 VAC breaker that feeds the old Main / Range fuse box.
All of the new circuits I have added use the techniques described here; but, one really important” topic appears to be missing. The use of proper grounding and the use of GFCI’s (Ground Fault Circuit Interrupters) usually required by code in certain places, like kitchens, bathrooms, laundry rooms, and out of doors. Normally, no matter the voltage or power involved, current flows into one wire, energizes the load, and the same amount of current (at reduced voltage) flows back out the other wire. If a ground fault occurs, and some of the power is flowing somewhere else, like through your body, the GFCI circuit detects that difference and shuts off the power flow.
The circuit will detect differences as little as 4 or 5 milliamps (0.004-0.005 amperes) and disconnect the power in as little as one-tenth of a second.
One of my senior projects in college was the design of a GFCI that actually worked.
There are now additional breakers called AFCI’s (Arc-fault circuit interrupters) that are being used in new construction. These gadgets have additional circuitry that detects arcs and trip in order to try and keep fires down to a minimum. The arc in question would be that frayed extension cord, running under the throw rug that gets stepped on, damaged, and ignored, until the arc catches the rug on fire.
This one is easy to take care of without the fancy breakers, that are subject to sometimes tripping seemingly at random.
I just checked my favourite hardware store, Ohio Prepper, and arc-fault seems to be the way it’s going. Not such a bad idea if it reduces the number of house fires. That must be one of the most tragic and saddest things that can happen to us when we watch our house burn down. And I would want power disconnect in milliseconds not tenths.
Armin,
It is a safety valve for people with bad or poor habits on their use of extension cords. Thos fires generally come into being when someone runs an extension cord under a rug where it gets stepped on and damaged to the point that some of the connections are frayed and can’t conduct the required amount of current for the connected load, and the arcing then causes heat. Not running extension cords under throw rugs and inspection and proper maintenance is probably a better way, than betting your house and maybe your life on a $20-40 device, keeping in mind that someone who does this is probably not doing their monthly testing of the devices either.
We test our smoke detectors monthly as well as our GFCI’s; but, have no Arc Fault here.
Another problem with AFCI’s is their susceptibility to tripping from outside interference. As a ham radio operator I have a friend who ran into this problem, tripping breakers in his house when transmitting on some of his radios. He was able to correct the breaker in his house; but, still wonders if any neighbors are having problems.
I volunteer with our county EMA and support local fire and EMS, and I agree that there are few sadder things, than a family hunkering down on a late night in one of our support vehicles, watching the firefighters trying to put out the fire in their home. Even when the fire is stopped quickly, smoke and water damage can make life afterwards a brutally changed recovery ordeal.
Actually you would not. Since the 60 Hz cycle last 17 ms and it takes several cycle samples to verify that the glitch is indeed a ground fault, it simply takes that long to be accurate. Change the time to a lower value, and the droop you see when a motor (like the refrigerator compressor or well pump) turns on, could confuse the circuit and continuously false trip the breaker.
That 0.1 seconds (100 ms) is only about 6 line cycles, and for standard 120 VAC (actually 117 VAC RMS) is more than enough time to keep you safe.
Even if you’re not dealing with some SHTF scenario, this is good information for the new “do-it-yourselfers”. It wasn’t until I bought my home did I worry about how to replace anything electrical. Thanks “Ask A Prepper”.
Greetings,
I would strongly recommend not using the push in connections in the back, I have experienced several wires popping out and interrupting a whole circuit.
Only use the screws on the sides
I agree 100%, Woodtick51. Excellent advice. It’s not in our best interests to be sloppy when doing electrical repairs. If you’re not comfortable with electrical (many people aren’t) then you have no choice but to spend the money to get a professional to do the job. It’s better in the long run than you attempting something that you’re unsure of and possibly burning your house down.
Woodtick51,
I have used those push in connections many times; but, the wire has to have a non stressed, straight entry to make sure there is no stress to pull them out after everything is assembled.
This is often a better method; but, also, be sure to wrap the wire in the clockwise direction so the tightening of the screw (actually a bolt) does not try to eject the wire; but, actually makes it snug.
I agree with this, my brother did electrical along with my uncle, and in their opinions the easy use quick connect wasn’t worth the powder to blow it to hell. And it is not that difficult to wire the plugin’s with the screws, I have done it, with half a dozen kids screaming in the background, don’t reccomend doing it that way but hey you do what you got to do.
I understand that we all have different skills and abilities, Rich, and some of us just don’t know how to change even a simple electrical outlet. I was lucky enough to get a very good grounding (pun intended) in electrical theory and practice. I read through your article and I’d just like to add one thing. It may be one of those “Duh!” moments and I don’t mean to talk down to people. But if it’s not done properly there is a very good chance of a fire starting. When tightening the wires on the new outlet make sure to loop the wire around the screw in a clockwise direction if the screw tightens in a clockwise direction. Most do. As you tighten the screw you also tighten the wire loop around the screw and it makes a secure connection. If done the opposite way and the wire is looped around the screw CCW then as you tighten the screw you actually loosen the wire loop and it makes for a very sketchy connection prone to loosening over time and possibly causing a fire. A small thing but important. And I know I’m probably preaching to the choir as most people on this page already know this. And for those that don’t, just remember to loop your wire around the screw in the proper direction and you should have no problems. And I think Rich already said it but I will re-iterate. Before beginning ANY electrical repairs remember to firstly ALWAYS shut off the power to the circuit you want to work on. If you’re unsure which breaker to shut off (most houses these days have breakers not fuses in their electrical panel) just shut off the main power to the house for the short time you need to affect repairs. Everything should be fine for that short period of time. Better safe than sorry. You’re obviously going to do these repairs during the day when you have light to work with. Just use a little common sense when working with electrical circuits and you should be ok. Getting shocked by 110 isn’t usually lethal. Just unpleasant. 220 is a whole other kettle of fish and if you’re not careful 220 will knock you off your feet. I’ve been shocked by both and I’m still here although I would not want to repeat my experience with 220. Once was enough for me.
I saw no mention of making sure to prevent the bare wire from making any contact with any of the other “live” areas of the outlet – any bare ends of either of the insulated wires, or the screws they may be secured by.
Learning to do the many different repairs around the house makes good sense. There are some good books that detail how to do electrical repairs. Get one that illustrates (with photos) on how to do the repairs. A picture is worth a thousand words.
a simple article, but absolutely excellent! I will keep this around for a long time to come.
this is most valuable info. every home stead prepper regardless if your mechanically inclined or not should know the basics of some little home improvement repairs. you can’t rely on a handy man should something major go down. he’ll be busy fixing his own issues. every one should know the basics. thanks. good info.
I don’t know how often this happens but it did happen to me in a brand new house. The electrician ran two circuits off two breakers….on on the “A” phase and one on the “B” phase but got cheap and used a common neutral to go back to the breaker box. I found it when I turned on the kitchen light and it was not at full brilliance, I took reading on the outlet and tested each of the contacts to ground and had no indication of voltage so I took the cover off and reached in only to get zapped. It told me that the neutral was not connected to the neutral bus and after I took off the cover of the breaker box, sure enough the white wire carrying current from both breakers was charred for about 6 inches, meaning that there was 240 split according to the load and the microwave had the better art of that as it’s source. Toasted the microwave MOVs which I replaced after I fixed the common neutral connection.
The builder lived behind me and his dad was the electrician. I explained what had happened and he told me that it routinely done to use a common neutral.
Just my 2 cents worth… A ground fault tester should be in your bag of tricks. With it, you can test for reversed wires, faulty grounds, and depending on the quality, GFCI.
Even if you don’t have or suspect a problem, the previous owner or a careless electrician may have reversed the wires on an outlet. Had this happen to me once. I had an electric fence that “worked” but didn’t stop animals. Checked the wiring, and after correcting the reversal, the goats, horses, and cows gave the fence a very wide berth.
I am a licensed electrician. I go to many jobs like this to make the proper repair for someone who has tried to do it themselves. There is much more to correctly changing out an outlet than what is included in this article. Many times, the problem wasn’t in the outlet. That is just where to symptom showed up. Doing the electrical yourself can easily turn a $25 repair into a $500 repair. Home owners insurance also gets real picky about payment for damages when someone not licensed has made an electrical repair and done it incorrectly leading to a burned wall or worse. Yes; many electricians will quote you an outrages rate to make a simple repair. Shop around!! In a case of worn out outlets, I personally will change out the entire house for $8.00 per outlet. Much less than the deductible for your insurance when a fire starts.
Good point, Darrell. Sometime in the future I need to run maybe a dozen circuits from the front of the house to the back and talking about it with other people they also mentioned the same thing about house insurance. If I did the job myself and the house burns down because of my stupidity and the insurance company finds out then apparently I’m SOL as far as the insurance company paying out. IF I did the work myself I would get a licensed electrician to sign off on the job. And I would have to use a sub panel as there aren’t enough circuits left in the main breaker panel. Thinking of running 12 AWG wire as I want 20 amps per circuit just because of what I want to hook into them. Less chance of the breakers kicking out because of a very transient overload. Just a quick note about adding extra panels if you don’t have enough circuits in the main panel. There’s a youtube video on it if any one is interested. Explains it in much better detail. Apparently you can only wire subpanels for 110. If you try and wire them for 220 then apparently you can end up in a situation where the panel is live. Not an ideal situation. To be forewarned is to be forearmed.
Armin,
For 20 amp circuits and 20 amp breakers, 12 gauge is indeed the appropriate wire size.
Transient overload?
You need to size all components of the circuit, from the breakers, wiring and outlets on the end, for the expected power or current rating. 12 gauge wire should easily handle 20 amperes or about 2400 watts total load.
While YouTube videos are useful, one needs to understand things well beyond mimicking YouTube, videos, more than a few of which I have found to be less than adequate.
We wire 240 volt panels all of the time; but, once again, more than YouTube knowledge is required. I have 240 volts wired to my office / ham / man cave to run some equipment and easily split those same circuits into 120 VAC outlets as well; however, one needs to know which phase is on which 120 outlet and be aware of the cross phase voltage that would yield 240.
Another way of identifying a circuit is to plug in a radio and turn up the volume. When the radio goes off you’ve located the breaker you’re looking for.
You can also use night lights, Reg, and then there’s no danger of accidently messing up the radio. Night lights are cheap and plentiful and if you test out room by room then plug the night lights into all the outlets in a room and then when you turn on each breaker separately you can see if there is more than one outlet connected to each breaker. I would think a radio would be tedious, Reg, but again each to their own. Whatever floats your boat. 🙂
Good article. If you are having a bit of a problem with the individual breakers switch the main breaker off and hang a note saying do not touch. Had my ‘first’ experience with electricity when I was five and pushed a knife blade into a low wall plug. Since that ‘experience’, I’ve developed a health respect for electricity. I’ve also learned to change out just about everything electrical in a home, but I check and double check to make sure the power to what ever I’m working on is dead. I also use an up-to-date home repair manual and follow the directions, carefully. Never ‘jury rig’ anything electrical. If you do…people might read about you in the ‘Darwin Awards’. If you run into a situation and you are not confident about how to do it…hire a pro. If not…just make sure your affairs are in order.
Dave from San Antonio,
This same thing apparently happened to me when I was about 3 years old. I say apparently, because I don’t remember the incident; but, my parents mentioned it more than a few times while I was growing up.
My dad was handy with electricity and electronics and I learned from him, eventually going into electronics as a career.
To this day I still do most of my own wiring; but, like many of you, turn off the power first.
My last teachable moment was when an incandescent light bulb broke off in the barn, leaving the Edison screw portion in the socket. I turned off the power and removed it with a pair of insulated needle nose pliers. I don’t fear anything 240 VAC or less; but, have always had a great respect for it.
I have friends who climb the poles & towers and work with the 7200 to 765,000 volt circuits, and I really give them credit for doing such things, that I’m not sure I could ever do. LOL
I have done some rewiring and replacements of wall sockets, and I wrap electrical tape around the socket to cover the exposed screws where the wires attach just in case one came loose. That way there is some protection from a short.
While it is generally true that 110 will not give a healthy person a fatal shock, the operative word in the sentence is “healthy”. Too many of us have hidden health problems that haven’t manifested themselves yet. Working on a hot electrical circuit is the wrong method to use to find out if your heart is in tip-top shape. It is really the wrong method if the circuit you happen to be working on requires a step-ladder.
I know of a very experienced electrician who was working on a dock-side electrical fixture which was running 660 volts. He inadvertently grounded his screw driver. The very impressive arc knocked him several feet, totally melted the blade of his screwdriver and gave him some interesting molten metal scars on his face.