Have you ever wondered what the structure of your garden soil is? It would help when making decisions on what and where you might plant, as well as amending the structure of your soil.
This test is so easy that I recommend doing it each year before creating a garden plan. The results of the test could determine how much fertilizer you use or what changes you should make to the soil depending on what you plan to grow in your garden.
It comes down to the number of various particles and components that make up your soil. The shapes and sizes of each group of particles determine the soil’s structure and how well it will work for growing your garden. A good understanding of the soil and its components will lead to a more successful year of growth.
Understanding the Basic Components of Soil
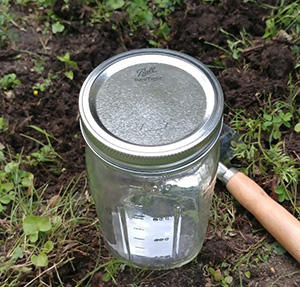 Most soil contains 3 components; sand, silt, and clay. And, each region and area will have a different structure of these 3 components.
In fact, different areas within your own property could vary quite a bit from one area to another.
Clay – This is the smallest of the 3 mineral components. It consists of tiny and flat particles that fit together and often creates the biggest area of soil in many areas.
Clay consists of necessary nutrients and works well as storing water. So, having a large amount of clay can work in your favor, unless you have an abundance of rain in a season. It’s also a cooler soil that takes longer to warm up in the spring.
Sand – The largest particle making up soil is sand. These particles are round, which allows more space between particles. As a result, water will drain more quickly from sandy soil, than one of more clay. Another downside is that the nutrients drain right along with it. For gardens with a large amount of sand, it will require more fertilizer and water than soil consisting of more clay.
Silt – The size of silt particles is between clay and sand, but closer to clay. Soil that consists of a large amount of silt is typically found along riverbanks. This soil feels smooth while moist, yet powdery when it’s dry.
A good combination of all 3 of these particles is referred to as loam soil. And, it’s the best type of soil for gardening. To obtain loam, you need to know what you currently have, so you can make adjustments.
So, grab a mason jar…
The Mason Jar Soil Test
Start with a clean and empty jar, such as a mason jar, including the lid. It could be either quart or pint size. You just need a jar with lid, soil, and water.
#1. Fill the jar halfway with soil.
#2. Add water. Fill to about 1” from the top and put the lid on.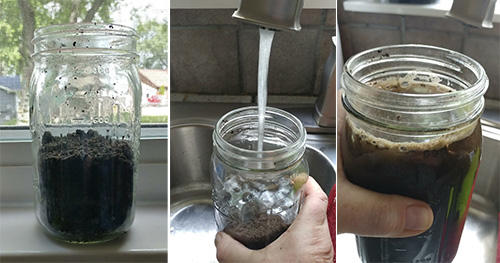 #3. Shake the contents for a few minutes.
#4. Set the jar aside for a few hours.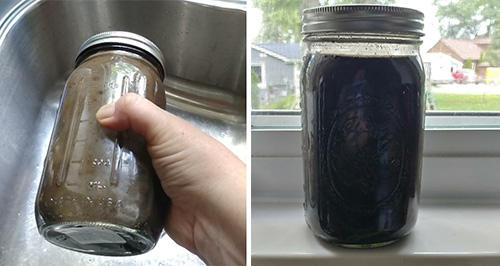 As the content settles, it will separate into layers of silt, sand, and clay.
Related: How to Adjust the pH in Soil and Water for Abundant Harvests
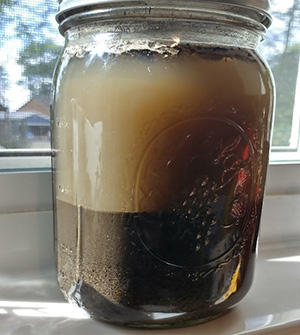 What you should see in a few hours:
- At the bottom, you will see the heaviest layer, consisting of sand and rocks;
- The next layer will consist of silt;
- Next will be the layer of clay;
You should also see some organic matter floating at the water’s surface. Also, keep in mind that the color of the soil is indicative of the amount of organic material within it. The lighter it is, the less there will be. Dark soil holds more organic matter and will warm quicker in the spring.
Reading the Results
Once you have done the test, you need to know what it all means and if you have the desired loam soil.
- Loam – 40% sand, 40% silt, and 20% clay;
- Silty Clay Loam – 60% silt, 30% clay, and 10% sand;
- Sandy Loam – 65% sand, 20% silt, and 15% clay;
- Silty Loam – 65% silt, 20% sand, and 15% clay;
So, knowing that loam soil is an idea, what amendments could you do to achieve it?
Sandy Soil – A good way to amend a sandy soil is to add compost or manure. This is probably the fastest way to get it to a loamy state. However, both compost and manure contain significant amounts of salt, and high levels of salt can be damaging to plants. So, if you already have high levels of salt in the soil, such as seaside gardens, use a plant-only based compost.
Silty Soil – You can amend silty soil by tilling in 1” Cocopeat to break up clay particles to help with aeration, 2” of Perlite to help with drainage, and 4” of compost to help with water retention.
Clay Soil – For the same reasons as above with silty soil, till in the same ingredients, but adjust the amount to 1” Cocopeat, 4” of Perlite, and 6” of compost.
My test resulted in about 50% sand, 40% silt, and maybe 10% clay. So, I have fairly good soil in that area. But, to get my perfect soil, I would do a combination of the sandy and silty soil amendments listed above. Or, because it’s so close to the desired loam, I could just add fertilizer and water more often.
However, the area I tested is where we normally put a few annuals. We plan on planting a large produce garden on the other side of the house next year, and that will most likely have a completely different test result. Therefore, it’s important to do a different test for every area you intend to plant a garden.
Hopefully, this helps in getting you closer to the perfect soil for your garden. No more excuses! Well, except for maybe pesky critters that you will need to keep at bay.
You may also like:
 18 Reasons to Stock Diatomaceous Earth for Survival
The Only 10 Plants You Need In Your Medicine Cabinet (Video)
DIY Mini Greenhouse For Year-Round Vegetables
The Three Sister Garden Plans: How To Get The Most Out Of Every Square Foot


Here is a Web Site with other methods of getting gross results of what your soil’s Ph level is at. The red cabbage method is a fun way to try it out.
https://preparednessmama.com/testing-your-soil-ph-without-a-kit/
There is one other component of soil to determine before deciding to plant: Rocks. No test needed to determine if the rocks have your fields in custody. Just stick a shovel in a couple places and you will know for sure.
While rocky soil might also be good soil, the trouble involved in working it might make for poor returns.
My uncle was a young man in around 1914 in central Texas. Black land and lime stone rocks were common in fields. His land was heavily rocked. They were in a drought and most of the cotton didn’t make. His did however because rocks sweat. Cotton price was high so he made a good profit and learned the value of rocky soil.
Your site would not allow me to correct my name??
That’s a great bit of info, KJ. This can also be helpful to anyone who is planning on making a cob building with the soil at the construction site, as a clay-rich soil is necessary to have the cob bricks/lumps hang together properly.
Good info. Very good, in fact! We already knew ours when moving back to Arizona. Adobe clay and coarse sand. It makes a great brick. Plenty of caliche (natural baking soda) that nothing will root thru, even in severe drought. Ph is 8+. Tohono and their ancestors, who have been farming here for several thousand years advise, get under the caliche. dig it out. replace with high carbon material like logs, branches, leafy material (this is called green manure, very high in nitrogen, so use with caution, it makes a lot of great growth in plants, but tomatoes and chilis will not fruit till the nitrogen evens out). Throw a heavy mulch over that to keep the sun from baking the sol. Family farming in Penna are trying hugelkultur, and also burying the logs. They doubled production on everything. BTW, it can take a year for sawdust and undecayed woody material to begin to return nitrogen to the soil. but then, it makes everything boom. Our siol was about 1/2% organic latter, and depended on ants and ground squirrels for aeration. With all the wood now in the garden trenches, a lot less water is needed to keep things from frying in the heat. And, even when we get monsoons, sometimes inches of rain and hail all at once, it absorbs it, not allowing it to run off, and there’s no root rot. But, we also have to add sulfur to take the Ph level down. niio
I’m tired of fighting my garden soil, I’m going to do the “no till” garden, just throw cardboard down right on top of the grass and weeds, water it down and walk on it to press next to the soil then poke a small hole put the seed in and cover the hole with a small amount of compost or dirt.
No more tilling, weeds or hassle. As the cardboard rots just throw down more.
Good thing too is the store down the street from me gives me all the cardboard I want for free!
Also, underneath that cardboard you will find some of the richest dirt you have ever seen after the worms come and make a home there.
I am about to start a “no-till, no work” garden, too. I found 3 of Ruth Stout’s books, read them all and am ready to start. After making a bunch of phone calls and asking neighbors, I have two large rolls of spoiled hay to pick up tomorrow to spread out over the place where we want the in-ground garden to go. The area has been leveled out, dead trees and trash, rocks and old fencing removed. After spreading the hay, we are going to put in some fence panels to keep out the wild hogs, then plant some potatoes to get the soil broken up under the hay. And maybe get some food in the process.
I am doing a lot of experimentation for now, to find out what works with the least amount of hassle and failure, while the failures won’t equal starvation. Success will bring along the bonus of fresh veggies. That way, when the SHTF, we should be able to supplement our stockpiles fairly successfully. This year, I am fighting an invasion of grasshoppers. If they would eat the sand spurs, they would be earning their keep. Instead, they went after the few seedlings I had coming up in my keyhole garden. A trip to pick up some aluminum window screen seems to have worked for now. I planted some more seeds and some of them are already coming up. Since we have a fairly long growing season, I am hopeful that I will get at least a few veggies out of the garden. We shall see….
What kinda chemicals are leaching into your soil and plants from that cardboard?
Just FYI , agricultural or pelleted lime keeps grasshoppers out of garden beds and rows. Here in NW Florida we have fought an invasion of huge black grasshoppers for the past 4 years. I had used diatomaceous earth, homemade repellents and lost everything in the garden…
Read about the lime on a gardening blog this spring, applied about 2 – 3 cups per 4×8 raised bed, reapplied 2 weeks later as we had a very rainy spring. Very little grasshopper damage this whole season.
BDN,
I tried DE, also. It didn’t do enough to make a noticeable difference. Especially since I am watering every day, just trying to get seeds to sprout and then trying to keep the sprouts alive in the Texas sun. It was also too late by the time I remembered it. The bugs had already eaten most of what was growing. The mechanical solution, window screening over the garden, seems to be doing a fair job. I am still getting one or two grasshoppers finding their way in when I check n it each day, but by moving some of the cap stones that are holding the screen in place, I am able to lift it enough to reach in, grab the pests, and toss them out of the garden. (We built the keyhole garden by dry stacking concrete blocks 4 courses high, then topping with 2” thick cap blocks. This way, it is easily disassembled and moved if necessary.).
I will see if our local Tractor Supply store has any pelletized lime and try it with the hay mulch on the new garden area. Thanks for the suggestion. Some of these grasshoppers are HUGE! Bodies as large as a man’s thumb! One neighbor called them “jumbos.” I’d say closer to “prawns!”
Ruth Stout rocks. I remember when she passed away, her daughter wrote a sort of a eulogy in Organic Gardening for her. She called her mother every day to see if she needed anything, or even just some company. One day in February, Ms Stout was about 86, and no answer. After trying several times, she went to the house and found her mother with a pen in hand, her head on a seed catalog ordering her spring seeds. I’ve been into her work since I went Army but Dad was too disabled to care for the garden. I mulched it all and he had plenty all summer. No weeds, just tree leaves as fertilizer.
A few years later, I was working for a rancher in Colorado who’s wife kept a flock of turkeys. They kept the grasshoppers so sane levels and got fat on them. Only thing, turkeys love to scratch. But, they also patrolled the barn and took every fly they could. They move like lighting and can nab a fly on the wing.
Am back in Arizona, thank God, and here, mulch is as much to insulate the soil as anything. Last year, the grasshoppers were so bad I lost a lot of amaranth. This year, post-drought, they’re not too bad. The lizards get a lot of them and other bugs. Grasshoppers have to get to softer soil to lay eggs, and when they go into the mulch, then a lot of predators are waiting. Now I need a way to keep the quail from eating the seeds 🙂
https://www.organiclesson.com/get-rid-of-grasshoppers/
If your soil is over Ph 7, I wouldn’t use lime. I add a little sulfur to the soil to cut down on lime clogging the works and making more caliche. Most plants like neutral or mildly acidic soil.
Wish I had those logs. I dig trenches to get rid of the caliche, and fill them with wood and grass, leaves, anything organic to create humus. With that, we use a lot less water. I can only go down 3 feet, then sandstone, but it works. Next month, the gray water system is going in if only a small tank and hose to move to different beds.
Little to none. Fish worms are sensitive to toxins and they thrive under cardboard. Slugs and snails don’t like it because it’s rough and the fibers cut them. We save all junk mail and cardboard. When a new trench is dug, it goes in the bottom because it holds moisture and rots fast, breeding a lot of fungus needed to to help plants grow. niio
Not sure fudpucker, but I do try not to use cardboard that has a lot of colored ink or coatings on it.
We use cardboard too. Works great.
A kid sister in Penna lives near the Susquehanna River and gets slugs longer than my finger. A bro told her to mulch with cardboard. Slugs and snails do not like it, even when wet. Fibers in the wood particles cut them. She tried and it worked. She wound up with a ton of fishing worms, too, so no chance of nitrogen loss. niio
I don’ t think this person has been to Clay, County, Missouri. If you plant bulbs like onions or garlic, they simply can’t make it through the gumbo. Their roots have no where to go. The only way to make your area useful is to remove it, using it to fill in low spots, and putting the soil that WILL work in it’s place, keeping in mind that you can build your own.
Years back, I was working in Ohio, Shelby Co., on the plateau, and the soil is clay. The farmers used a tractor so big, it hinged in the middle. I tried to put in a garden and even bought a new shovel. No go and jumping on the shovel only made the blade bend, then bounce me. Not an easy thing for someone who weighs over 200 lbs 🙂 But, I like mulch. I went to the ton dump and took truckloads of leaves, using one load per bed. They can be planted in if you chop a line down them. By fall, the clay was mellow enough to dig in with the hand. Same with a garden started for a sister in red clay area that we call the demons road valley. Not even worms in that place tho it had been in lawn for decades. But, she had her garden under wood chip mulch. It works, and it’s like God intended. niio
Here in NC we have a lot of red clay too which can be hard to work but I do see a lot of corn and tobacco being grown in it.
I amend my soil with grass clippings, horse manure, leaves, kitchen scraps and anything else organic I can find to help make it workable, I even added sand at one point.
But now I might just stick with the no till garden and see how that works.
NC is a cool state. I have a mess of family there, from Hendersonville to Fayetteville. Word is, heavy mulch, wood chips, paper, anything to make the worms happy, and they they make the plants thrive (here, no fishing worms, it’s too dry). The only things I do not like about raw manure, plant diseases and weed seeds. Most of the wormers used in animals will kill fishing worms, too. Even composted it can. Wood chips are great, too, but if I lived in a wet area (used to market garden in Penna and Ohio), I’d still want cardboard to keep the slugs out. Modern farmers are doing covers, rye, radishes and turnips over-winter to break break up the clay and plowpan. Some kid in the piedmont is getting up to 400+ bushels of shell corn using just that as fertilizer after about 6 years. the clay is now black loam. niio
I use leaves and pulled young weeds. Dig it all into the soil. Land here is adobe clay baked hard. We used the back how on the tractor to b team up the soil a about 15 inches deep then I worked it roughly into the wide raised beds I’d planned. Worked in rabbit manure from cleaning the cages and floors where my 17 rabbits live. Chicken pen cleanings are still too fresh to use. I also worked in last years cotton wood and elm leaves and in some areas burried elm branches cut past year. The soil is really responding well to some care. It was more clay than anything. If damp it still sticks hard to metal tools in using but is softer and crumbly as it drys out. It was like rows of broken adobe bricks when I started. The high clay content helps it hold water for several days after a good soaking. It it becoming nice to work with. After the gardening season ends I’ll cover with cardboard. Its worked well for me at other places.
Ph through this part of NM is 7-8. My garden is 7.5 . adding plant material helps bring it down a bit.
Sounds cool. Given we only average 13″ a year, I like getting deep as I can in th adobe brick works and bury everything. that slows the decay but that’s how humus is produced. All those coffee grounds mixed in the clay are turning it dark brown and it flows when it’s raked. I like the leaves on top the soil as insulation.
Had a strange one this morning. something was bothering me and I got up before 3. Last night, after sundown, I watered the garden. It didn’t need it, but something made me do it, give all the beds a good soaking. At 4 this morning, I heard sirens and got up, and the neighbor had flames all over the roof. Our firefighters are good. You have to be in an area where brush fires are a constant threat. They got it out, but when I checked the garden near sunrise, there were chunks of powdery black ash all over the front and the back. It’s bad to lose good neighbors. they’re fine, so I understand it. But, now they’ll find a new place closer to work down in Tucson. I wish them well.
Years ago my husband worked for a KFC facility storing and preparing many items for the owners 8 stores. We got 8 large black trash of cabbage trimmings several times a week. I covered my garden with that and let it rot in. It helped hold in moisture and built up the soil.
I also fed 7 little pigs a lot of it. Only time I ever raised pigs. A bunch of smart brats! Cute, funny, and always finding a way out of their own. I was quite pregnant and didn’t enjoy chasing them. They quickly learned my scrap bucket from the kitchen. I’d grab the bucket, often only filled with air but they’d follow that bucket anywhere.
Between piglets and top dressing the garden I never had a regular compost pile there. Didn’t need it and by top dressing with lots of vegetable scraps I didn’t need to water nearly so often. Cover crops would do much the same but also roots also go deep and break up hard layers. That wasn’t a problem there.
Here there are layers of gypsum ( the white stuff in wall board). Breaking that up, where it exists, is a good thing. I’m not finding it here like my at last home.
PH is now 7 in my garden. I’d like to get the slightly narrower raised bed down to 6.5 for the tomatoes. Potatoes are in a large trash can where I’m using a large bag of planting mix. Just adding layers as the plants grow.
Where I lived in Ohio, they had a salad factory in town. A neighbor and I would get truckloads for his sows, and me for a few feeder pigs and calves.
Potatoes don’t seem to mind Ph as much as tomatoes. If scab is a problem for you, plant cereal rye in the fall, then dig it under and plant the potatoes a week later. A lot of the smaller ones I left in the hills. They’ll come up with the rains and I should get a new crop then.
Tomatoes, Porter was bred for West Texas, gypsum mines and all. It tolerates caliche, gypsum without the sulfur to counteract it. There are a few caliche mines in the area.
Pigs train easily. We would pasture them in the brush, and one shout and the sows would come running to the feeder. We had one we never did catch. He took off each time we showed up. Late in November, a neighbor hunting deer shot him. that was the best pork I ever had. Maybe because he was fat on nuts and apples, or maybe because of all the times he wore us out chasing him 🙂
Sorry about the neighbor but I understand about watering then learning of the fire.
Pigs loved the black walnuts that grew along the road. I’d crack blackwalnuts with a hammer on a block of steel. Young pigs cracked them with their teeth, sorted out the shell with their tongues to spit it out and ate the nuts. Pretty impressive jaws. A friend bought them all when they were close to butchering size. The money paid my hospital bill when my third son was born and bought most of a years worth of hay for our mare and the older boys Shetland ponies.
Folks always planted black walnuts around the barn for livestock. It chases off mosquitoes and flies. I remember listening to hogs in the walnuts at night, cracking them. It was almost like gunfire. when they pastured with the dairy cattle, we had to keep an eye on any cows calving because of the hogs. They can crack a cow’s leg bones with one bite. Ours were pretty well-mannered, thanks to letting them in the woods all summer. Plenty of snakes and so on to give them what they needed to raise fat pigs.
A grandmother’s cousin back in Penna used to buy every pony he could in the fall from town people. He went as far as NYC (65 miles away and an overnight trip then) and got them for a few dollars. They went on pasture for the winter, with plenty of hay, and in the spring, when they lost the winter coat, he would sell them back to the people he bought them from for 20 bucks. Outside of hauling and a few dollars costs, he made a lot of cash that way. I don’t recall exactly, but I think he got a lot of them from coal mines in the area, older ponies that were easy going for kids to ride. When he hayed, some was kept in case of bad weather, the rest sold. Ponies did that 🙂 Mind hogs, as folks say, they’re the only animal that will buite off the hand that feeds it–other than family, of course 🙂 And I’m getting to bed! niio
It’s actually four components. You forgot humus; but, did mention it as organic material later in this article.
Loam must have humus, since that is the primary food for many plants. And should make up a significant portion of the soil, is important for retention of moisture and contains a significant amount of available soluble nutrients.
Where pray tell does this salt come from? Ours contains little or no measurable salt and one should NEVER compost anything except plant material.
Another thing to consider is soil pH, and the easiest way to measure that is with either a pH test kit or a pH meter. Wal-Mart sells this one: Soil Tester Meter, Fosmon 3-in-1 pH Meter, Soil Sensor for Moisture, Light, & pH Level Measurement for Growning Garden, Lawn, Farm, Plants, Flowers, Vegetable, Herbs & More for only $11.00. It Is well worth having in your kit. You may use lime counteract a soil that is too acidic and pine needles to counteract on that is too alkaline.