Canning ground beef and meat in general is easy. Yep, that’s where we’re starting today: what we’re about to do is pretty easy and everyone should be doing it. The freezer is great, but you do end up with degradation in taste and texture a lot faster than if you simply can your meat.
Today, we’ll work on canning ground beef. A cow in a jar, if you would. Keep in mind that you can do this with nearly any beef recipe too; beef stew is a long-time favorite and has been on everyone’s list of soups and stews to can forever.
There’s a reason it’s so common in the grocery store and let me tell you; the mark up that you’re paying is out of this world!
So, grab your canner and let’s get to work!
The Meat
For this example, we’ll be canning ground beef.
Brown your beef until it is fully cooked. Once cooked, drain it thoroughly. We do not recommend rinsing it, though you may choose to pat it dry. Why? The less fat on it, the better.
Draining helps, but patting it also allows it to really get that last bit of grease off of it. The last thing that you want is for your canned meat to have trouble on the shelf and heavy fat content can cause issues long-term.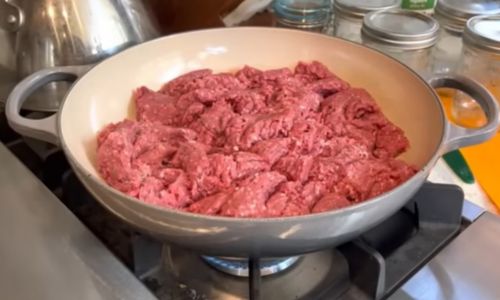
Our goal with this particular canning ground beef process is to try to find a shelf-stable ground beef that can last up to five years.
⇒ The Only Food That Grows Almost Faster Than You Can Eat It
Of course, everyone eats their ground beef long before that. But just in case you want to stockpile your beef, keep in mind that you have half a decade with this method.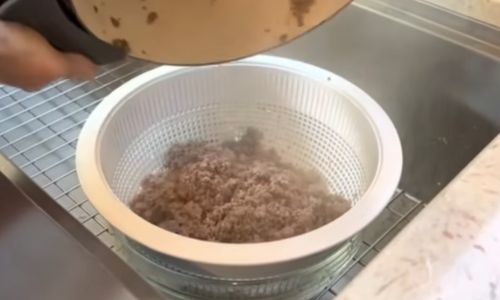
Fill your chosen canning jars approximately 1″ below the rim of the jar. Your average pint jar will hold about a pound of meat, give or take a little depending on how you break up the individual clumps in the pan.
If desired, you can add a little seasoning to the meat at this point, too. This allows the seasoning to really settle into the meat versus using it in the pan where you may char it or leave some of it behind.
Related: If You Have Been Storing Meat This Way, Stop Doing It Immediately
If you use your seasoning in the can, I recommend approximately 1 tsp of your chosen seasoning blend per pint of beef being stored. So, if you’re using a 2-quart jar, that’s 1 tablespoon and 1 teaspoon worth of seasoning. You may decide to go heavier or lighter depending on your exact spice blend.
Getting Ready
Once you’ve filled your jars with meat, it’s time to top them off. Boil water on your stove (we use an old teapot) and slowly top off your jars.
If your seasoning floats, that’s just fine. It will eventually rehydrate and sink into the meat, essentially marinading it until it’s time to use the jar far in the future.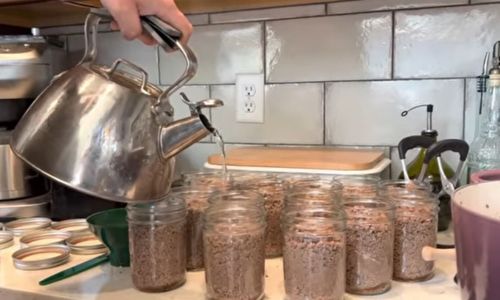
We generally recommend that you use vinegar or another astringent (that is food-safe) to wipe down the rim of your jars at this point. If you don’t, you may lose a jar or two to mold here and there.
It is still rather unlikely and if you need to avoid this step due to health concerns or allergies, the seal should still hold tight to your jar and you should still have safe food to eat.
However, you won’t have every jar sparkling clean when you pop the top off. So, if at all possible, wipe down the rims of your jars with a paper towel soaked with plain white kitchen vinegar and let it air dry briefly so as not to trap the vinegar scent in your jar.
It’s Canning Ground Beef Time!
Place your lids on your jars and tighten them down, by hand, as much as you can. If you have gripping problems (like your gallant author does), you may want to ask a family member to help you. You may also desire to use a handheld grip mat to help you hold on to the rather slippery glass jars.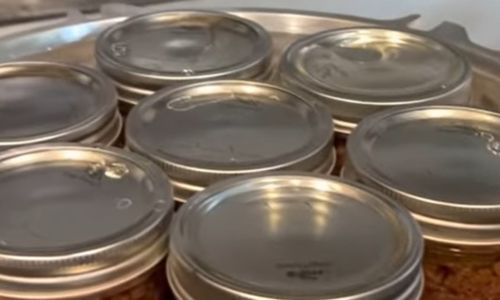
Since we have no way to guess what your canner specifics are, we will give you a general sense of what ours is. Still, we strongly recommend that you read your canner’s recipe/guide book/how-to booklet and abide by those guidelines.
While most canners are so safe that most of these instructions are interchangeable between brands and series, we don’t want anyone getting hurt. You can learn here the only canning mistakes that could put you in danger and should be avoided at all costs.
Therefore, our complete disclaimer is this: if you decide to use our model’s settings rather than researching your own, we cannot be held liable for what happens on your end. We only know what our machine does. Please use your machine’s directions.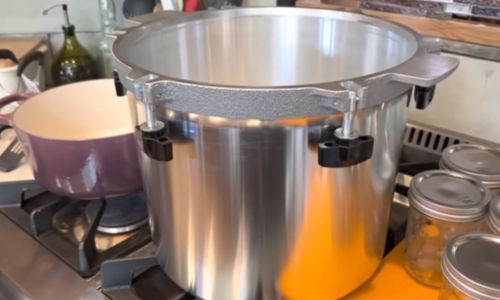
We place our rack into our canner and add about 3-4 inches of hot water (depending on the size of our jars; you never want your jars to be fully submerged). When our canner is full, we clamp it down and let it get up to steaming heat and around 15 pounds of pressure.
We carefully regulate that pressure and temperature, then allow it to work for about an hour and a half. Again, please check your manual and do as it says, not necessarily as we do. Our canner is a newer model and may work differently than yours.
Once we reach this time mark, we turn off the heat and allow the canner to fully release all the pressure within it. When the gauge reaches 0 pounds, we remove the lid (with the lid used as a shield opening toward ourselves so the steam can’t rush out and hurt us).
Related: My Grandma’s Method of Canning Eggplant
At this point, we allow the canner and those gorgeous jars to cool and rest. Don’t be surprised if your jars are still bubbling inside. This is totally normal.
Remove your jars from the canner after about two hours of rest time. Place them on a kitchen towel and allow them to fully cool over the next 24 hours.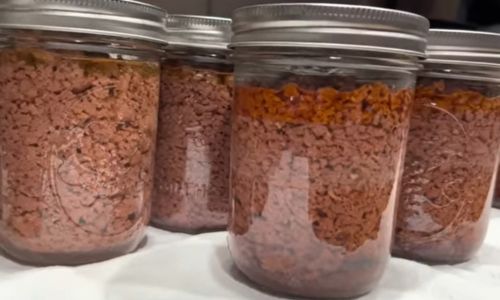
If desired, you can remove the screw rings from your cans. This does make inspection for popped lids a little easier, but I like the look of the screw rings on the lids and rarely remove them.
Keep in mind to inspect your jars as you put them on your shelves. It’s best to keep these in a root cellar. If you don’t have one, you can learn here how to build one for cheap. If you see cracks, dents, or anything to suggest that a jar may not be fully sturdy, go ahead and throw the entire thing away. It is so much better than having a jar explode on you when you go to open it up. Don’t ask us how we know that; you all already know how we do!
These jars should remain viable food for up to five years after being sealed, so long as their seal remains. There may be a small amount of fat at the top of the jar, but that’s just fine. If the fat is visible all over the inside of the jar top to bottom, we recommend using those first.
Do you have a different method than we do? Or a recipe you’d like to share? Meet us down in the comments and happy canning!
This article was first published on Self-Sufficient Projects.
You may also like:
 EMP Prevention Plan: Why Our Government Has Done Nothing
What to Do With All Your Frozen Food Once the Power Goes Out (Video)
The Upcoming US Blackout: What To Do Before It’s Too Late
Money Saving Tips From Real Survivors of the Great Depression






we have been canning hamburger for years. we still have some left since 2020 and its still good and its so convienent when in a hurry for a quick meal. when food for less has the 10lb rolls of hamburger on sale we’ll get 40lbs and can it. the local bent can store gets 40lb boxes of boneless, skinless chicken breasts for 30.00. we’ll get 1 to 2 cases and can that also. its excellent to have on hand. our canner says to can the hamburger at 10lbs for 1.5 hours but i guess canners are different. for the new people starting to can get a quality canning book and follow the instructions to the letter. botulism and a pressure cooker explosion are deadly. just saying.
The “Ball, Complete Book of Home Preserving” is a good book and has been the accepted standard for canning for decades.
Very easy to understand, which is great for beginners, and this ol’ coot still uses it.
Can meat while we can as the vegans want to strip us of our meat resources.
The bird flu is not a hoax it is a bioweapon used to bring down part of our meat supply in the poultry side. Since Biden came into office we have had millions upon millions of chickens killed because of the bird flu.
Did those farmers actually have to kill those chickens?
Is there some new technology to save those chickens stricken with the bird flu?
Don’t forget to honor the fallen heroes on Memorial Day!
This is a day to remember that some gave and some gave all so we are safe and secure. We can enjoy the beaches, sports, barbecue and friends on this day, it does not need to be a day of sorrow. But a day knowing we are Americans and freedom is not free!
We will need the courage to repel Biden’s open border illegals such as the invasion army of young military age males and females with potential to us harm.
How can i find a local bent can store, i have never heard of them ?
Our local place for that would be called Railroad Salvage.
Yep, need to add discussion regarding things that can go wrong while canning such as explosions and syphoning and prevention…safety first. Back in the 30’s commercial canning plants opened in the south, and many of the farmers slaughtered steer and took them to the plant for canning. They used tin cans, but the process was essentially the same. My father raved about the canned meat. They cut the meat up as for stew, packed the cans raw with just enough seasoned water for processing. The result was stew beef in gravy.
We grow a couple beef cattle on our small ranch, it is getting expensive to do with everything needed to support having homegrown meat for our family.
The meat industry is possible the next soft target by people who should not be here in America. California was one of the biggest states to produce beef and dairy products until the political climate made being vegan a better choice.
That might be why those Californians have crazy ideas of how we should do progressive stuff, because they don’t eat a well balanced meal.
One thing in California the LDS church use to have canning at their buildings. But California found some health law so church people and outsiders could no longer to canning of wheat grains. The church was forced to import pre-canned products from outside of California.
We are reviving our canning skills in our community here in Northern California. A farmhouse that sells pies from their canned berries and fruits made classes available. I was so happy because I been canning for years since my grandparents here used to can everything we grew on our land, and keep it in a food storage shed. Our area is very agricultural, and always has been. We are rich in history, the real old west california. The elite and city people on the coast are running california down.I feel like my red district is east Berlin sometimes, a little. But I am hoping enough people wake up and flip this whole state red. I look out on golden fields with grazing cattle and horses, orchards and rice fields,and my whole heart is in this land. Include California in your prayers for america.The valley is full of farmers, farm workers, good people.and we help feed America, we love america God bless america..Thank you for this meat canning information. I need a refresher on the pressure cooker method, since I can fruits and vegetables using the can bath method.
I have been rendering tallow and adding it to whatever meat, chili, stew, chicken soup I am canning. as it cool it moves to the top and seals the food by being on top of the liquid. I did this with carrots and green beans also. It gives you nutrition along with whatever you opened. Good deal on tallow.
Amen to that!!!
I’ve always wanted to try canning meat but was never comfortable with the idea. That said, I think I’m going to give it a try after reading this. Thanks.
You don’t have to use hamburger Folks. If you get a good sale on HB, then by all means, use it.
We look for meat sales on bottom round, chuck, mock tenders, rump, etc., and buy the whole thing, still in the bag. Trim the fat and boil it down for your liquid to add to the meat. Add spices to the strained broth if desired.
Then we cut the meat into 1 sq. inch strips long enough to fit in the quart jars. We don’t pre-cook it. Add the broth to jars of meat, with a 1/4 t of salt per jar, & pressure can, at 10#, for 90 minutes. Pressure is higher at higher altitudes, make sure you check.
We just opened an 8 year old jar last week and made hash with it. Not a thing wrong with it!
I’m noticing mine lasts far longer than what is stated in directions. Years longer.
Hamburger is my least favorite canned meats because it dries out. Skinless chicken thighs raw packed is so easy and inexpensive.
It’s my least favorite too, Lucy, but not because it dries out … it smells like and has the consistency of cat food. I still do it annually, but it won’t be what you expect as a new canner. It is softer meat. I have tried the unauthorized version of dry canning it without water, and the end product is more what you’re looking for, BUT that is rogue processing and not worth the risks!!! Please follow the federal home processing guidelines or the Ball book. Don’t try something just because some YouTube person does it! I’m guilty of that. Never again.
P.S. Lucy, I am not saying that YOU are a new canner or inexperienced. Just general statements!
Has anyone canned meat for their pets, like for cats and dogs?
We think of ourselves to can for, has any prepper had success with canned food for their pets and backyard farm animals as an option?
Boy howdy oops!
BBQed pulled pork is really good to can.
I freeze dry my ground beef. It comes out just like it did when I put it in the freeze dryer. Takes up less room than canning too.
I’d like to have a dry freezer machine, they are still expensive for us fixed income seniors to try. Have seen used ones but not sure they are worth it after being maybe misused by people selling them on ebay or other sites.
Those machines are very loud. Take up a lot of space too.
What kind of freeze dryer do you recommend? Thank you.
I do not have a pressure canner. Is there another way I can can my meat? I have heard that you can can in the oven. Is this true and if so how?
definitely do not try canning in your oven. first, canning jars are not made for that. Second, the contents of the jar must be held at 240 degrees under pressure for 90 minutes for pints and an hour and a half for quarts to kill the botulism spores. In an oven that temp will not reach the middle of the jar. Also, when canning, only crank the rings finger tight so that the air in the jar can escape. If you do it too tight the lids could buckle. After your jars cool, remove the rings. By not removing your rings, you could lose a seal and you wouldn’t know it. Bad business there for sure. I’ve been canning for many years and learned from my mistakes. Invest in a pressure canner if you want to can low acid foods like meat and most vegetables.It’s the only safe way. Happy canning, it’s well worth it
Thank you
I have canned ground beef and stew for a few years. I cook my ground beef and season the Latin way with sofrito (made from ground onion, pepper, cilantro, garlic. may add dry oregano). I may or not add tomato sauce. This makes a basic mix for me. at time of using I can add pasta sauce (for pasta), Mexican seasoning (for tacos or burritos, even chili)or just use as is for shepherds pie. I also season my stew meat, then at eating time I just add carrots and potatoes. While not exactly as fresh made, it is good and provides a quick healthy meal. Lucy
Today Tuesday 5/28/2024 The comment section is closed?
This has happened a few times lately, why?
I am talking about Tuesday’s article the post is there, not the comment section.
What kind of a dummy would do a negative thumbs down on that comment?
This website has strange rules and shuts down on Wednesday for new posting.
Can the ground beef be canned without cooking it first? It seems as though it would cook in the canner and then the finished product wouldn’t be so mushy.
I have been canning various meat for fifteen years. If you simply put raw hamburger in a jar to can it, you will have a dense (think dry meatloaf) chunk of protein in the jar.
I will not eat any low acid foods canned by a relative after discovering that they oven can everything
Do not attempt shortcuts in canning meat or vegetables. Use a pressure canner and follow approve guides for canning times and pressure. Nothing is gained if you run the risk of at least a bad seal or worst case botulism.