A shelter that can protect you from the elements and provide warmth is vital in any survival situation.
Understanding how to build primitive shelters can give you peace of mind to focus on other survival needs and potentially prepare yourself for any disaster or evacuation.
This article will explore several primitive ways to build a shelter and the techniques used to construct them.
I will also discuss the benefits of different types of shelters and provide step-by-step instructions on making them. So if you are ready to learn the basics of primitive shelter building, read on!
Construct A Debris Hut
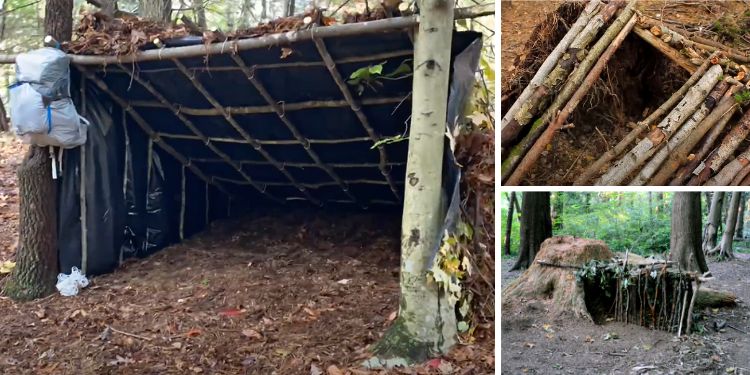
 Constructing a debris hut is an easy and effective way to create a shelter using only natural materials.
By collecting sticks, leaves, and other resources from your surroundings, you can make this type of structure that offers reliable protection from the elements.
Related: Waterproof Socks – One Step Further In Terms of Outdoors Living
By building your debris hut properly, you can use the heat generated by your body to maintain a comfortable temperature between 96°F (37°C) and 100°F (38°C). This type of shelter is perfect for regions with mild climates, shielding occupants from wind and snow.
Soldiers, mountain climbers, and survivalists have used debris huts for centuries as a quick shelter solution. As long as you can find the right materials in your environment, constructing a debris hut is a viable option in any situation.
To make a debris hut, you will need the following:
- Sticks and branches for structure
- Leaves, bark, and grass for insulation
- Pine needles and moss to provide extra warmth
- Rocks or logs to hold the structure together
How To Construct A Debris Shelter
 1. Collect many sticks and branches, ensuring they are long enough to form the framework of your shelter. You will need at least 4 feet (1.2 m) of debris to make a decent shelter.
2. Place one stick horizontally against a tree or stable object as the roof ridge pole.
3. Connect two other sticks to either side of the ridge pole, using rocks or logs as anchors. This will form the triangular shape of your shelter.
4. Add extra sticks along the sides, connecting them to the ridge pole and anchors. This will give your shelter more stability and support.
5. Create an insulation layer around the structure. Use leaves, bark, and grass to form a barrier between you and the cold ground.
6. Add extra insulation by stuffing pine needles and moss between the sticks.
7. Place rocks or logs around the edges of your shelter to keep it secure.
8. Leave an opening for your shelter if desired. Cover it with a blanket or tarp to keep the warmth in and wind out.
Build A Lean-To
A lean-to shelter is an excellent overnight camping option in nature. It offers protection from any strong winds or rain that may come along, as the open side is typically oriented away from those elements.

While it may not offer the comfort of a fully enclosed shelter, a lean-to can serve its purpose perfectly well and often doesn’t require abundant materials to construct.
Because of this, it is easily assembled with logs or other raw materials found within your immediate area.
A bit of work here and there could make for quite a comfortable abode when out in nature for extended periods.
Here is what you will need to build a Lean-To:
- 2-3 Sturdy logs for the frame
- Rope or natural fiber for tying the logs together
- A tarp or poncho to cover the frame
How To Construct A Lean-To Shelter
 1. Gather 2 or 3 logs for the frame and place them on the ground in a “V” shape.
2. Secure the logs together with rope or plant fiber.
3. Raise the frame, so it stands upright, making sure the open side faces away from any strong winds or rain.
4. Place a tarp or poncho over the frame to form the roof of your shelter.
5. If desired, add another layer of tarp or even a blanket for extra insulation.
6. You can also add leaves and grass for additional insulation and an extra layer of protection from the elements.
7. Once you have completed the shelter, test it and adjust accordingly if needed.
Build A Wickiup Shelter
A Wickiup is a type of shelter consisting of a frame of sticks and branches, which are then covered with vegetation, canvas, tarps, or other materials.
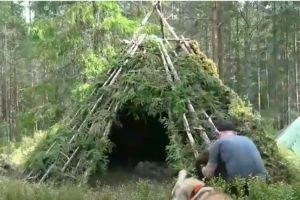
They are perfect for surviving in the wild as they provide good protection from the sun and rain and offer good ventilation.
Constructing a Wickiup shelter requires some work and preparation, as it is typically built by foraging for materials available in the area and weaving them together.
Related: Emergency Shelters When You Are On The Move
However, a wikiup is an excellent option for anyone looking for a more permanent shelter that can accommodate a small group of people.
To construct a wikiup shelter, here’s what you’ll need:
- Sticks and branches for the frame
- Canvas, tarps, or natural vegetation to cover the frame
- Twine or natural fiber to bind the structure for tying the sticks and branches together
How To Construct A Wickiup Shelter
 `1. Begin by foraging for sticks and branches of varying lengths. Make sure to collect at least 15-20 sticks for the frame of your shelter.
2. Arrange the sticks into a circle, using at least 4-5 longer logs for support.
3. Secure the frame together with rope.
4. Weave the remaining sticks and branches into the frame, crossing them as you go to make them strong and stable.
5. Once the frame is complete, cover it with canvas, tarps, or natural vegetation such as leaves and grass, making sure to tie them tightly together at the bottom.
6. If needed, add extra insulation from the elements by adding more leaves and bark inside the shelter. However, this is not the only way to use bark. Learn here how to make bark bread from one of the most common trees in America.
7. Test your Wickiup shelter before using it and adjust accordingly if needed.
Assemble A Tree Root Shelter
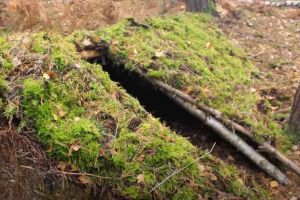 Tree root shelters offer an efficient and versatile camp method without investing much energy and resources.
Constructed by digging out the area around tree roots and leveraging their structural support, these shelters can provide dependable protection from the elements.
Tree root shelters are an excellent option for those who need adequate shelter with limited tools or supplies. They can also be used as a temporary refuge during times of emergency due to their open access entry point.
If you find a tree that has fallen in the area, it can be used as a tree root shelter by excavating the roots sticking out of the ground. It can provide extra insulation from the elements. This shelter is also suitable for use in areas with high moisture levels.
To assemble a tree root shelter, here’s what you’ll need:
- A tree with roots sticking up from the ground
- Shovel or your hands for excavating
- Sticks and branches for support
- Leaves and grass for insulation
How To Construct A Tree Root Shelter
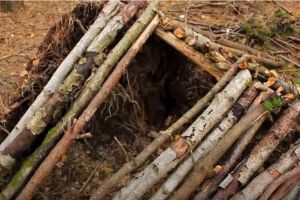 1. Look for a tree with exposed roots that can be used as the shelter’s foundation.
2. Excavate the area around the roots to make room for your shelter.
3. To make it easier to access, create an entrance by digging a trench from the tree roots to the outside of the shelter.
4. To provide extra support and stability, use sticks and branches to form a frame around the base of the roots. This will help give the structure additional strength and insulation.
5. Cover the shelter with a thick layer of leaves and grass, making sure to plug any holes or gaps that may let in wet weather. Leaves and grass also make excellent camouflage and can help you blend into the environment.
6. To provide extra insulation from colder temperatures, add a layer of foliage or dirt around the outside of the shelter.
Make A Salish Subterranean Shelter
Originating in Pacific tribal cultures from Alaska to modern-day California, the Salish Subterranean Shelter provided protection and comfort for ancient inhabitants.
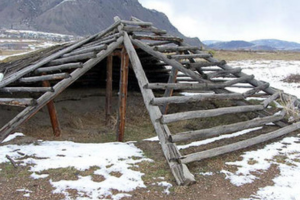
As its name implies, this shelter is constructed by digging a pit into the ground, then covered with a roof.
Despite being an ancient concept, the Salish Subterranean shelter is still suitable for modern-day use. It provides better protection from the elements than above-ground shelters.
By digging the pit into the ground, you can create a stable shelter well insulated from the elements and act as an effective fire pit for warmth. This type of shelter works best in shallow topsoil areas, making digging the hole easier.
To build a Salish Subterranean Shelter, here’s what you’ll need:
- A shovel
- Tree branches and logs for the roof
- Leaves and grass to cover the roof
How To Construct A Salish Subterranean Shelter
1. Select a site for your shelter, making sure to avoid any areas prone to flooding.
2. Begin digging the pit, making it approximately 2-3 feet (60 to 90 cm) deep and 6-7 feet (1.8 to 2 m) in diameter.
3. As you are digging, use logs and sticks to form a shelter roof, ensuring it is well supported.
4. Leave a hole in the middle of the roof for ventilation and to allow smoke to escape if you have a fire inside.
5. After digging, cover the roof with a thick layer of leaves and grass to provide extra protection from the elements.
6. Dig a small fire pit in the middle of the shelter, lining it with stones.
7. If desired, add extra insulation from the elements by covering the pit with a tarp or canvas.
In the face of a survival situation, it pays to know how to quickly build effective and efficient shelters. Knowing what materials are available in your environment and having the skills to utilize them can mean the difference between surviving a trying situation and succumbing to it.
By equipping yourself with the knowledge of different primitive shelters and how to construct them, you can increase your chances of survival and ensure you have a dependable refuge in times of emergency.
You may also like:
 Meal In A Jar Recipes You Need To Prep While You Can Still Afford It
The EMP Proof Shelter You Need For The Upcoming Crisis (Video)
Money Saving Tips From Real Survivors Of The Great Depression



Those of us living in desert sagebrush country have no real trees to build shelters, you omitted our region so I say what do you have for us.
The Wickiup was a common desert shelter for indigenous people in N.America.
How about using rocks to build a shelter and using brush material to fill the gaps or burrowing into the side of a hill?
Saguaro ribs are long, strong, and resilient. I think the Apaches may have used them for the skeleton of the wickiup and interwove branches from creosote bushes.
Dig a hole and use a tarp over the top.
For long term, import some pressure treated lumber and plywood, waterproof it, and cover with sand.
For strictly primitive, dig a hole, and pile sagebrush in a igloo-shaped dome. They will all interlock and support each other. Then you just have to thicken it up with multiple layers.
Got rock? I live in the desert region of Utah. Trust me, if you have an innovative spark, you’ll find a way. As I said, “got rock?”. That’s what our forefathers made their houses of.
Sorry that you live in an area that does not have the trees and large brush.
Seems to me that you will need to look at your surroundings and make that choice to what you can use to build what it is that you wish to build.
Sounds like you need to bring in some foreign materials to help with your project.
Center blokes and plywood or 2 by 4s, sack create, maybe need to use steel if you live in a sandy area that has no ground structure.
You can also look though the site at the articles and see if there is something that may help.
stay sharp
Living in the South West, the material options are more limited to build a shelter. Usually the survival articles are based more of the forested regions where preppers have a better selection of building materials. Like the Midwest, the desert is a different animal to contend with for shelter.
Try to explore, see what the Native Americans used in their regions to give a better idea.
I’m thinking some of these would make good animal shelters in my woods. Pigs, goats, sheep. I like the idea of the Salish shelter because it would be cool shelter in the summer, since it’s underground. Plus, it’d be cheaper than building a run-in shelter with store-bought lumber
Blast from the Past: when I was growing up in Alaska (really, my family lived in Eagle River Alaska, until I was Ten) We actually watched a movie in school about a young Athabaskan man building a Salish House for his soon to be wife. We were so fascinated about the story, we tried to build a version of the shelter using packed snow walls and salvaged logs. Our Principal was so impressed with our efforts he took a photo, which was later published in the school newsletter. Unfortunately, I never saved a copy of the photo.
These are all great, if you live where there are plenty of trees , sticks, branches and natural vegetation. What do you do when you live in a desert?
Most, if not all, the survival information I’ve run across, never seem to address surviving in deserts.
Does anyone have suggestions on that kind of specific situations?
Everything I’ve read on desert survival is slim pickings.
1.shade – do what you can to be in it during the day. Create shade if it doesn’t exist by using poles and tarps, guy lines etcetera. Travel if you must during late evening and early morning hours, if not at night. A hat is personal shade.
2. hydration – extra extra important. Stockpile water and have the means to make “solar stills” to try to get some moisture out of the air.
3. danger of death due to sunstroke, heatstroke, heat exhaustion increases. Staying hydrated helps a lot – even young people can die of heart failure if they are not hydrated well. Sunburn is also a risk. Use high-SPF sunscreen, or mud. Use sunglasses, hats, and light but sun-blocking fabrics.
4. Wildlife can maim or kill you. Snakes and scorpions may seek your body heat during cool nights – will crawl into or under your sleeping bag or your boots – always check before entering/exiting/moving to be safe.
5. Areas belowground are usually cooler than the surface. Deeper is cooler.
6. Think Tatooine – Star Wars. What did Uncle Owen and Aunt Beru do to survive? cool underground (mainly) dwellings with condensers to pull moisture out of the air, plus loose-fitting and airy clothing.
7. Think the Australian desert – Mad Max: Road Warrior and Beyond Thunderdome & parts of Crocodile Dundee. Hats, effective modes of dress, and *Dinki-Di* dog food, to name a few. Water was obviously a precious commodity.
8. Thinking “what would I do if…” beforehand, is a good friend and ally, and the precursor to any useful prepping activity.