A Google search for ‘survival kit’ yields over two billion results. You can purchase a survival kit for almost any scenario or environment.
However, these kits are often in bags or other containers that are not particularly useful in a survival situation. A DIY Survival Jar is a comprehensive survival kit that you tailor to your specific needs and place inside a container that can hold water.
The reason that you want to place survival gear inside a vessel that can hold water is that water is the one element that we will perish without after as few as three days.
Therefore, if you had to rely solely on a survival kit in a life or death situation, not having a way to carry and store water becomes a serious problem.
Why Build a DIY Survival Jar?
There are so many different ways to put together a survival kit and a wide range of bags and containers that you can use to house them.
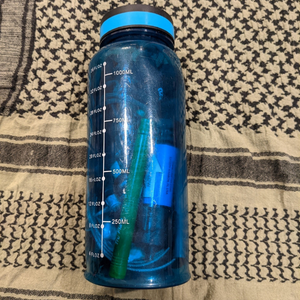 The advantage to using a water bottle, pot or cup to hold your survival kit is that you also get a usable container that so many other survival kits lack. Another advantage is that the cylindrical shape slides into backpacks and gear bags easily without taking up too much room.
In many cases, you will find that you can slide a one-liter water bottle in amongst the various bags and pouches of your bug-out bags without even noticing it is there.
Related: 11 Items You Shouldn’t Have in your Bug-Out Bag
Constructing a waterproof container from natural materials is very difficult. While it is a skill that is very valuable to have, you should never rely on skills like this in a survival scenario.
It will always be better to have a water container with you than to try to improvise when the chips are down.
It should be noted that a DIY Survival Jar is intended to be a last resort kit rather than part of the equipment you use daily. A kit like this is intended to provide the bare essentials until you can either self-rescue or get rescued.
Container Selection
Because the container that this survival kit is housed in is vital, you’ll want to select an appropriate vessel to improve your survivability. 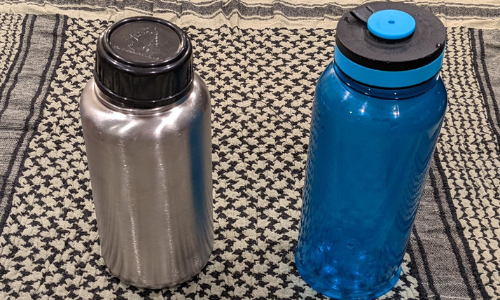
Personally, I like to carry stainless steel water bottles because they can be placed over a fire to boil water. This allows you to render water safe to drink without requiring chemicals or filters.
Related: How to Build a Water Purification System in 10 Minutes
Another option is a metal cup with a lid that you can secure. This will also give you the ability to boil water while providing a sturdy container to hold the contents of your survival kit.
Suppose you plan on packing methods of filtering water. In that case, a plastic water bottle will suffice as a container to hold your survival kit.
One major disadvantage of this, aside from not being able to place over a fire, is that plastic bottles are more prone to breaking than their metal counterparts.
Many titanium options on the market offer significant weight savings over stainless steel but have the disadvantage of being far more expensive.
Key Components of the DIY Survival Jar
Regardless of what environment you are tailoring your survival jar for, you should consider the survival rule of threes when gathering the contents.
The Survival Rule of Threes is:
- Three hours without shelter in bad weather
- Three days without water
- Three weeks without food
Using this as a guideline, we want to prioritize items that will allow us to build shelter first, then items to render water safe to drink, and lastly, things that will help us gather food.
You should also place items inside the survival jar so that the shelter and water items are at the top and easily accessible.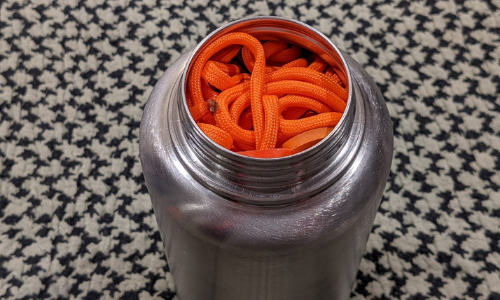
We also need to keep in mind the size of the bottle and how easy it will be to remove items from the survival jar when required. When you need to use this kit in a survival scenario, you may not have the fine motor skills to fish small items out of the bottle.
Other Items to Consider
You may want to include items to help you navigate, such as a map and compass, and some first aid items as well.
Unfortunately, there will not be too much free space to hold a wide range of first aid items.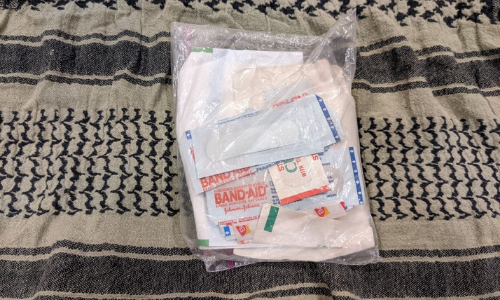
Gauze and bandaids, antibiotic ointment and some over-the-counter medication like ibuprofen, Aspirin, Imodium, Tylenol and an antihistamine are good to include.
In addition, any prescription medications you are required to take should be included. The key here is to keep these first aid kits as small as possible.
My DIY Survival Jar
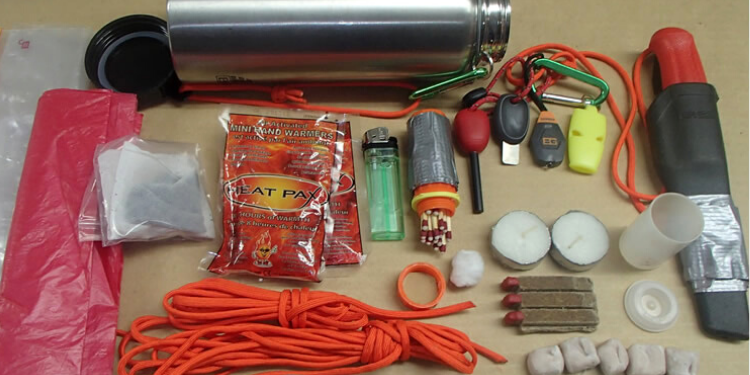
For my personal DIY Survival Jar, I chose a stainless steel water bottle as the container for the kit.
I designed this kit or a wilderness environment to allow someone to build a shelter, purify water, gather food, and signal for rescue.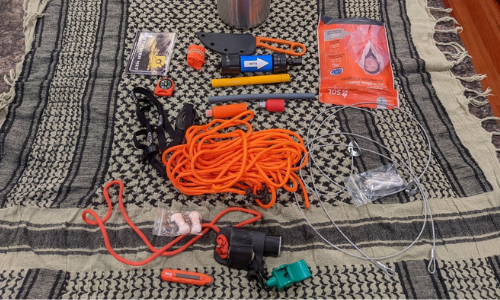
I chose not to include any first aid items because I prefer to use dedicated first aid kits rather than put first aid supplies in survival kits.
Shelter
I kept my shelter kit very simple. With these items, one could set up a ridgeline from which any number of shelters can be set up using the emergency blanket as a tarp.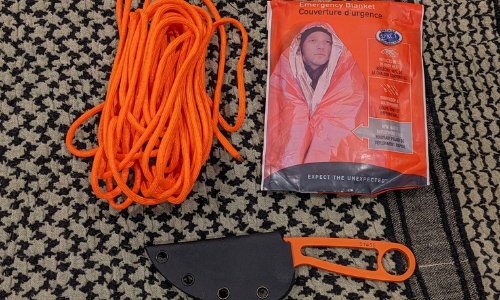
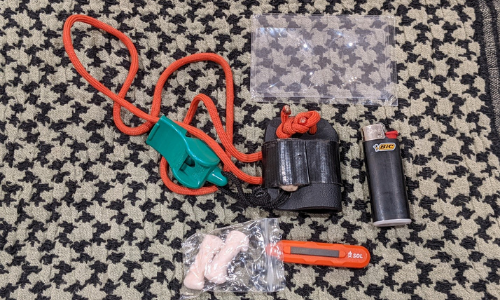
The fire kit includes some tinder, a Fresnel lens, a BIC lighter, and a spark lighter. This is more than enough to get a fire going in various conditions.
- Emergency blanket
- Paracord
- Small knife
- Fire Kit
Water
I am not a fan of chemically treated water, so I included a water filter that can be used as a straw to drink water directly from the source.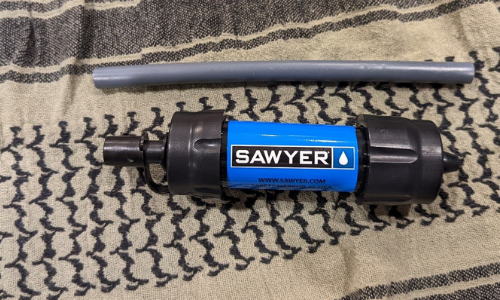
Or the water bottle can be used to hold dirty water, and the filter can be used to drink from the bottle.
Food
Food procurement is last on the priority list for short-term survival. Still, a small fishing kit and a few snares can lead to a quick meal if deployed correctly.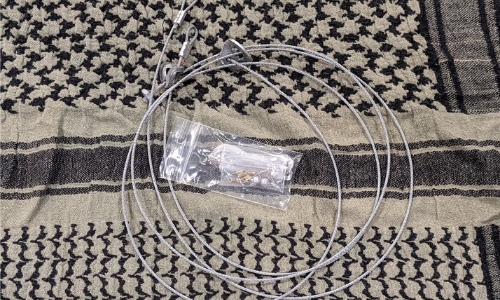
Signaling
Getting rescued is the goal of any survival situation.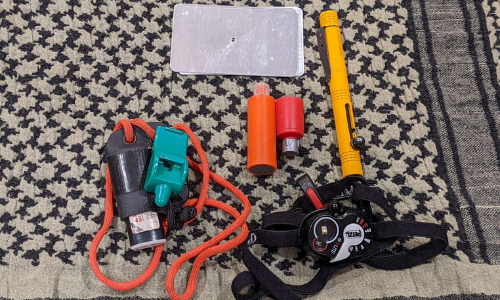
I have included several items that will make signaling for help easier.
- Pen Flares
- Signal Mirror
- Whistle
- Headlamp
- Flagging Tape
Even though you can purchase survival kits from any of the hundreds of online retailers, you will build a better, more complete kit if you do it yourself.
You will also have the satisfaction of successfully taking your survivability into your own hands.
You may also like:
 5 Delicious Recipes Made with Ingredients that Last 100 Years
Do You Make These Fatal Mistakes In A Crisis? (Video)
Why People Will Happily Line Up to be Microchipped Like Dogs



For myself – only purpose I could see for something like this is a checked bag inclusion for plane travel >>> a mini-BOB for the rental car daily travel ….
Probably would modify the content to be less “emergency” and more long distance GHB >> enhance the food procurement – first aid – add a mini compass – ect ect
Debating between the metal water bottle and a Coleman type wide mouth thermos – rig it for shoulder strap carry – would be durable as hell …..
Yes good article.
Have something like it all ready. put up.
The title got me. the jar part. Maybe a, Survival Container would be more better to say.
Thanks, it dose remind me to add more to them. Now that I have read this.
I love the stainless bottle as an option for boiling water. These can be placed in your vehicles as a minimalist option. They would also make great cache items.
I have made these for years for friends going out on service missions. I used a bottle bag which would hold the contents of the bottle when it came time to collect water. It is amazing how much you can actually fit in a 1 quart bottle! Great article!
I now use a larger bottle bag that has a storage pouch on the side.
Great read! Thanks for sharing this info. I have many of the items already, but not packed in a jar/bottle. I love the stainless steel option.
Water bottle survival kit:
I really like this idea. Though, of course, me being me, I would do it somewhat differently. The basic items are similar and accomplish the same tasks. However, I carry the kit in a water bottle pouch which has a small side pouch. This pouch does add some bulk and a little weight to the kit, but it can still go into many of the same packs and kits that the bottle by itself would. It gives a great deal of additional capability with the additional items that can be carried. With the sling attached to the pouch the kit can be carried independently if the rest of the gear must be cached. And since the pouch is MOLLE compatible it can be mounted on a belt if that works better for the situation
1) Container: Kleen Kanteen stainless steel 40oz wide-mouth single wall bottle w/folding D-ring cap
2) Shelter: SOL XL Survival blanket
3) Cordage: 50’ #18 bank line
4) Sharps: Cold Steel Mini-Leatherneck Clip point
5) Spark catcher fire tinder: Tube of Lightning Strike Napalm tinder
6) Intermediate fire tinder: 10x large-match size sticks fatwood, wrapped in tack cloth in small zip-lock bag
7) Fire starter #1: MK windproof Jet lighter
8) Fire starter #2: Brass Spark-lite wheel striker
9) Fire starter #3: 8x Zippo Typhoon Matches with striker pad wrapped in Gorilla tape
10) Fire starter #4: Pocket 4x-power Fresnel lens
11) Water purification: Aqua-Pouch Plus water purification kit
12) Water storage/carry: 3-pack 1-qt emergency water bag
13) Food procurement #1: Set of stainless steel survival wallet cards for fishing, hunting, hatchet, tools, medical
14) Food procurement #2: Flat kite string winder with 25-yards 30’ Spiderwire Stealth braid fishing line
15) Food procurement #3: Geocache tube with swivels, snaps, etc.
16) Food procurement #4: 20’ stainless steel snare wire
17) Signaling #1: Aluminum tube whistle
18) Signaling #2: Tru-Flare Pen Flare w/6 red flares (or similar)
19) Signaling #3: Small signal mirror
20) Signaling #4: Petzl TacTikka +RGB
Extra Items:
Survival Resources 10” x 4” Water bottle pouch w/sling
Pathfinder 25oz stainless steel folding handle graduated cup w/lid
Olicamp 16oz stainless steel folding handle graduated cup w/lid
Self-reliance outfitters SS water bottle stove
Self-reliance outfitters SS water bottle hanger
2x SS Sporks
2x Telescoping SS straw
4x PryoPac Gel fuel packets
2-oz screw top tin to hold gel fuel
2x Light My Fire Grandpa’s Fire Forks
This is one of three water bottle pouch kits I use.
Another one is the field water purification module of my modular kit system and the third one is the field water & cooking module of my modular kit system.
Water purification Module:
Self-reliance 4”x10” water bottle carrier
Go Berkey single black element stainless steel purifier w/primer
Survival Resources pre-filter support sheath & coffee filters
Katadyn Micro-Pur MP-1 foil pack chlorine dioxide tablets
3x 1-quart water bags
Scotch Brite scrubber (1/2 of one to clean element) (get at a grocery store)
Self-reliance 4”x10” water bottle carrier
Water & Cooking Module:
Self-reliance 4”x10” water bottle carrier
40 ounce stainless steel Kleen Kanteen w/fold down ring top
Pathfinder 25-ounce folding handle graduated cup w/lid
Olicamp 16oz stainless steel folding handle graduated cup w/lid
Self-reliance outfitters SS water bottle stove
Self-reliance outfitters SS water bottle hanger
2x SS Sporks
2x SS telescoping straws
Survival Resources pre-filter support sheath & coffee filters
Katadyn Micro-Pur MP-1 foil pack chlorine dioxide tablets
4x PryoPac Gel fuel
2-oz screw top tin to hold gel fuel
2x Light My Fire Grandpa’s Fire Fork
MK windproof Jet lighter
Just my opinion.
Jerry, I like your detailed post, including starting with the single-wall stainless steel bottle. The article said, “I like to carry stainless steel water bottles because they can be placed over a fire to boil water.” but should have clarified to only use a single wall stainless steel container on a fire because a double wall may burst from the heat causing the air between the layers to expand to extreme pressures.
@Jerry D Young:
I think the whole idea was for a SMALL survival pack, one that can be actually carried by hand if necessary. your list is for a more detailed pack that would fit in a vehicle or closet or by the door in case of emergency. Your list is not one that would fit the category of the title of the post, but good for the other packs mentioned.
To me, putting your stuff in a bottle that you will subsequently be using to carry/boil your water begs the question, where will you put the stuff that was in the bottle to start?
I think that it’s great for a grab and go emergency kit, but I would add some sort of foldable bag to carry the stuff in afterwards, or just go with a bigger kit and put the bottle in separate. That way, you can fill the bottle at the earliest opportunity (like from your stash before you bug out) and still have access to the other items. But that’s just me.
Keep in mind to use a SINGLE WALLED stainless steel bottle. If you use a double wall insulated one, it could explode when placed on the fire….. then You’ll need the first aid kit.
Hey Calude: I got your book “The lost ways” and ended up getting a cheap Black and white knock off that looked like it came from a self published seller. The book you sell has color pics right, then why when I ordered your book did I get the knock off?
I also got a cheaper knock off version in black and white. I have tried multiple times to contact seller to no avail??? What’s up with the bait and switch 🙁
The shoddy book could get someone hurt with the poor photos of plants. Really need nice clear color plates. I have been trying to get an answer for 2 years.
I like this idea a lot it and appreciate the comments about modifications. Having a second water container empty along with one filled would also provide more options without taking up loads of space.
ANY item that requires batteries will need to have them OUT of the device for storage. Over time the batteries will leak, destroying the device. Anything in long term storage must be periodically refreshed. Medicine, food, etc. will not last much more than a year.
YOU DON’T GET TO LIVE 3 DAYS WITHOUT WATER; ONLY TWO DAYS (BECAUSE ON YOUR THIRD DAY YOU ARE IN A COMA)–and that is not “living”; and more likely than not, you will be very difficult to revive if someone finds you and tries to rehydrate you (that is not living well either) on your third day. The reason why you only get two days of “living” (that always implies ‘being able to function” is because the human body must “modify-transform” drinking water into a jell-water that the body uses to hydrate cells; AND IT TAKES ABOUT 12-HOURS TO COMPLETE THAT MEDICAL-HEALTH-VITALITY TASK! So with every sip of water you take, your are essentially drinking for “12-hours from now” (this is like saying, ‘drink today for being able to wake up hydrated tomorrow’ ).
Look at trees and bushes. When they dry out, the first thing these living things do is (1) Drop leaves; and (2) permit some of their extremities (branches) to die. The human body does that also. Lips chap, break open, and bleed. The body conserves any remaining functional water for the “mid-section” (all the vital organs), and with the result that the body pulls water from the extremities and allows them to “cramp up and die” (unless you hydrated these limbs 12 hours earlier). Any part of the body that is dying is closer to death than “living”. So, to say “you can live for 3 days without water is fraudulent BS”. You can live tomorrow with water today. The only people who potentially can survive 3 days are those in the best physical shape (whose blood vessels are enlarged, therefore holding more water). If you want the most survival time, drink when you are thirsty because you will be hydrating yourself for approximately 12 hours from now, giving you the best possible chance to find water (or reach water) in those approaching 12 hours (you certainly cannot do that if both legs are cramping or you are unconscious and in a coma).
My opinion is that for most Preppers this means that you are (or will soon enough be) forced to “stay near water” (creeks, streams, rivers, lakes, ponds, swamps, etc.)–and those will be the more dangerous “people” places.
All mammals go for water, usually during early morning Twilight. There are 3 Twilights, each lasting about 21-minutes. Astronomical Twilight is when ONLY the Eastern horizon gets a hue or tint/hint of day-light. Nautical Twilight is when the Western horizon gets its hue or tint (barely visible) of morning coming day-light. Civil Twilight is when the all the sky starts brightening up (but the sun has not risen). Shadows will still be dark in early Civil Twilight. Sunrise and day time is when shadows seem to disappear (that is, you can see if something is lurking there).
The racoons that scrounge trash cans in my town start heading back to the street rain-gutters at the end of Astronautical Twilight (traveling during Nautical Twilight) when it is still very dark (before the 20 minute Civil Twilight). Trout in creeks “wake up” during Astronautical Twilight and inspect their water during Nautical Twilight, and begin eating during Civil Twilight before sunrise. Does anyone think that is not important to know? It is very hard to hunt, trap or fish in total darkness (though many a hunter and fisher goes to their places in total darkness and remains silent until the fish start biting and the animals start moving. “There is a time and a place for everything under the heavens.” Nature knows when it is time to wake up (do your chores for water and food) and go to bed (stay out of sight). Yes, technology exists to see warm-blooded animals at night (but it requires a working battery and they are fatal). When the last battery goes dead, you will be reliant upon Twilights and lousy weather that masks your presence and the noise you make. Why does the Rooster sing out when it is still dark outside? His eyes see the hint of approaching morning with the Astronomical (east horizon sky) showing a hint of light (that will last 23 minutes). Every consecutive day of the week, the time for these twilights changes by 1-2 minutes, waking earlier in Spring and later in the Fall.
All nature’s animals avoid people like “the plague”. Preppers need to do that also by getting their water and meat near the start of Astronomical (east horizon) Twilight; because in day time you will be seen and possibly hunted. Boiling the water is best done during daytime (when the wind picks up diffusing smoke, and when daylight hides campfire light. Go online to Weather sites to get the times for Astronomical, Nautical, and Civil Twilights in your area.
By mid-summer the Twilights will begin close to 3am, so you will be sleeping near dark-time (when it is safest to sleep).
Plastic water bottles are good for carrying “dirty” water that will likely make you sick if you drink it.
Radar again. I forgot to mention Winter (in the north), when water freezes and animals hibernate. Well, I don’t really want to talk about this. Yes, ice/snow can be melted (day times), but you still have to shave or chop ice (and need a tool for that). It takes a lot of snow to melt into little bits of water; and evaporation of water lessens what you get.
If I had to be out a full year, I’d be doing what the Indians did–migrate to warmer climates in Fall (for winter), and following waterways. Topo Maps would be a critical need as they show where the likelihood of SEEPS (underground water) are, and streams, and hilly areas where one is less likely to be seen from a distance when getting one’s survival needs met. You also need that topo map to plan the best way around a huge city (if you decide to avoid it). A SEEP is a place with a lot of moisture in ground, where when you dig a deep hole muddy water pools at the bottom of it. Time Taken: (1) Find potential Seep; (2) Dig deep hole; (3) gather muddy water; (4) filter mud out of water; (5) Boil Water; (6) contain water; (7) Do it again for every container you have. Time spent when you may get no water from first hole? 1/2 a day, full day. Plan on it if you are not near a water source.
Also with water, it is best to designate certain stainless bottles for DRINKING ONLY, and other containers for hauling dirty water only, because most hazardous virus, bacteria, parasites, fungi and toxins will be found on the “lips” of the containers you are using. If you have two identical containers (one for dirty water, one for drinking water), mark up one as your “drinking water” so you don’t get confused. When one adds “sickness + throw up time” to survival needs–this is a serious problem. Plan correctly to do it correctly.
My opinion about overland hiking and living off the land is that one will travel between 5-10 miles a day (in half of the awake-day; therefore 1/4 of ones’ 24-hour day is hike time); with the other half-daytime day just doing “life-safe-drink-eat” time. Yes, one may be able to forage for weeds-food/water; but it can take a lot of time to set up shelter daily, then find water, then boil, then “keep gear ready to go”. As terrain changes (and it does regularly) more time is spent searching for needs. Again this is why a topo map is a critical-carry item. It keeps you away from your greatest hazard (people) and lets you conserve your energy by going to the most likely places that will provide you with needed resources.
My throat is not strong so I often have to use warm water, especially in winter, a thermos like this is definitely the perfect choice for me.
I like the idea of this, never thought of it before. Again, thanks to those that advised on single-walled stainless containers—that’s good advice.