The ability to propagate plants from cuttings is a valuable skill, especially if seeds are scarce. It is an easy task to master and only take time and a little attention to produce a whole new generation of plants for your garden. If you have never tried reproducing plants from cuttings, learn the skill now, you may need it someday.
There are advantages to reproducing plants by cuttings, as well. Seeds do not always produce a plant that is as prolific as its parent, especially in the case of hybrids. We know to grow heirloom plants because second generation hybrid plant seeds are not dependable and most often do not produce a strong plant. But, when you grow a plant from a cutting, it will be genetically identical to the parent plant. Propagation by cuttings also saves you the time required for seeds to be formed and germinate. In many cases, the cuttings will mature faster and produce fruit earlier than seedlings.
Another advantage is the ability to extend your garden further into the fall. Mid-summer, when your plants are healthy, take cuttings to produce new plants. A few weeks later, as the original plants are dying back from the heat, you will have new plants to replace them and continue producing.
Choosing the Mother Plant
Probably the most important step in the entire process is choosing the mother plant. Your new plants will be genetically identical to the mother, so choose the best plant possible. You want a plant that is healthy, grows well, and produces well. For example, if you have one tomato plant that out-produces all the others, that is the plant to choose, as long as it is still healthy. If you choose a sickly plant that gave you only one tomato, don’t expect the cuttings to do any better. You could even spread disease if your plant is infected.
Ideally, choose new growth from a plant that is healthy and thriving. If there are flowers or fruit, remove them. You want your cutting to put energy into growing roots, not producing fruit. For this reason, I also avoid fertilizing the plant before I take my cuttings and I do not fertilize the new cutting until it is well established. Too much nitrogen will make the cutting focus on growing more leaves and ignore the roots. If it is temporarily short of nutrients, it will grow roots in an effort to acquire them.
One warning: Some hybrid plants are covered by patents and it is illegal to propagate them by cuttings. Before taking cuttings, make sure you have the right to do so, especially if the mother plant is a new hybrid variety that could be patented.
The Rooting Medium
Your rooting medium should be sterile and low in fertility. It should hold water well, but be well-drained enough to provide aeration. Many gardeners use a mixture of one-part peat and one-part perlite or sand. I prefer to use straight sand because it holds moisture well and it has enough structure to support the plant. You don’t want the sand soggy, just damp.
Four Types of Cuttings
There are four different types of plants that can be reproduced by cuttings: herbaceous, softwood, semi-hardwood, and hardwood. There are multiple ways of reproducing each, but I am going to teach you the way that I learned in horticulture class many years ago. It is reliable with most plants.
Related: If You Find This in Your Garden, Burn It Immediately
Herbaceous and Semi-Hardwood Plants
Herbaceous and semi-hardwood plants include a long list of vegetables and flowers. You have probably noticed that I am listing fruits and vegetables, not ornamentals. My gardening has always been focused on edible plants, however many ornamental plants work with these methods also, so don’t let my bias stop you. Here are some of the plants that can be propagated using the herbaceous plant cutting method.
- Basil
- Bok Choy (use root end)
- Curry
- Lavender
- Lemon balm
- Lemon Verbena
- Marjoram
- Mints
- Oregano
- Parsley
- Peppers
- Rosemary
- Sage
- Salvia
- Savory
- Stevia
- Tarragon
- Thyme
- Tomatoes
- True Hyssop
- Watercress
Stem and Branch Cutting from Herbaceous Plants and Soft-Wood Plants
Herbaceous plants are non-woody plants. In my opinion, these are the easiest and fastest to root. Soft-wood cuttings are also easy to root and perform well. I’ll be listing some plants here that I have rooted this way or that I know to work well. However, plants not listed might grow equally well. It doesn’t take much effort to give it a try.
Related: 24 Lost Gardening Tips from 100 Years Ago
I recommend taking more cuttings than you need. Some will root better than others, and some may not root at all. You can always give away plants if they all take root. Here is how to do it:
Rooting Herbaceous and Soft-Wood Plants
#1. Stem cuttings or branch cuttings are the easiest cuttings to propagate. I recommend taking the cuttings in the morning when the plant is fresh and fully turgid. Use a sharp knife or pruning shears to cut a stem off at the stalk or just below new leaves. You can root a piece as small as 2-inches or less, but I prefer to use 4 to 6-inch pieces. Terminal stems are best, however, a long stem can be cut into multiple pieces.
#2. Remove the leaves from the bottom third to half of the stem. Place the stem in water or wrap it in wet paper towels and place it in a plastic bag. Keep the cuttings cool until ready to use.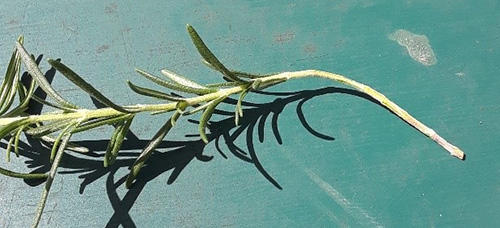 #3. Fill a small paper cup or other container with moist sand or rooting medium. Use a thin stick or a pencil to poke a hole in the center of the sand.
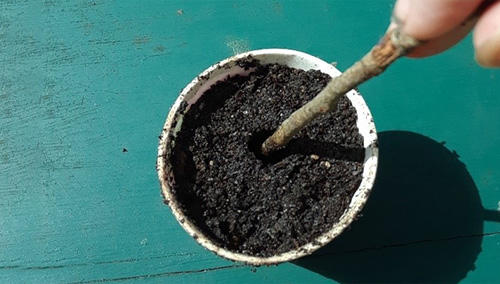 #4. Place a small amount of rooting hormone onto a paper plate or other shallow container. Roll the bare end on the cutting into the rooting hormone. If the stem is damp (it should be), the rooting hormone will stick to the end.
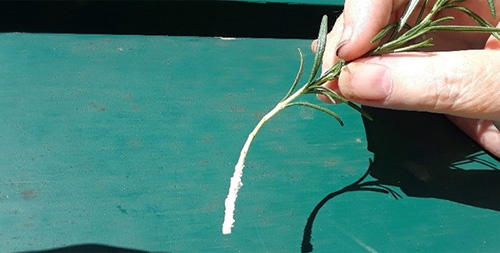 #5. Stick the hormone coated end into the hole in your rooting medium and press in around the cutting to support it. If you try to stick the cutting into the medium without making the hole first, the rooting hormone will be scraped off in the process.
Note: Rooting hormone is not necessary, but it makes the rooting go faster and increases your chances of success. Use it if you can.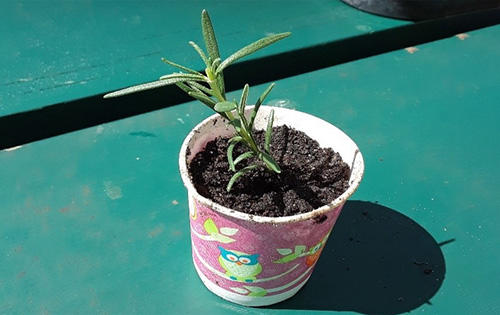 #6. Keep the sand or rooting medium moist and in a humid environment. The best way to do this is to cover the rooting with plastic. Half of a water bottle or soda bottle turned over the cut and stem works well. Gardeners all have their own methods, but I like to place the potted cuttings into a large take-out dish with a clear dome lid. Keep the cuttings out of direct sun.
#7. Check the moisture level every day. You want the sand to be moist, but not soggy. After two to three weeks or when the plant seems to be thriving, give the stem a slight tug. If it comes out of the hole, it is not rooted. But if the roots hold the plant into the ground, you can transplant it to a larger container or into the garden.
Semi-Hardwood and Hardwood Cuttings
Semi-hardwood and hardwood plants include bushes and trees. Many of these are normally propagated by grafting the plant onto a specially grown rootstock. This method produces a strong plant and is used to produce the nursery plants and trees. When we take a stem cutting and root it using the method below, we will grow the natural roots of the cutting. The roots may not be as strong as the original grafted plant, but the plant can take root and grow.
Begin with more cuttings than you need when using hardwood and semi-hardwood cuttings. The cuttings are harder to root and not all plants will survive.
Related: How I Grow My Herbs Indoors
Plants to Root Using the Woody Plants Method
- Blackberries
- Blueberries
- Currants
- Elderberry
- Fig
- Gooseberries
- Grapes
- Honeyberry
- Kiwi
- Lemon tree and other citrus (normally grafted)
- Mulberry
- Olive
- Orange tree (normally grafted onto sour orange rootstock)
- Plums (success varies with variety)
- Pomegranate
- Raspberries
How to Root Semi-Hardwood and Hardwood Cuttings
For woody plants, take the cutting in the fall after the plant has gone dormant. You will need a larger piece, approximately 6 to 12 inches. Follow these basic steps:
#1. Take a healthy cutting from a supple branch that includes as least 2 notes (the enlarged bump where the leaves attach to the stem). You want a branch that is about ¼ to 3/8 inch in diameter.
#2. If there are leaves present, remove all but a few of the topmost leaves.
#3. Coat the lowest inch or two of the cutting with rooting hormone. Place the cutting into damp garden soil or potting soil. One of the nodes should be under soil and one above the soil line.
#4. Keep the cutting warm and the soil moist. I usually place the cutting into a plastic bag and secure it with a twist tie or rubber band. Check the moisture level daily. Water the soil as needed to keep it moist, but not soggy.
#5. When the cuttings begin to grow from the top, transplant the cutting into the garden or a large pot.
Trench Method of Propagation for Hardwood Cuttings
If your climate and soil are favorable, you can root hardwood cuttings in a trench to be transplanted the next year. Here is the method:
#1. Take 6 to 12-inch cuttings as described above. Make a trench by pushing a shovel into the soil and rocking it to form a narrow slit trench. If the soil is clay, amend it with coarse sand to improve drainage.
#2. Place the cuttings into the trench so that only a third of the cutting is above ground and the cuttings are at least two inches apart. Press the soil down around the cuttings.
#3. Water the soil around the cuttings. It should stay damp over the winter. Check the soil periodically and water again if needed. (This will depend on your climate.)
#4. In the spring, new growth will appear at the top of the cuttings, Dig up the cuttings carefully and transplant to its final location.
Related: 10 Beautiful Plants That Are Secretly Killing Your Garden
Other Types of Cuttings
While I have focused on stem and branch cuttings here, there are many other types of cuttings that will grow. Many plants will grow from root cuttings and some will even grow a whole new plant from part of a leaf. It never hurts to try to root whatever type of cutting you have. My pineapple garden grows from the cut off tops of ripe pineapples.
Many plants don’t even need a rooting medium to grow. In my pictures, I put my rosemary stems in garden soil, but many gardeners root their rosemary in water alone. I prefer soil because it is easier to transplant later. (I actually prefer sand, but I didn’t have any when I potted the rosemary.)
Vegetables Grown from Root Cuttings
Many root vegetables can be grown from a piece of root. Ginger is a good example. You can grow a large pot of ginger by planting a small knob of store-bought ginger or turmeric. I plant a knob every spring and harvest enough ginger to last me for the year. Whenever I need ginger, I just dig up a piece.
The following vegetables can be grown from a root cutting. Potatoes and sweet potato root cuttings should include an eye.
- Horseradish
- Jerusalem artichokes
- ginger
- Potatoes
- Sweet potatoes
- Turmeric
Many leafy type vegetables can be easily regrown from the root end of the original plant, even if the roots have been cut off. Often the roots don’t regrow, but the leafy vegetables will. You can harvest these over and over. These work best in shallow water or in wet sand:
- Beet greens
- Bok choy
- Cabbage
- Carrots
- Celery
- Fennel
- Leeks
- Lemon grass
- Lettuces
- Onions
- Rutabaga
- Scallions
Strawberry cuttings are easily taken from cuttings taken from runners when they begin to develop roots.
There are probably many vegetables that can be rooted this way that I am unaware of. Experiment with the method and see what you can get to grow. There is a lady in my neighborhood who has an enormous garden growing only from rooted cuttings and discarded seeds. She not only grows all her own vegetables, but she feeds much of the neighborhood with these vegetables. The method is that powerful.
You may also like:
 10 Trees Every Survivalist Should Know and Why
This Homemade Device Can Power Up Your Entire House 7 Days In A Row (Video)
The Overlooked Gold Mine of Post-EMP Survival
40 Bizarre Home Remedies Our Grandparents Taught Us That Actually Work


I learned the other day that hops are grown from root cuttings. Also, comfrey.
thats cool!
When cutting onions, we always cut them vertically, to miss the root. The root and part f the onion goes in water to soak for a few hours. If it starts to grow roots or the top is a little longer, it gets planted for a scallion. Most of this stuff is easy. Try it. I just planted a few dozen cabbage seedlings, but always save the core to plant in moist soil, out of the sun, to grow leafy greens. Some try to go to seed, and that’s even better. The stalks are great raw or cooked. Right now, we’re pinching off the flower buds of collards and kohlrabi. Blanched and then used like broccoli, good.The radish flower stalks are great when the weather is still cold, but get hot with the heat. Right now, most of those and all the turnip flower stalks are green manure for beans and watermelons. If you live in the south, http://www.SouthernExposure.com is a good catalog. They carry potato onions, which can be stored up to a year. Potato onions will not go to seed, but replant the small ones and get up to 6 new, large onions the next year. Desert, Native Seed Search. For those interested, the Southwest has a native hops, Neomexicali, which can handle the heat. I’m still looking for rhizomes but will take seeds.if I can get them. They need to be in by the end of August around here, to make growth before freezes kill them back (November or December). The problem is, they just became commercially available, so everybody and their uncle in 8 states wants some. Let me know if you know where I can get any. I have to check LL Bean seed list. BTW, Porter is a good tomato of the heat and drought scene.
Valuable article. Thanks for taking the time to write it. It is a must save.
Interesting. Three comments on this important article and innumerable posts as the armchair gunnys argue back and forth over the merits of a semi-automatic over a revolver, hurl insults at other posters and utter pronouncements as if announcing the 13th, 14th, 15th and 16th Commandments.
Yet in an EOTW situation, the information contained in this article and Red’s post might just be the information that saves your life and your family’s life as opposed to whether you have a .30-30 Marlin lever action or a 5.56 Blackwater Operator’s semi-automatic.
While I certainly added my comments to the long list of comments on the topic of guns, it was this article that I printed out and archived, not the article on which gun was the best for the apocalypse.
I classify all articles saved with (!).
From zero (firearms – as they are forbidden in practice – here in Brazil) to three (!!!).
This certainly is one !!!
Great article, very important!
Célio Freitas
You might want to consider printing out the articles you deem important enough …just in case
Yes, I classify, in order of importance for my situation, here in Brazil, and print only those that I consider to be most important, and that may be necessary in a moment of crisis, there is no printing everything …
But, except for several different subjects, what is not relevant today may be in the future, and the reverse is also true. The situations change.
left coast chuck
Same here; but, I print direct to pdf for later access on a computer or other device that can be printed later.
great information! I’ll bet the process would work well for cloning marijuana plants. The clones usually sell for up to $25 dollars each in my area of Washington. I have a medical marijuana license and can legally grow up to 15 plants. Thanks!
While I don’t know about plant patents, I have been through the process numerous times and while making or growing a patented item for your own use is technically illegal, if you do a small quantity for personal use and don’t distribute it or sell it, the likelihood of an expensive patent infringement lawsuit is very low, since the patent holder can generally only sue for lost revenues for licensing fees. OPSEC would of course be paramount. Grow it, eat it, and shut up.
If someone is worried about stealing, then contact the owner of the patent and ask how much they would want for your to clone their property. this is how nurseries do it. niio
I love it!