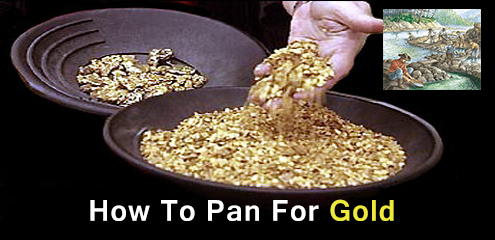
The principal behind gold panning is really simple. Gold is heavy. Just about everything else is lighter. If you load a pie-pan shaped container with gold-bearing gravel and sand, proper agitation in water should cause the gold to sink to the bottom, while washing away the lighter stuff that rises to the top. Eventually, all that is left in your pan is the heaviest minerals, including gold, platinum, copper and other metals.
What do you need to start Gold Paning
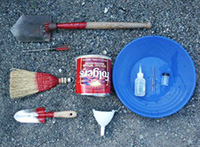
1. The gold pan. There are lots of different types of gold pans. They all work, so don’t spend too much time obsessing over getting just the right kind of pan.
2. The sniffer bottle. It is used for sucking up little bits of gold out of your pan.
3. The classifier, also known as a sieve or strainer. It is really optional, but I find it to be a great help.
4. Some digging tools. A mini shovel will be real useful
 5. You’ll also want a smaller spade and either an old screwdriver or some other skinny tool for cleaning out small cracks and crevasses in the rocks.
6. The small plastic pail is used for collecting concentrates. You can use just about any sort of container for that. More on why this is important later.
7. Buckets. You can pack a lot of the other equipment in them along with some water bottles and other supplies, and carry it all down to the creek. Once there, a bucket makes handy stool to sit on in the creek to do your panning and another serves to carry your paydirt from where you are digging it to where you are panning it.
Other nice to have accessories are gloves. A nice pair of rugged leather gloves to protect your hands from blisters.
Naturally you’ll want to take all the usual stuff you would take for any outdoor adventure in the wilderness. Things like a first aid kit, warm clothes, drinking water, mosquito repellent, sunscreen, etc. You can buy specialized tools from Gold Fever Prospecting.
Gold Panning Technique
Once you have located some gravel that you want to sample, place it in your gold pan-filling it about 1/2 of the way to the top. While placing material in your pan, pick out the larger-sized rocks, so that you can get more of the smaller material and gold into the pan.
It is best to pick a location where the water is at least six inches deep and preferably flowing just enough to sweep away any silty water that may be washed from your pan. Fill the rest of the pan with water.
Be careful not to get so vigorous in your left and right shaking that you slosh material out of the pan during this step.
Sweep the big rocks out of the pan using your fingers or the side of your hand. Just sweep off the top layer of rocks which have worked their way up to the pan’s surface.
Tilt the forward edge of your pan downward slightly to bring the forward-bottom edge of the pan to a lower position. With the pan tilted forward, shake it back and forth using the same left and right motion. Be careful not to tilt the pan forward so much that any material is spilled over the forward-edge while shaking.
This tilted shaking action causes the gold to start working its way down to the pan’s forward-bottom edge, and continues to work the lighter materials to the surface where they will be more easily swept off.
Using a forward and backward movement, or a slight circular motion just below the surface of the water, allow the water to sweep the top layer of worthless, lighter materials out of the pan. Only allow the water to sweep out a little at a time, while watching closely for the heavier materials to be uncovered as the lighter materials are swept out.
It takes some judgment in this step to determine just how much material to sweep off before having to shake again so that no gold is lost. It will just take a little practice in panning gold before you will begin to see the difference between the lighter materials and the heavier materials in your pan. You will develop a feel for knowing how much material can be safely swept out before re-shaking is necessary. When you are first starting, it is best to re-shake as often as you feel that it is needed to prevent losing any gold. When in doubt, shake!
Materials tend to get darker (and heavier) as you work your way down toward the bottom of the pan, where the darkest and heaviest materials will be found, they being the purple and black sands, which are usually minerals of the iron family. The exception to this is gold, which is heaviest of all. Gold usually is of a bright and shiny metallic color and shows out well in contrast to the other heavier materials at the bottom of the gold pan.
As you work your way down through your pan, sometimes gold particles will show themselves as you get down to the heavier materials. When you see gold, you know it is time to re-shake your pan.
There is another popular method of sweeping the lighter materials out of the top of your pan which you might prefer to use. It is done by dipping your pan under the water and lifting it up, while allowing the water to run off the forward edge of the pan, taking the top layer of material along with it.
Every few cycles of sweeping and re-shaking, tilt your pan back to the level position and re-shake. This keeps any gold from being allowed to work its way up the forward-edge of your pan.
Usually the last materials in your pan consist of old pieces of lead and other metal, coins, BB’s, old bullets, buckshot, nails, garnets, small purple and black iron rocks, and the heavy black sand concentrates. Black sands consist mainly or in part of the following: magnetite (magnetic black sands), hematite (non-magnetic black sands), titanium, zircon, rhodolite, monazite, tungsten materials, and sometimes pyrites (fool’s gold), plus any other items which might be present in that location which have a high specific gravity-like gold and platinum.
Find a Place For Gold Panning
The next thing you are going to need is a stream to pan in.
Location is arguably the most important factor when it comes to determining the success of your gold panning experience. You can have the most expensive equipment and tools in the world, but unless there’s actual gold in the water and land, you simply aren’t going to come out with any. Thankfully, the U.S. is filled with hotspots from the east to west coast that are perfect for hopeful panners. As long as you’re willing to make the trip, you’ll find these locations are well worth the extra time it takes to reach them.
If you see a small post sticking a couple inches of the ground with some reflective tape on it, chances are the area is already claimed. When in doubt, check with the park or agency who owns the land to make sure panning is legal and you aren’t breaking any laws in the process.
Of course, gold panning can be a nice hobby, but it can also be a skill to consider in a financial crisis. Bill White, one of the most respected crisis analysts has urged recent bulletins on WND.com, Townhall.com and Theblaze.com about the coming financial crisis. And given the fact that at this moment a mere 86 million Americans are supporting a whopping 317 million people I suggest to watch his video and take him seriously.
I wish you much luck in your gold prospecting!
You may also like:
 8 Myths About Storing Water That Are Actually True
How to Make a Year-Round Self-Sustaining Garden (Video)
Livestock Animals You Should Start Raising For The Upcoming Economic Crisis


Do you buy Gold?