Potatoes are low acid foods. It’s important to be aware that the only suitable method for canning low acid foods is by using pressure canning.
Make sure that your equipment is nice and clean. Here are the items that you will need to can your potatoes:
- Jars
- Potatoes
- Salt
#Step 1
The first step you will take is to give your jars a good wash. You will need to sterilize your jars. This will clean your jars and rid them of any bacteria. Sterilize your jars by putting them in hot soapy water.
When you have finished cleaning and sterilizing your jars, you will then want to move onto cleaning and sterilizing your jar lids.
#Step 2
Prepare your potatoes.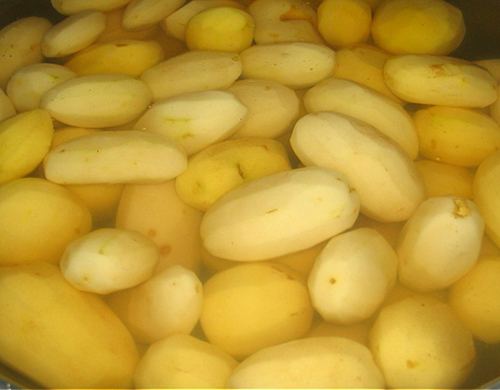
Give your potatoes a quick wash. Then peel your potatoes and slice them into dices.
#Step 3
Fill up your pot with cold water. Then place your potatoes on the ring and begin cooking them. Make sure that you cook them until they are almost cooked. You will have to test them with a fork for this. Add a bit of salt too while you are cooking.
#Step 4
Once the potatoes have almost cooked, you need to turn off the cooker.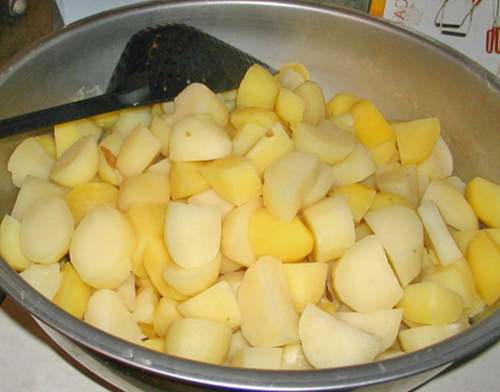
Drain your potatoes and be ready to put them into your jars.
Leave your potatoes on a sieve over the pot and let the water drain from the potatoes for five minutes.
#Step 5
While you are waiting for your potatoes to drain, what you need to do is to sterilize the jar lids in hot water for around five minutes. You can also steep the jars in hot water while you’re waiting, making sure that there are no bacteria in the jars (or lids) before you put the potatoes in.
Let your jars dry out on the outside before you place the potatoes in them. Give the jars a soft pat with a towel, so that they are not slippy on the outside. It makes it easier for you to work on the next step.
#Step 6
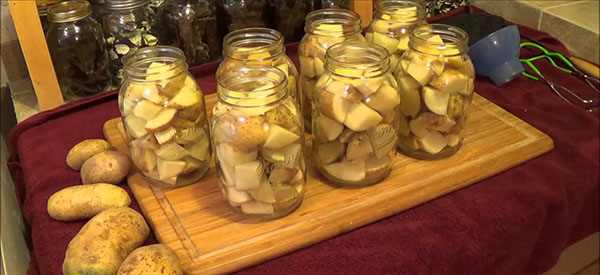
The next step is to fill the jars.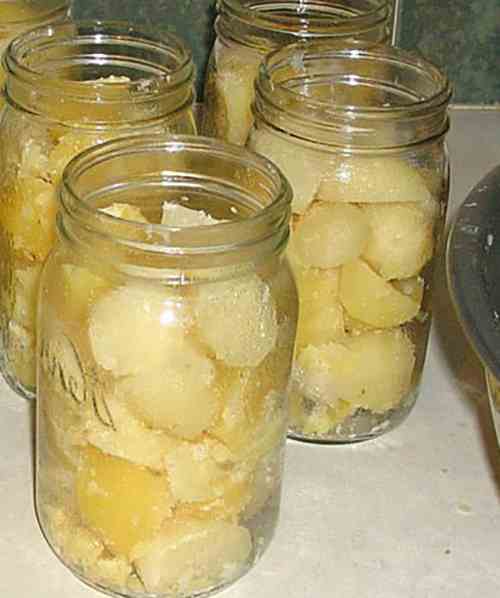
Put the potatoes in the jars first, then add the water. There is a good reason for this. Don’t fill up the jars with water to the top. And add a little bit of salt into the jars. Just a pinch will do.
Keep the jars and the jar lids hot until this point. Use a towel when you are handling the jars to protect your hands.
#Step 7
Air bubbles will accumulate at the top of the jars, you will need to remove those air bubbles before you seal the jars. The best way to remove the jars is by using a plastic spatula.
Next, you need to wipe the rims of the jars. Dry the rim of the jars using either a towel or some paper towels. Whether you use a towel or use paper towels, make sure that the towel or the paper towel is damp.
#Step 8
Close the jars by sealing the lids of the jars. Don’t seal them too tight, as you will not be able to open them. Just tight enough that the potatoes are kept fresh.
#Step 9
For ten minutes, place your cans in a pressure canner. Place your jars several inches apart, so that they are not touching each other. Once you see the steam coming out from the canner, you can put the timers on your canner.
As you close the vent on your canner, place the weights on top. Then, let the pressure build up in your canner.
#Step 10
Turn down the heat and place your canned potatoes in your pantry.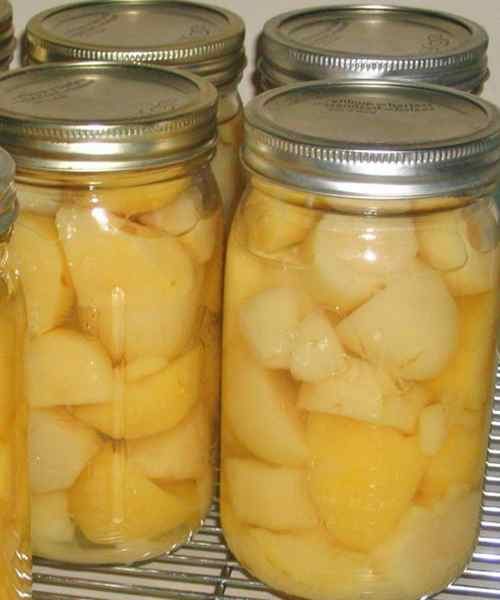
By not canning your potatoes properly, you can become unwell or even worse, it could be careful. So can your potatoes with caution. Don’t miss out any steps in the process.
The water that you fill up your jars with, should not be the same water as you cooked your potatoes with. The water that you will cook your potatoes in will have too much starch in them.
You may also like:
 10 Long Shelf-Life Canned Foods Every Prepper Should Consider Stockpiling
The Native American Food That Is Better Than Pemmican (Video)
Delicious Recipes Using Cattails – “The Supermarket of the Swamp”
How to Make Delicious Biltong with 1 Year-Shelf Life






whoever wrote this is not a canning expert nor has ever canned a potatoe
bull buck can you flesh out some of the details for me? I also found more questions than answers here. Like, how to keep the potatoes from getting mushy in the water filled jars? How much pressure to use?
A lot depends on the type of potato you use. I always use a had firm potato like the red ones or the yellow ones. Baking potatoes will get mushy and fall apart. Sometimes there will be a lot of starch in the jar. Again this can mostly be avoided by lightly par boiling before canning and again using the right potatoes. Been canning for years and potatoes is no different. It’s not rocket science but you should pay attention as to the type of potato used. Some are starchier than others and does not effect the product just the look. I take mine that may be that way and place in a colander and run water over them to remove the starch and then use as usual.
I was going to say the same thing! Learn from someone with experience canning potatoes. (Don’t follow methods in this article.)
I have been canning for 45 years and if I had followed this method I wouldn’t be alive today. Get a Ball Canning Book or go to your Extension office for instructions.
Where do you find that book please
A good book store, here even Lowes has them
Rural King, WalMart, and many other places.
You can get the ball canning book from WalMart, Lowes or most places that sell canning supplies. Also available from Amazon.
I agree. The language used is incorrect and could be very misleading. Follow a good cook book !
You left out pressure amounts and times- 15 lbs pressure 35min for pints, 40 for qts.
A variation- raw potatoes, carrot chunks and raw onion in the same jar-add 1 tsp salt, boiling water to cover, and pressure as above-instant Roast mix, or stew starter( Can be added to meat and cooked in crock pot without veg becoming mushy)
Thank you, Beck409, that helps a lot.
I have a canning pot – how do you control the pressure? I haven’t canned in ages but we have a large garden this year and I will have to once it’s time to harvest everything. Especially our potatoes because they are doing fantastic.
Please, please people. Get a Ball Canning Book. You have to following the canning proceedures exactly to be safe. You have to make pressure adjustments for altitudes for your area and must follow the exact time. A Ball Canning Book will show you how to operate your pressure canner, Desiree.
To can under pressure an ordinary pot won’t work. You have to have a pressure cooker.
Sounds like what you have is a water bath cannier. Most veggies NEED TO BE PRESSURE CANNED. Buy a pressure cannier. Buy a Ball Pressure canning book. Read the book. Read the instructions that come with the pressure caner. If you don’t do all these things you could become very sick from what you can or even die.
HELLO, WELL I’VE CANNED FOR YEARS NOW AND USE MY PRESSURE CANNIER AS A WATER BATH AS WELL ITS ALL ABOUT USING THE LID, I CAN JAMS JELLIES AND EVEN CHICKEN AN RICE.. THIS ABOUT COOKING POTATOES PELLIED AND PRE COOKED IS BULL… I DO CUBED POTATOES AND MANY KINDS OF MEATS WITH CARROTS MAKING A STEW . THERE IS NO NEED TO PRECOOK THE POTATOES, YOU NEED THE STARCH WITH THE PROTEIN TO HELP WHEN THE SHTF. THE CANNIER BOOK IS A GREAT IDEAL FOR FIRST TIME CANNER KEY POINTS TO KNOW IS TO ALWAYS HAVE JARS CLEAN AND LOOK FOR RECEIPTS TO CALL FOR HOT OR COLD JARS. AND NEVER REUSE LIDS, MAKE SURE GLASS JARS ARE NOT CRACKED AN TOPS AR NOT BROKEN WASH ALL YOUR VEGGIES ..
P.S ALWAYS ADD A TABLESPOON OF VINEGAR TO YOUR CANNING WATER EVEN IN THE WATER BATHS TO HELP JARS FROM SCARING IN THE HOT TEMP. SO THERE CLEAR AT END OF CANNING PROCESS
After placing filled jars in the pressure canner be sure to add 2 to 3 qt. water and apply lid. Bring heat up till steam escapes through the petcock (vent) and vent for 10 minutes with a good steady stream of steam coming out. Then check to make sure that the other lock on the lid is completely up and set the weight on the steam vent. Some weights have the pressuer marked on them and you will most likely choose the 10 pound weight slot. If your canner has a jiggler weight then place it on the canner. Others have a guage to watch which takes a close watching. Turn the heat up till the jiggler begins to rock. You want it to rock in a medium motion. Not too fast and not too slow. If the canner has a dial you will watch the dial move up till it says 11 pounds and adjust the heat of the burner to keep it at that number. Do not let the number drop below 11 or the book says you need to start the processing all over again. Watch the heat and turn gradually up and down to keep it constant. Time your canning when the canner reaches the right pressure. On the rocker you will know it has reached the right pressure when it is rocking at a med. spead. Too slow is not up to pressure too fast is too high a pressure. After doing this a few times you will get it right. It just takes time. When the timing is over turn the heat off and allow the canner to cool completely before you rwemove any weights or remove the lid. It will take around 3/4 of an hour or maybe even a whole hour. When you can lift the weight and no steam comes out you may remove the lid and take out your jars. Place them on a folded dry towell and cover with a light weight dish towell till the jars are cool and sealed. This will protect them from any cool draft that could cause the jars to break. Happy canning.
@Desiree: You can’t use a “canning pot” to PRESSURE can. You need a specific pressure canner. NOT an Instant pot.
NEVER can items that are PRESSURE CANNED using anything but a PRESSURE CANNER, and follow directions for the specific foods in a special pressure canning book, as mentioned here, The Ball Canning Book
i agree with you both, bull buck and angel. my skepticism began with the first top picture showing the potatoes in the jars, unpeeled. and you do not sterilize in soapy water. the misinformation goes on. whoever doesn’t know how to can already; get yourself a good reliable guide and know that potatoes can be (pressure) canned and stockpiled.
I have been canning for a little while now, but have never tried to can potatoes. My favorite method for storing those is dehydration, but I would like to learn to can vegetables too.
I agree. One cannot sterilize jars and lids in hot soapy water. One must sterilize them in rapidly boiling water. It’s been years since I watched my mother can food during WWII, but that is one lesson I took away from those sessions. Only rapidly boiling water bath immersion will sterilize jars and lids. Even if I didn’t have that memory of watching her do that, common sense (now called uncommon sense because it seems so few have it) tells us that to kill germs, items must be immersed in rapidly boiling water. As a consequence of that grossly wrong information, I would suspect any other advice that this writer offers. This article is a prime example of the misinformation that the internet frequently offers.
Thanks
Actually, with pressure-canning, there is no need to pre-sterilize canning jars — but they should be clean. The jars will become sterilized during the canning process.
Thank you. Thought I was the only one who knew that
No need to “sterilize jars if you are pressure canning. Just make sure they are clean. There is lots of misinformation in this article. Do not follow the instructions.
I don’t know how to can and I really need help before crops come in Thank y’all
Ann, 3 years ago I didn’t know how to can either but I bought Ball Blue book and several other Ball canning books plus others. Now I’m not an expert but We are still alive. Potatoes will be my next canning try. I do green beans, carrots, Red Beets, peas as “fresh pack” and I pickle many more. Fresh pack requires a pressure canner, pickle just water bath.
Thank you very much I will get the book and more like it I didn’t know we’re to start
Not only the Ball book but go to :
http://nchfp.uga.edu/
National Center for Home Food Preservation. They are pretty much on top of it when it comes to canning, drying, pickling etc.
I agree, but you can do potatoes without pealing. I have done it for years and at this time am using those potatoes that were canned in 2010. The one thing I have come across is to use a potato that is meant for using in things like potato salad etc. I use the red potatos. Baking potatos are way too startchy. Did that once and they were ugly in the jar. Had to take them out when ready to use and place in a colonder and rinse with plenty of water to get the jelly startch off. They were fine but sure looked ugly.
Thank you guys for pointing this out. I will be new to canning this fall and my family never canned things when I was little so I have no clue how to do this. Should the potatoes be peeled? I generally leave the skin on for the fiber. I’m sure I can find this info elsewhere on the web but as a newb I was just curious. I did know that you had to boil the jars and lids or run them through the sani cycle on the dishwasher.
Desiree: I don’t know how hot the “sani cycle” on your dishwasher is, but if it isn’t over 185°F. it just won’t do the job. Be safe, use a roiling boil for sanitizing your jars and lids.
Don’t you think heating the jars and contents to 240+ degrees for 40+ minutes will be enough to sterilize the jars? Ball just recommends washing the jars in soapy water and rinsing well and keeping them hot if adding a hot liquid to reduce thermal shock. But that is all.
No need to peal the potatos but be sure to use a hard potato not a baking potato. They get mushy and give off a lot of starch. I did this once and had to rinse the startch off them before I used them. They look ugly in the jar but they are fine.
I will take my post even further. If you wash dishes in soapy water and do not rinse them thoroughly, you will get the trots. The trots can lead to dehydration. Dehydration can lead to death. When we were in the field in the Marine Corps way, way back we always washed our mess gear in a garbage can full of hot soapy water, scrubbed them with a toilet cleaning brush and then dunked them in two separate garbage cans full of boiling clear water. All of the water was kept at a roiling boil with kerosene fired immersion heaters. If the ambient air temperature wasn’t too far below freezing, swinging the mess gear in the air would quickly dry it.
Please go back on this article and correct words. This is a terribly confusing article.
http://nchfp.uga.edu/publications/publications_uga.html
This is the location for safe canning and preserving procedures. Many are omitted in this article. To keep your family safe….go to the University of GA website for free information above. This is not the first time that procedures for canning and preserving have been published by this Preppers organization that were incomplete and dangerous. Please go to the UGA website listed here for your safety http://nchfp.uga.edu/publications/publications_uga.html
Good thank you for sharing the web address with me cause I don’t know how to can So maybe I will learn
I understand that sterilization is important when canning, but I guess I don’t understand why there is so much “Sterilzation” BEFORE the actual Pressure Canning process. Yes, wash EVERYTHING well – but why doesn’t the Pressure Cooker kill ALL Bacteria?
Good question and seems logical, but I can’t answer it. All I know about canning if from watching my mother do it all during the War. She always sterilized the jar and lids. After filling them she then put them in the pressure cooker to do the rest. Was it overkill? I can’t answer that. If it is, isn’t overkill better than underkill? I would echo the recommendations above to get the Ball Canning Book or visit the University of Georgia website. The Ball folks have been offering canning products since before I was born and many universities have Home Ec departments that actually use scientific methods. I would trust what they have to say more readily than what I read in posts to articles like this.
You only need clean jars when you are pressure canning. And you do not sterilize the lids. If you boil the lids you will ruin the seals. Read the box. The heat, time and pressure does kill all the bacteria.
Sally, I agree with you. Today the lids come with directions to wash them and rinse well then cover with hot water and keep them hot. This is just to keep the rubber sealing compound soft for putting on the jar. No need to sterilize and boil. The germs on the lid if any will be killed when processed. To sterilize you boil for 10 minutes and when you put the lid on a jar that is even waterbath processed it must be covered by an inch of water at least and everything I have seen is processed for at least 10 min. so the lids will be sterilized in processing. Modern days method says no boiling the lids !
You don’t have to sterilize the jars before canning in a pressure canner. Just wash them. I run mine through my dishwasher. You also don’t have to boil the lids or rings. Again, just make sure they are clean. For potatoes you are going to heat them and the jars, lids, and rings to 240+ degrees for over 40 minutes. That temperature will sterilize everything. Ball quit recommending boiling lids in the late 60’s as they changed the gasket material. Old habits are hard to break.
because you have to sterilize the “inside ” BEFORE you add your food!!! This is the only way to prevent botulism! Or any other boogie.
I believe you missed the point that Water-Bath canning is no longer recommended. The absolute SAFEST canning is “PRESSURE CANNING” at 240 degrees. Please re-read the comments. There is NO NEED to Sterilized the “inside” to prevent anything. Consider that you make no mention of the Lids, or even the food being canned. Very flustered with those that comment based on memory rather than current guidelines by CURRENT reputable “experts”
Oakeydokey, Not anymore. The only time you sterilize a jar is if you waterbath but not in the pressure canner. The temp. in the pressure canner is so high and the food is processed for so long that everything in the the jar and the inside of the jar are more than sterilized.
Tampaguy, The pressure canning does kill all the bacteria. The major thing is to make sure that the rim of your jars are clean and free of any material or grease. If you are canning something in a pressure canner and it is timed for 90 minutes and everything was clen , there is no way your jars won’t be stereilzed in the canning. It is more important to do the sterelizing first if you are doing acid food and using a water bath method. That method is used only for fruits tomatos, jams, and jellies, and pickles or kraut. Then make sure that everything is very clean and jars stereilzed first. I’ve been canning for 50 years and you really don’t need to worry , just be very careful all the time.
GENERAL QUESTION; If one has a 6 quart pressure cooker, instead of a CANNING PRESSURE COOKER, could that be used? I would be making small amounts of canning. Two or three jars. I read you need space in between. I am retired and have all the kind of time. I did not want to spend 100’s of dollars to buy a canning pressure cooker. Thoughts? My mom used a water bath method, but never canned low acid foods. I am still alive. Wish I paid more attention as teenager, when she did this. ☺ I helped, but did not care about all the details.
From the selection “Using Pressure Cookers” listed on the website furnished by lyesoap above:
Pressure canners come deep enough for one layer of quart or smaller size jars, or deep enough for two layers of pint or smaller size jars. The USDA recommends that a canner be large enough to hold at least 4 quart jars to be considered a pressure canner for the USDA published processes.
From your description, Older Prepper, it appears to me that you have a pressure cooker that will do the job. I would urge you to read the section at the U of George website.
A 6-quart pressure cooker holds 6 quarts of liquid, not 6 quart jars. I only use a dial-gauge pressure canner not one with weights because they can be inaccurate. I have to can at 13 pounds of pressure for my altitude and the weighted pressure canners only have 5-10-15 pound weight. I would have to process everything at 15 pounds and it can turn beautiful wax beans and potatoes to a dirty brown color at that pressure. A pressure cooker is not as expensive as you might think. WalMart sells the dial gage Presto Canner for around $90. I have also purchased them on Amazon at a good price.
Sally, What makes you think you have to process everything for such a long time.? You can use 10 lbs of pressure for a little longer time or 15 lbs. at a little shorter time. Both methods will work out just fine. Check the time in your book and then choose a time in between 10 and 15 lbs. There should be no problems.
A 16 quart pressure canner will hold 7 quart jars or 7 pint jars. A 21 quart pressure canner will hold 7 quart jars or 18 regular mouth pints or 16 wide mouth pints stacked. The 6 quart pressure cooker means that it holds 6 liquid quarts.I just checked Amazon and the 21 qt canning pressure cooker with an accurate dial gauge is only $81.
Yes a smaller pressure pot will work but it limits size and. Umber to small pint batches. For one person that is probably just fine. I have three different pressure cookers and have done a few jars or just a few pints when that was all there was to can at the time. Time and pressure according to a good canning guide.
I live above 6000ft so everything is done at 15 lb here. Things can beautifully at 15 lb. But do follow a good guide for where you live.
My larger canner was an end of season bargain at a Tractor Supply store. I pad $69
Water bath canning is good for canning fruit with some acid content which is most fruits. Most vegetables except pickles need to be pressure canned. Same with meats or vegetable mixtures even with a tomato base, pressure them.
older prepper, I don’t recomend using anything but a pressure canner as it is harder to regulat the pressuer in it. I know of some who do it but I would not recommend it. WalMart has a canner for around $50.00. I have one and it works real good. Never can anything but acid foods in a waterbath canner. Everything else goes in a pressure canner. I have canned just about anything you can think of. I have discovered that I don’t like tomatoe based meals that are canned in a pressure canner because the tomato base always tastes burned to me. So I can everything except the tomato base in the pressure canner and do the tomatos in the waterbath and combine them when I fix the meal. I can all kinds of meat and poultry, and even made meatballs and canned them. I have done meatloaf too but recommend it is done in straight sided wide mouth pint jars. Some things can be combined in the canner as long as they are canned at the same pressure and the same length of time. So if you only have a few jars of one thing plan on doing a few of something else at the same time. That way you can make better use of your time and fuel and canner. Happy canning. By the way some canners do not give you a lot of space between jars so don’t worry about that, just make sure they don’t touch or they could get stuck on each other. I did that once and it was not fun.
I have been canning for many years. Every fall my garden gets put up for the year. My German aunt taught me to make Choke Cherry jelly in Montana, she created a monster! I came home and canned everything in sight or pickled it. I have many Ball canning books. They’re great! My jars go from sanitizing rinse in the dishwasher to the microwave for 5 minutes so there’s sanitized completely and hot when I fill them up so the jars don’t break putting them in the water bath or pressure canner. Also the lids and rims I keep in a pot of boiling water poured over them. So everything is hot when I put it in the hot water. And nothing breaks. Learn that the hard way. Hot zucchini relish all over my counter because the jar was not hot.
My mom NEVER used a pressure canner. She canned all sorts of stuff and with low acid foods she always cooked them for 3 hours, She also canned chicken. I bought a pressure cooker and have canned everything I can get my hands on…all kinds of meat and as I write I am canning chicken Breast. Never been made sick from Moms canning nor mine.. I canned potatoes I had cut with my apple corer, makes for some interesting shapes and they don’t get soggy in the water. I canned Potatoes carrots and celery together so I can make stew. Just open jar and add a jar of canned beef. SO GOOD and quick, canned onions too.add a jar to the stew, they did get soft but has a good flavor.
@ Older Prepper: NO! a pressure COOKER is NOT the same as a pressure CANNER! Nor is an Instant Pot! (they are actually pressure cookers.)
You must use a specifically named PRESSURE CANNER, it is the only safe way to can certain foods.
Oh My Gosh Folks – this is an IED trick from ISIS. I agree with Sally, This will get you dead. Get a book!!!!
I am a longtime fan of this website, and appreciate the information made available. However, this is one of the most poorly written articles I have ever read on this site. Do you have a proofreader? Do you need one? Also, some of the technical information is erroneous, such as sterilizing jars and lids in “hot soapy water”. WRONG! You MUST BOIL them to sterilize them, period.
Canning jars must be freshly washed then boiled. I air dry them to use while I’m preparing or cooking what I’m going to can.
Some call it over kill if you’re going to be pressure canning. I’d lean to over kill. Better safe than sorry.
My family has been canning since they closed pressure cookers with clamps, then nuts and bolts around the rims. Then came screw on tops then tops that locked when hot and couldn’t be opened till Cooled. Now there are electric pressure cookers. I haven’t tried that step yet.
Pressure cookers were litterally life savers. Still are. Use them according to the directions or a good up to date canning book.
Stay safe.
I just seen that you mentioned the ELECTRIC pressure cookers. I have only seen a couple and I think these are for COOKING FOOD only I don’t think they are big enough to can in jars for preserving. If I am wrong maybe someone will correct me..
Miss Lou,
I have seen the electric pressure canners demonstrated on television and do not reccomend them for canning. The woman showed how she said to can one jar of something in the electric pressure cooker and she put the food in a jar added the lid and ring and then laid the jar on its side inside the cooker ! I would never do that for fear that in the processing the jar could leak and or break. It is always improtant to keep jars upright without tipping until the lid is sealed or it could cause a leak and you could loose all your hard work. Wouldn’t recommend the electric pressure cooker.
The article said the best way to lift a jar was with a spatula. There are inexpensive canning accessory kits with a jar lifter, magnetic lid lifter and jar filling funnel. Makers it all so much easier. The jar lifter is an odd looking little contraption that clamps as you lift the jar and is worth 10 times its weight in gold.
Just wondering HOW to lift jars with a SPATULA ..LOL don’t seem possible to me unless your spatula is different than. mine. I flip pancakes and hamburgers with mine or ice a cake with it.
The spatula is not the size you would use for pancakes, you use it inside the jar to release the air bubbles. I use a butter knife it works fine.
You need something that benefits you and your household in the long run, such as the
Shamwow. Cover firmly with foil and location in the
pre-heated oven. Apply it carefully with a cotton ball,
twice a day if possible.
Geez, don’t kill yourself over a $2 jar of home canned food. Do it right!!! If you don’t have a Ball Blue Book, check out Ball’s website. It has many recipes and good instructions for canning. The website is good but the book is better. Your county extension often has canning classes. They always refer to the Ball Blue Book as if it is the Bible of all things canned.
Also, if you have a pressure canner, get the pressure gauge checked each year. Our county extension food handler does if for free while you wait. And always have an extra lid gasket on hand. Usually you will need to order on line.
Jar lifters are cheap and available almost anywhere canning suoplies are sold. I bought mine as part of a kit that had the lifter, a magnetic lid lifter so you dont get your fingers burned on hot lids, and a gel canning rack for a spaghetti pot for when I’m not pressure canning.
I have that get rack for small batches, three different sizes of preasure cookers/canners, and two old enameled canning pots. I started out helping Mom pack jars when i was 4. I still can.
We get food from a church pantry food program and this one is blessed to have fruits and vegetables. I can any we won’t be using that week. I canned a lot of greens from my garden last year. Will do the same but it is a much smaller garden this year. Zuchinni, bananas, berries I usually freeze excesses for baking projects later on.
I have pints of pickled multicolored cherry tomatoes, great on a relish tray, mustard, kale, and swiss chard greens, green beans, corn, pickled and plain beets, rhubarb, and more. Most done a few pints at a time in a pressure canner. Always go by the book. So quick and handy to go to.
After the first investment in jars you just get new lids each time so the cost is very little. I still watch for jars at yardsales and moving sales. At 70 for just the two of us i dont need quarts of food very often. Pints can be canned stacked on each other in the canners if you have a lot of something. I’ve even canned the juice from prickly pear cactus fruits. It makes great jelly and syrup for pancakes or an Enjlish style triffle desert. The pads of the larger plants are good eating sliced or diced or even pickled and canned for Mexican dishes. We like the diced ones in a chicken or rabbit stew.
Canning potatoes is an iffy thing. Startch boiling up under the lid edges will keep you from getting a good seal. Red potatoes are less starchy and would be the best bet to try. Go by the book. I live at over 6000 ft so i have to use the highest pressure and longest times listed.
Even canned pinto beans are wonderful to have a few on hand when you’re in a hurry. Cold pickled veggies are nice as a side with a sandwhich or as part of a cool summertime repast. We do relish trays for company with mixed colors of small tomatoes, green beans, et all pickled and canned. I love pickled beets.
Canning may seem time consuming going in but it saves good food for later consumption and is quick and easy when you use it.
Americans throw away a lot of perfectly good food. Can, freeze, or dehydrate and save it for later.
You really discredited yourself with this
I am seriously shocked that Ask a Prepper would post this, as it has SO MANY ERRORS in it that could actually KILL someone!!!!!
Shame on you, Claude!!!!!
You have made this Blog a laughing stock, and I’m sure some, like me, will seriously think twice about trusting ANYTHING posted here ever again.