What do you do in an emergency situation when no doctor is available? Unfortunately, we sometimes find ourselves in these situations. The problem compounds under survival conditions with no 911 calls and no emergency room nearby. When the day comes, you may need this first-aid wisdom from 100 years ago.
In the Mid-19th century, tobacco companies began putting helpful cards included in each pack of cigarettes. This set of cards taught helpful first aid tips. Designed to encourage brand loyalty, the cards here have a picture on one side and the first-aid tip on the reverse. Many of these tips from a 100 years ago are still valuable today, especially in emergency situations.
#1. Strapping a Wound:
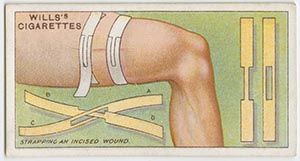 Cut two pieces of bandage tape long enough to reach several inches past the wound on each side.
- On one piece of tape, cut a rectangular hole in the center, one-third of the width of the tape and two inches long.
- At the center of the other piece of tape, cut away one third of the width in a two-inch strip on each side, leaving a two inch strip in the center that is only one-third of the total width.
- Thread the second piece of tape through the hole in the first, forming a x from the tape.
- Fix the bottom leg of the x on each side to the skin adjacent to the wound.
- Grasp the top sections of tape and pull tightly, drawing the skin together. Secure the upper pieces of tape over the lower section, holding the skin tightly together.
Related: 26 Practical Survival Uses for Duct Tape
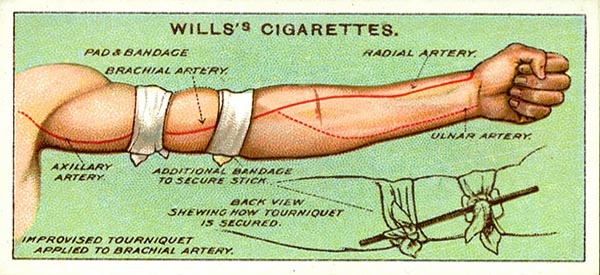
#2. Tourniquet – To stop bleeding from an artery below the middle of the arm:
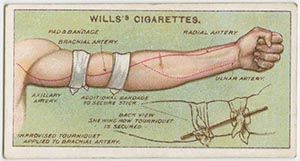 Raise the arm from the side. Make a pad from a handkerchief, bandage, or clean cloth and apply it to the artery.
- Wrap gauze or fabric around the arm with the center covering the pad. Tie the bandage together in a knot on the outside of the arm.
- Place a pencil or stick under the knot and twist to tighten the bandage, until the bleeding stops.
- Secure the pencil or stick in position by wrapping another bandage above or below the tourniquet and tying it in position.
Related: 24 Lost Survival Tips from 100 Years Ago with Illustrations
#3. Compression of the Artery – To stop bleeding anywhere below the middle of the arm by compression with your fingers:
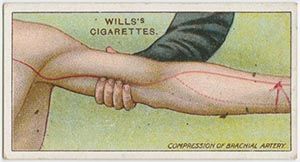 Raise the arm level with the shoulder. Turn the hand so that the palm faces up.
- Grab the upper arm with the thumb in front and the fingers behind the arm and across the brachial artery located on the upper inside of the arm.
- Put pressure on the arm and twist your hand so that the fingers and artery are pushed backwards and bleeding stops.
- Hold the pressure until medical help arrives.
Related: 23 Medicinal Plants the Native Americans Used on a Daily Basis
#4. Fracture of the Humerus – Apply a splint to a fracture of the humerus (the bone in the upper arm) in the following way:
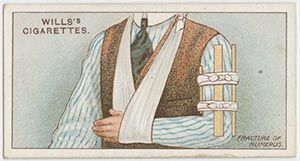 Bend the arm at the elbow, forming a right angle.
- Apply four splints, equally spaced to the front, back, and each side of the upper arm. The front, back, and outer splint should reach from shoulder to elbow. The splint on the inside, closest to the body, should not put pressure on the bend of the elbow.
- Hold the splints in place with bandages above and below the break.
- Support the forearm with a narrow sling passing around the neck and under the forearm.
#5. Fracture of the Forearm – To apply splints for a fracture of either or both bones of the forearm:
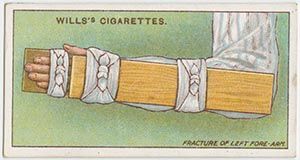 Bend the arm at the elbow to form a right angle, with the palm facing the body and the thumb pointing up.
- Apply two splints: the first on the inside of the arm, reaching from the elbow to just past the finger tips. The second on top of the arm from elbow to the knuckles. If clothing has been removed, place some padding between the arm and the splint.
- Secure the splints with bandages just below the elbow and at the wrist.
- Support the forearm with a large arm-sling.
#6. Improvised stretcher – To make an improvised stretcher, you will need two long poles, 6 to 7 feet in length, two short sticks – approximately 2.5 feet long, a rope, and twine:
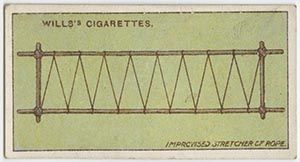 Lay the long poles on the ground parallel to each other and approximately 2 feet apart. Place a stick across either end, approximately 4 inches from either end.
- Tie the sticks to the poles at each intersection, forming a rectangle with handles.
- Tie a rope at one corner and stretch it back and forth across the stretcher, moving back and forth and down the length of the poles. Tie the rope to the corner diagonal to the starting point.
Related: Emergency Care For Gunshot Wounds
#7. Improvised Stretcher – Form a stretcher from two poles and two to three jackets:
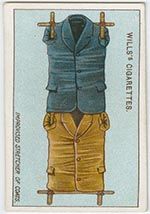 Turn the sleeves of the jackets inside out, leaving the sleeves inside the jacket.
- Button or zip the jackets closed. Lay them out so that the tail of one jacket overlaps the neck of the next.
- Push the poles through the sleeves inside the jackets.
- Carry the stretcher with four people, each lifting one end of a pole. If only two carriers are available, brace the poles on either end with cross-bars.
#8. Shot in Legs – When the leg is “peppered” by shot from a shot gun, most of the pain will subside quickly. Follow this procedure:
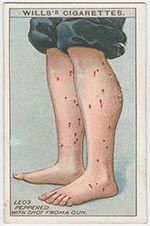 Prevent the injured person from walking if the pellets are buried beneath the skin around the knee or ankle.
- Put the patient to bed and wrap the leg in wet towels. Replace the wet towels every four hours. Do not attempt to extract the pellets.
- If joints swell, consult a doctor.
Related: Best Natural First Aid: Stops Bleeding In 10 Seconds!
#9. To Extract A Fish-Hook. When the barb of a fish-hook is buried beneath the skin, do not try to remove it by pulling it backwards along the entry path. Instead:
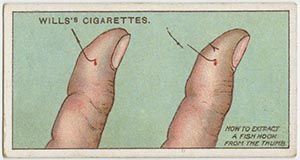 Cut the thread binding the shaft to the hook. If the hook has an eye, cut the hook below the eye with wire-cutting pliers.
- Clean the shaft of the hook and apply Vaseline or lard to it.
- Push the shaft of the hook upwards until the barb protrudes through the skin.
- Hold the hook in pliers by the barbed end and pull the shaft through.
#10. Sprained Ankle – When an ankle or lower leg is injured, help the patient to a place of rest as follows:
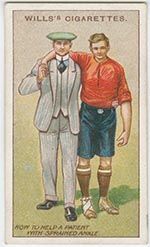 Stand next to the patient on the same side as the injured limb.
- Pass your arm, on that side, around the patient’s waist. Bring the patient’s arm nearest you around your neck and grab his wrist with your other hand.
- If the injury is to the ankle, bend the injured leg at the knee and hop on the good leg.
Related: The Hidden Truth About Taking Expired Medications
#11. Four-Handed Seat – To for a four-handed seat:
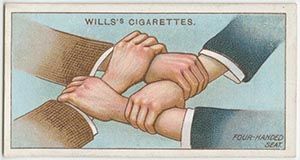 The two bearers face each other. Each grabs his own left wrist securely with his right hand.
- The bearers come together. The person on the left grabs the right wrist of the person on the right. The person on the right does the same, grabbing the free wrist of his partner, forming an open square.
- The patient sits on the square, placing his arms around the necks of his bearers’.
#12. Burns on the Face – When the face is burned by heat or strong acid, make a mask:
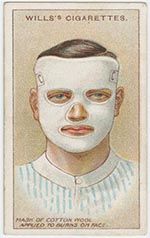 Cut two pieces of linen to the shape of the face, making holes for the eyes, nose and mouth.
- Layer cotton wool, two inches thick, between the linen, leaving holes for the eyes, nose, and mouth.
- Gently apply oil, Vaseline, or other burn ointment to the surface of the face.
- Place the mask on the face, holding it in place by strips of bandage or tape sewn or pinned to the sides of the mask and tied or pinned behind the head.
#13. Foreign Body in the Ear – Follow the most appropriate method to remove a foreign body:
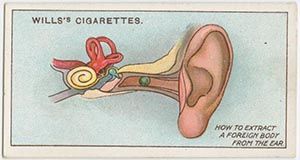 Float an insect out by pouring olive oil from a spoon into the ear passage. Remove the insect, then turn the head over to drain the oil.
- If it is possible, grasp a protruding part of the object with forceps, tweezers, etc, and remove it.
- A piece of pencil, bead, or pea pushed deep into the ear must be removed by a doctor.
- Prevent a child from putting finger into the ear by restraining his hands until the foreign body is removed.
#14. The Fireman’s Lift:
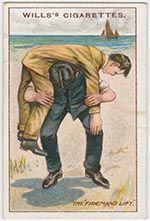 Turn the unconscious person face down.
- Kneel close to his head and, from the front, pass your hands beneath his armpits.
- Lift the patient up towards you, supporting him on your knee.
- Lock your hands around his waist and stand up, lifting the patient with you.
- Hold one of his wrists up and pass your other arm between his legs. He should fall across your shoulders.
- Stand up, balancing the body across both shoulders.
- Grasp the patient’s wrist tightly with the hand that passed between his legs.
- Carry the patient in this position, using the free hand to stabilize yourself or grab a support as needed.
You may also like:
 The Only Plant That Should Be in Your First Aid Kit
You Will Not Survive An EMP Strike Without This (Video)
Another 21 Lost Tips from 100 Years Ago – with Illustrations





Hey where can I get the cigarettes?
Like trading cards in bubble gum, back in the 20s and 30s cigarettes used to come with these cards of helpful household hints. Those cards are now museum pieces. Whodda thunk? Cigarette smoking didn’t become really popular until WWI. Cigar and pipe smoking were generally more popular prior to WWI. With troops constantly on the move, cigarettes allowed a quicker nicotine fix than either pipe or cigar. A ten pack of cigarettes used to be included in each day’s pack of C-rations during WWII.
That would be cool to come across one of those C-rations
West Coast Chuck,
I see you on several boards. I/we enjoy your comments.
There is always good info and interesting background.
In 1967 it was a 4 cigarette pack. I still have some dated 1955 in my airplane survival kit for when I flew the Alaska Bush.
1955? I never saw any C-rations that new. Most of the C-rats I ever saw had Lucky Strike Green packs. For some reason unknown to me, red dye used in the ink for the cigarette packs was supposed to be a vital wartime commodity. Lucky Strike used to advertise “Lucky Strike Green Goes to War” in their ads during WWII. The red circle on the pack was printed in green for the wartime. Smoking is now taboo in the military service. They have switched to chewing. Ha! Which would you rather have, cancer of the jaw or lung cancer? Wow! That’s a choice? A close business associate of mine had part of his jaw and neck removed before he died. Remember Roger Ebert the movie critic? So, to be politically correct, no more smokes in MREs. You have to buy your own chewing tobacco or snuff or whatever it is that is the approved substitute for the evil cigarette. In combat you never know when a mortar round is going to land next to you or a bullet has your name on it. Who is going to worry about cancer twenty years from now? Surviving next five minutes in a fire fight is far more important and immediate.
And they were included in life rafts. I guess now it’s too dangerous to smoke while you’re spending 30 days bobbing in 20 foot waves
Where can I get information on Veteranarian meds and equivalent dosages for humans.
Hi Liz,
Here is the article you are referring to: http://www.askaprepper.com/use-veterinary-drugs-humans-post-shtfthis-can-use-veterinary-drugs-post-shtf/
I want to purchase the Survival MD book.
It’s interesting, but in the days before 911 and cities and other public entities maintaining emergency medical services, the actions posted in this link were all taught in first aid ordinary first aid classes. These procedures and others were all included in the training for the boy scout first aid merit badge. If one lived beyond the city limits, it might be a struggle to get to a doctor and so how to set bones for simple breaks, apply splints, moving injured people, removing live electric wires from shock victims, all those skills were taught in primary first aid classes. Now a first aid class, unless one is taking a more advanced course aimed at wilderness responders or e.m.t. responders, is limited to “control bleeding; apply chest compressions; call 911.”
A few years ago I paid $40 for a first aid course sponsored by the Red Cross and taught by a well-meaning local fireman and that was the extent of the course. Took three hours to teach the above three items. Needless to say, I felt as if I had gotten taken.
This article suggests vassaline for burns, however I had been told that you should not apply vassaline to burns.
I think you are correct. Some old time remedies also used to recommend putting butter on a burn. That too is out of date and no longer recommended.
I burned my face with hot wax when I was a young teenager on a camping trip. I didn’t have any first aid supplies with me (You know, the old male teenager theory, “I’m invincible.”)
I applied toilet paper soaked in cool, black tea to the burn area.
Three days later when my father came to pick me up, the green toilet paper (Is anyone besides me old enough to remember colored toilet paper) was stuck to my face around my eye.
I guess it looked like I had developed some kind of ferocious fungal infection since he had dropped me off. We soaked the toilet paper off with more cool black tea and the doctor said the tannin in the tea actually prevented the burn from leaving any kind of scar, otherwise I would have wound up looking like the Phantom of the Opera.
While black tea is no longer first on my list of burn remedies, it still is on the list somewhere down from first place. Toilet paper is also on the list for use in place of gauze pads, but no longer at the top of the list. It does have the advantage of being easier to remove when stuck to skin than gauze that is stuck but it is only clean, not sterile and so can introduce infection. In case of severe bleeding, it can be used between the wound and the gauze that is on the wound to help absorb blood if you have run out of gauze pads.
The whole world of prepping is going to be structured on improvisation in an EOTW situation.