I recently read some great shortcuts and tips I would like to share for a few gardening and seedling hacks, to make some steps a bit easier. Many of these will provide an environment similar to a mini greenhouse or humidifying chamber to help stimulate growth.
Quick Mango Seed Sprouting
After eating a mango, don’t throw the pit away! Inside the mango is a large pit, and if you get all the mushy lining off, you have the ability to get that pit to sprout rather quickly.
Wrap the pit in a sheet of paper towel, just 1 square will do. Spritz the wrapped pit with water, then place it in a sealable plastic food storage bag. It should have a significant sprouting in about 5 days.
Sponge As a Seed Starter
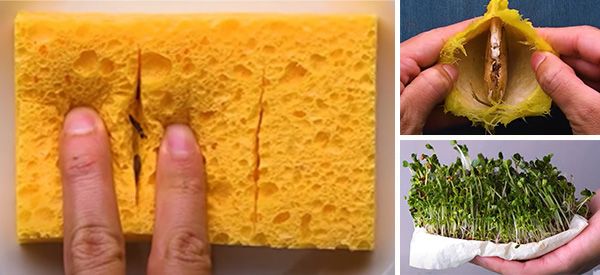
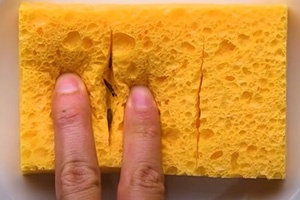 Cut 2 or 3 slits in a sponge, and place a few seeds in each slit. Spray the seeded sponge with water, then place a glass bowl upside down over the sponge, to work as a domed greenhouse, holding in moisture and warmth.
Watch the growth and then plant accordingly when your outdoor area or indoor pots are ready for the transplant.
Related: DIY Seed Tapes With Toilet Paper
Glass, Water, and Plastic Wrap
Fill a glass about halfway with water, then place a piece of plastic wrap over the top. Secure the wrap with a rubber band.
Cut a few slits into the plastic wrap, then place leaves, such as from succulents, into the slits so that they are still above the water (the majority can be on top of the wrap.
In about 7-14 days, you should see some new growth that you can now plant.
Colander for Cilantro
Place a napkin in the bottom of a colander, and then place the cilantro seeds on top of the napkin, spreading them out as much as possible. Put another napkin on top of the seeds and spray with water.
Next, place the colander and seed mix into a bowl of water. Keep this bowl and colander in a sunny area for 10-30 days.
After a while, you should have a beautiful bowl of cilantro with the roots being fed by the water below.
2-Liter Plastic Bottle Fruit Picker
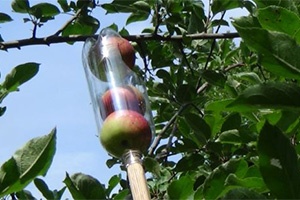 Turn a 2-liter plastic bottle upside down, then cut a hole in the middle of it, large enough to grab an orange or apple out of a tree.
Place a stick or pole in the small opening at the bottom, and you now have a fruit picker!
Simply grab the fruit in the tree by placing the large opening around the fruit and pull down. If it’s not ripe enough to pick, you will probably have some resistance, so move on to one that pulls off easily.
Related: All-Natural Fruit Tree Bait for Insects: It Works!
Strawberry Container
Don’t throw away those plastic containers that strawberries or blueberries came in from the store. Place a damp paper napkin at the bottom, then add seeds, such as broccoli.
Close the container and put it in a sunny area, for about 3-10 days. This is an easy path to microgreens, or sprouted seeds. Once they are about 3” tall, transplant into your garden.
Plastic Water Bottle for Sprouts
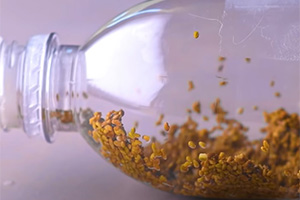 Don’t throw these away either! You can recycle plastic water bottles into a mini greenhouse for sprouts.
Fill the empty bottle about ¼ way with water. Sprinkle sprouting seeds into the bottle, then shake so they all get wet and settle to the bottom. Put the cap back on, and poke several small holes in the cap with a pin. Next, drain the water from the bottle.
Keep the bottle with dampened seeds in a sunny spot for 7-10 days. You should then have sprouts to enjoy! Just cut the bottle to remove them for use.
Rice Water for Starting Corn
The next time you boil rice, save the water. Place the rice water in a plastic container, then put an ear of corn into the water, but no need to be fully submerged.
Place the corn and rice water in a sunny spot for 30-50 days. At that point, you should see some tiny green stalks forming, which means it’s ready to plant in soil outside.
Green Onion, Carrot, and Beet Top Scraps
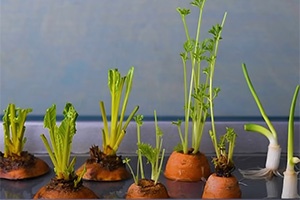 Take the top scraps of the veggies listed above, and place them into a tray of shallow water.
Let them sit for 4-10 days so they will start sprouting.
When they appear to have full tops, such as lengthy greens on a carrot, they are ready to plant in the garden.
Boiled Tea Bag Seed Starter
Take your used tea bags and put them to good use as a seed starter!
Make a small cut or slit into the damp tea bag. Plant a seed into the slit, and then place it in a sunny spot for about 7-10 days. After sprouting, it’s time to plant!
Banana Peel as a Fertilizer
Place a full banana peel into a jar of water, and put the lid on to leave overnight. Take about ¼ cup of the banana water and use it as fertilizer for a plant.
One batch of banana water fertilizer should be good for up to 14 days.
Coffee Grounds for Growing Mushrooms in a Jar
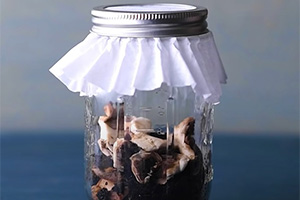 Place used coffee grounds into a glass jar, and add crumbled mushroom. Repeat this step until the jar is about half filled.
Put a clean coffee filter (upside down) over the top, then screw on a canning ring to hold it in place.
Store the jar for about 30 days and watch the mushrooms grow!
Egg Carton for Easy Planting
Use an empty egg carton to help plant seeds in soil. Simply press the bottom of the carton into the soil to make impressions, then place the seeds and cover with soil. This step should save you a few minutes for shallow planting.
Hopefully some of these will provide some easy shortcuts in getting your seeds started, or gathering the fruits of your labor!
You may also like:
 18 Plants That Should Never Be Planted Together
The 10 Medicinal Seeds You Should Plant for a Complete Backyard Pharmacy (Video)
Bury An Egg In Your Garden Soil, What Happens Few Days Later Will Surprise You



Very useful
Thank you! Many great ideas I haven’t thought of or heard of yet (esp. the mushroom culture!)
I will have to try these, although with my infamous brown thumb I have serious doubts about the viability.
Some great ideas here! Hopefully the improvised greenhouses will discourage the ubiquitous fungus gnats!
Fungus gnats lay their eggs in wet soil, little fungus maggots hatch out and develop in the wet soil. You have to let the top layer of soil dry out between waterings and ruffle it up about 1/8 inch deep with a pencil or something. F Gs drive me crazy! Short drive…
Easy ideas
Winter is coming. We have 2-3 more months before the first frost, but by then, an inch of coffee grounds around plants will warm the soil enough to fend off all but a freeze. Ground should be buried when it gets warm in the spring or the ground turns into an oven. niio
Is the mango going to bear fruit? I spent four years caring for grapefruit trees that gave nothing but shade.
https://www.youtube.com/watch?v=M_Hs2SUzWpU
mango in Michigan, how to
You gave up too soon. A website called “Garden Guide” states that grapefruit trees grown from seed can take five or more years to bear fruit. Grapefruit trees grown from grafting MAY bear fruit sooner.
Persimmon trees take at a minimum of seven years before they start to bear fruit. Patience is the watchword with fruit trees.
LLC: Adding to that, mulberries can change from male to female, and female to male. 🙂 niio
Red our outdoor growing season is about over. Frosts in September and snow in October are an average.
Many tree fruits need between 5 and 10 years to reach maturity to bear fruit. It’s the reason so many buy trees already several years years old. They will begin to bear fruit in one or two more years. Berries will be much faster. Most Nut trees will take longer.
ClergyLady: Yeah, when I was stuck in PA, we got the same weather plus sleet and blizzards. Fall was garlic time, and for very early green onions. Early cover crops, late radishes and turnips. collards were planted to winter over for us and the animals. Russian kale and so on, as well.
When I was a little kid, we used to plant pits and seeds down near the cow pasture. A lot didn’t make it, but those that did, if the fruit was no good, dad would tell us wait till next year, be patient! He had his brother, a master orcharist, come (while we were in school) and graft them. 🙂
plain old single ply TP makes good seed tape for things like beans and peas. roll out to length desired; use spray bottle to moisten (don’t overdo it} drop seeds at desired interval folding the paper over each seed as you go. after seeds are all in place. fold the paper again so it is all the way around 2 layers on one side and three on the other. works well to maintain spacing while covering the row. Drag a furrow with a hoe. place the tape, and cover loosely to depth desired, then water.
Boiling rice doesn’t give you “rice water”…all the water is absorbed in the cooking process!
Linda if you add extra water in the cooking process, it isn’t absorbed, it is Rice Water.
Wxaple: 1/4 cup rice and 1/2 cup water or 3/4 cup water at my altitude will equal just cooked rice. But 1/4 cup rice plus 2 cups water will give you some cooked rice and over a cup of Rice Water.
Is this book available in digital format?