Today I’m going to show you 13 ways to make a shelter out of your poncho.
Every shelter that you’re about to see has its own strengths: some will better protect you from the rain and snow, others from wind and sun.
Of course, there are a lot of ways you can bend the material to make yourself a good shelter, and these are just some of the possibilities. In the end, it all comes down to your adaptability to the situation and place you’re in.
I used:
- A military poncho
- A knife
- A rope
- An axe
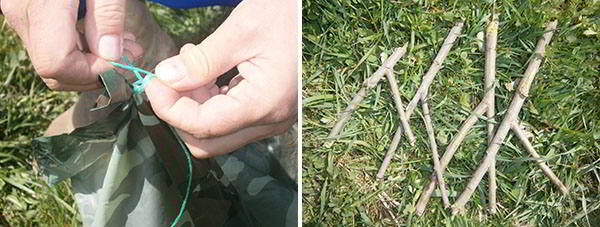
First I grabbed the rope and cut four smaller pieces out of it. I held onto one of the four ends of the poncho, pinched the material together, and tied a knot at the end, making sure that one of the ends would be longer. (If your poncho has a hole designated for this reason, this step isn’t necessary.) After that, I made a loop at the end of the longer end and did the same with the other three corners.
Related: 3 Quick Shelters (The Last One is Invisible!)
After that, I cut down branches that formed a Y shape, I used these to secure the poncho in place.
1. The All in One Shelter
First I grabbed a bunch of branches and tied them together with a piece of rope at two different places. I searched for a larger Y-shaped branch, locked one of the sides of the Y between the branches, then pushed it into the ground.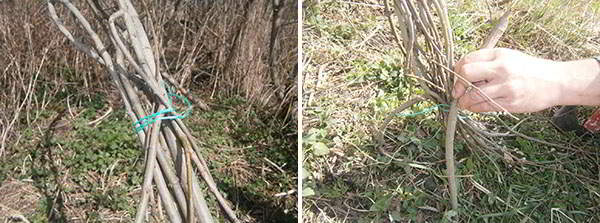
After that, I ended up with this dome shape.
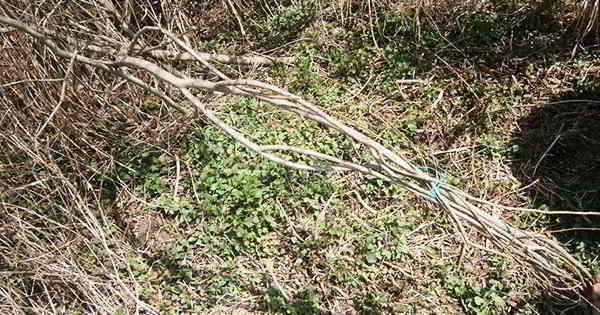
I simply put the poncho over it and secured it by the four corners of the poncho with the loops and the branches.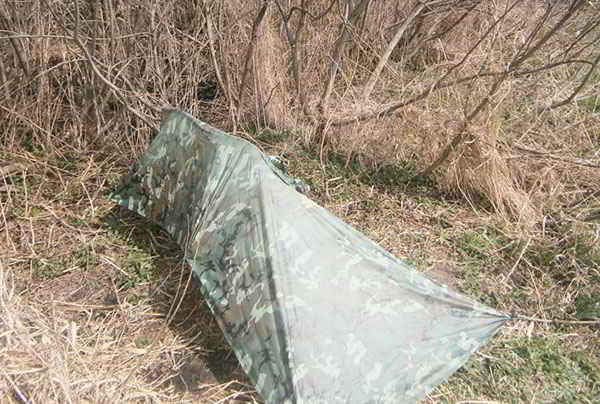
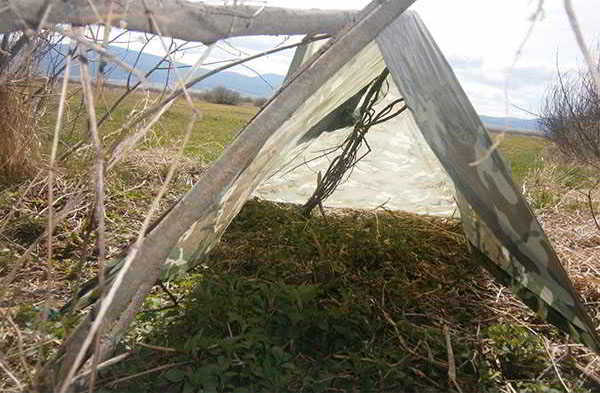
This is how it looked from inside.
2. The Insulator
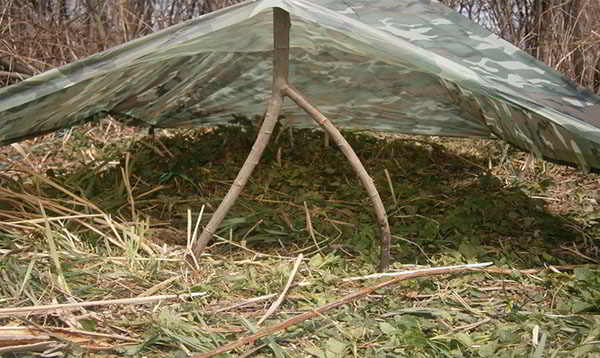
First I searched for a piece of branch that I knew would be strong enough, and then I tied the hood part of the poncho onto it. After that, I secured all four corners with the branches and the loops to make it into a shelter.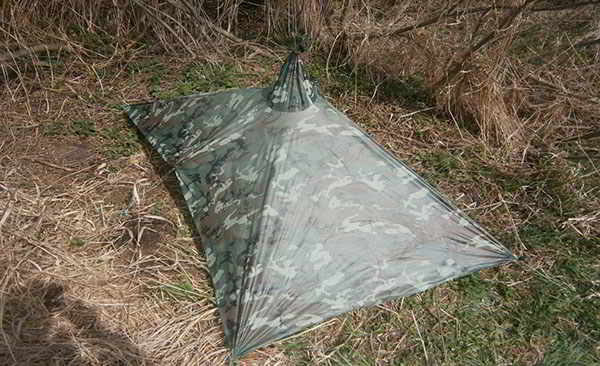
And from inside…
3. The Sunshade Shelter
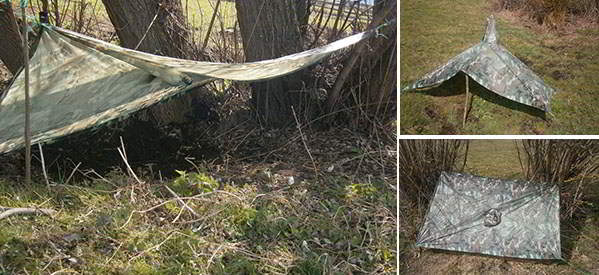
For the next shelter, I searched for two trees relatively close to each other. After I found them, I just tied all four of the corners to the branches and tied the hood up higher to protect against rain.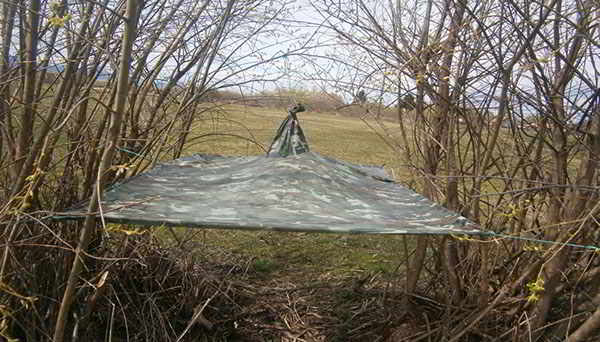
4. The Suspended Lean-To
Using the same two trees, I tied a rope between the two and placed the poncho on top of it, with one side larger than the other. I secured the back side with the Y branches and the top ones to the tree’s branches, making sure that it was lower than the level of the rope that I used to connect the trees.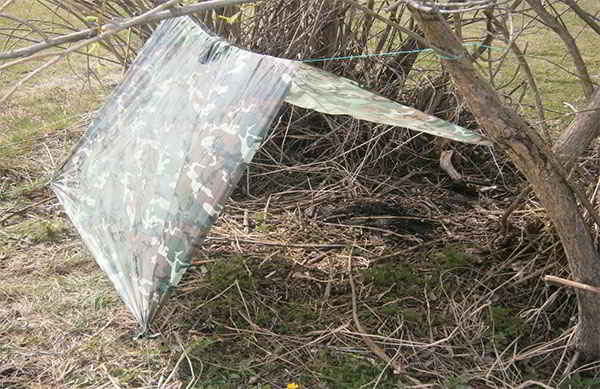
5. The Poncho Tent
Using the same two trees and the string between the two trees, I was able to make something that resembles the usual shelter form we all know. I simply placed it on the rope and secured it with the Y branches.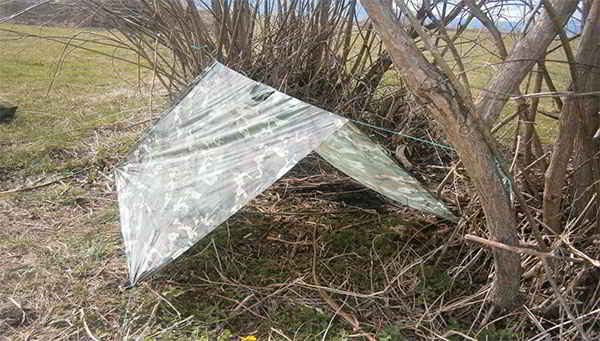
It looks pretty cozy to me.
Related: Finding Shelter in the Wild
6. The Vertical Lean-To
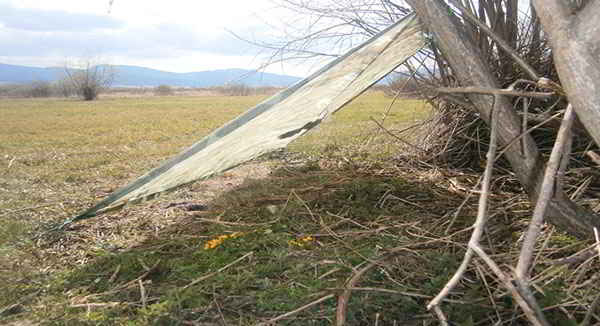
I placed one side down on the ground and connected the other to the rope I used before. To make it more secure, I tied it onto the rope at the middle top part of the poncho. This way it wouldn’t fall off. Make sure the rope is high so you get more of a vertical shelter. This is ideal to protect against rain.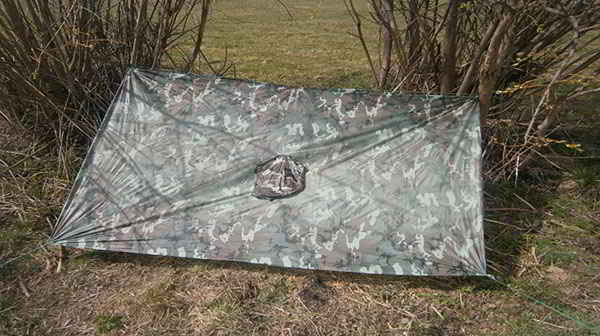
And here it is from the side so you can get a clearer understanding.
7. The Horizontal Lean-To
I placed the rope lower and then placed the Y branches a little farther away. This way I can get a more horizontal shelter, which is good against strong winds.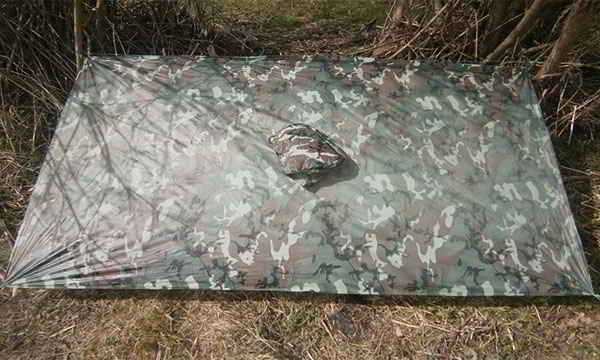
8. The Obtuse Triangle
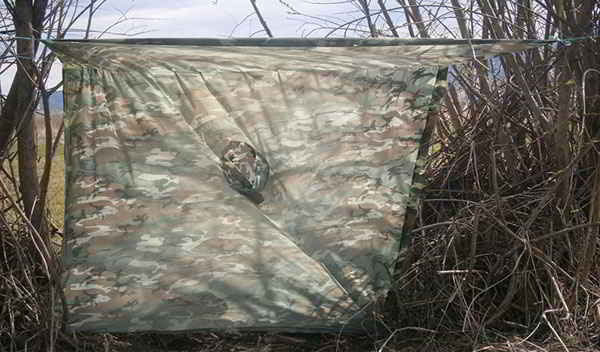
For the next one, I did something similar to shelter #4 except that although I moved the rope higher and placed it in the same way, letting it hang over a little just like before, this time I attached it a little bit higher than before. This way, if it rains, the rain will pour down the back side of the shelter.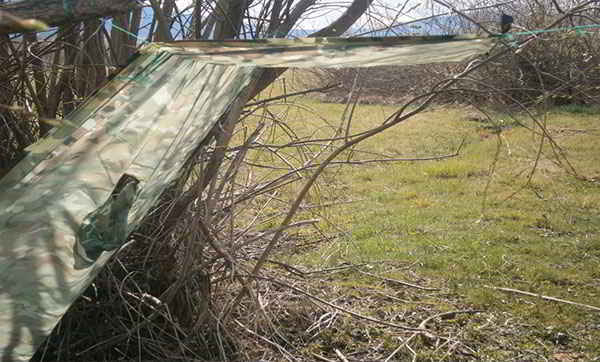 This is the view from the front.
These last shelter styles are for those people who get lost in a place without a large number of trees around. All you need is a few branches, and you are ready to rest.
Related: The Ultimate Bug Out Home For Just $250
9. The Cauldron
I searched for three branches; two of them were Y shaped like the smaller ones we had before. The third one was a simple straight branch that had all its smaller sprouting branches removed. I first pushed the two Y-shaped branches into the ground then placed the straight branch on top to make something similar to a cauldron holder structure. I placed the poncho on top and secured it to the ground.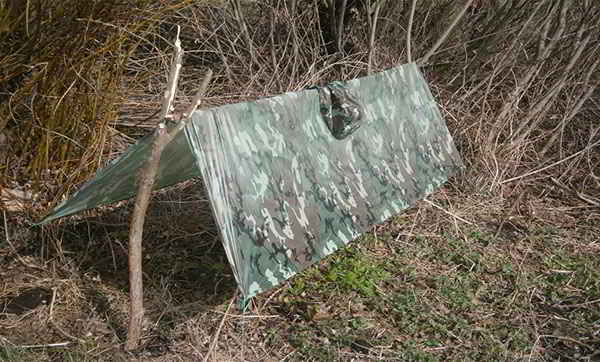
It’s simple but effective—perfect to survive a night in the wild.
10. The Diagonal Shelter
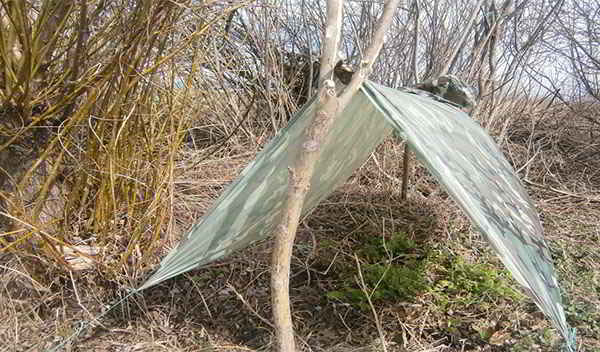
This shelter is one of my favorites. It’s easy and only needs your poncho, the four Y branches, and a long, straight branch.
I simply hit the straight branch into the ground then tied one of the ends of the poncho onto it. After that, I tied the other three corners tightly to the ground to get this interesting shelter design.
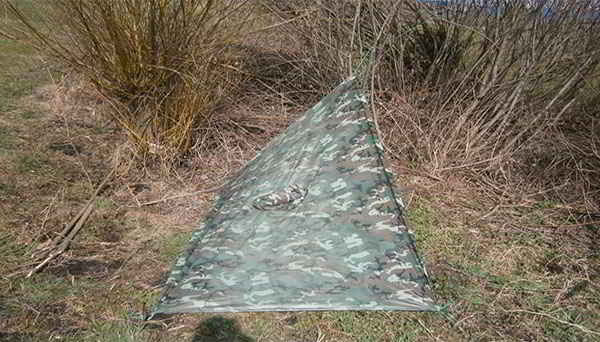
If you want, you can even lower the size of the entrance when you go to sleep by sliding the loop lower on the branch.
Related: Top 5 Awesome Bug Out Vehicles You Can Actually Afford
11. The Airplane
For this shelter, I pushed two branches into the ground and hung the poncho up by two of its corners. I then used the Y branches to secure the two other ends.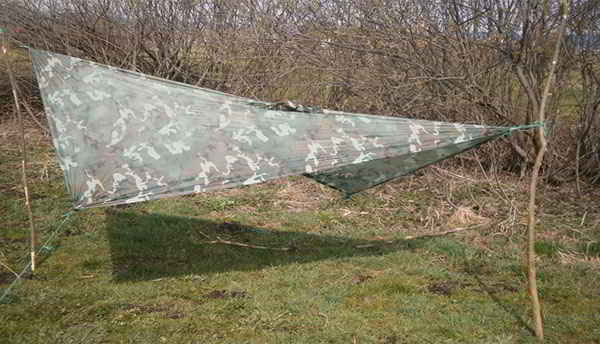
12. The Ghost Man
This is probably one of the easiest shelters out of all of these. All I did was push a branch down into the ground and place the poncho over it so the hood was holding onto the top of the branch. I secured it and added another smaller branch for the entrance, but this isn’t necessary.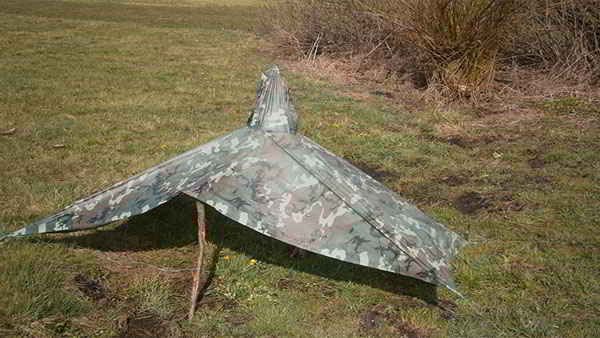
It’s a cool little resting place when you’ve walked for hours and need a minute away from the sun.
13. The Glider
This shelter requires more determination from you but gives you the possibility of only needing the poncho. First I dug a hole approximately my size and made sure I got a few inches deep. I placed the poncho on top and secured it with the Y branches, but as I said before, you don’t need to use this. If you dig deep enough, you can gather enough dirt that it can keep the poncho in place when put on the edge of the poncho. You could also gather some rocks and use those.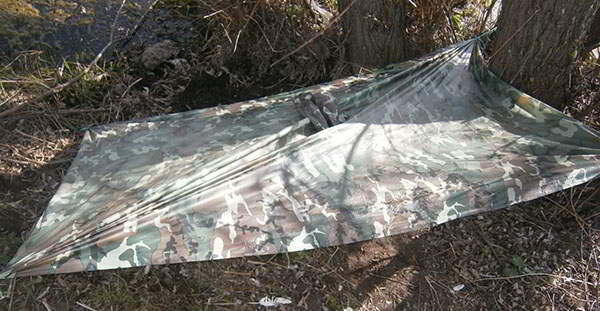
As you can see, you don’t need to dig too deep, just enough to snuggle under there.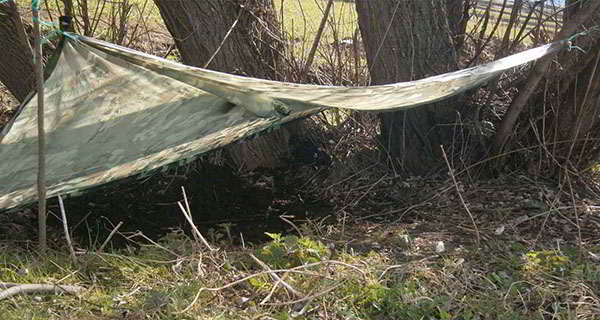
If you don’t think you will be able to bug out click on the banner bellow to learn how to secure your home from looters.
You may also like:
 Things We Did as Kids That Would Get Someone Arrested Today
10 Things Cowboys Carried With Them in the Wild West to Survive (Video)
I Lived Without Electricity For A Week. Here’s What Happened



Don’t have a poncho but I do have an old round, army green parachute. Ideas are good but easy with things readily available.
Teepee is the first thing that comes to mind.
I love the variety. It accures to me that my grandaughters need knot instruction.
My grandson has been studying my old knot board I did as a kid. Also we had to learn 16 compass points directions and find them without a compass. So many good things kids should be learning. Make it fun or rewarding and they will learn. I still love camping and cooking over different kinds of fires not just charcoal in a barbeque or my little gas camp stove. A fire in a pit with an air supply hole. A campfire with a rock ring and a cast iron frying pan and a tinfoil and cardboard reflector oven. A pot hung over a fire. Cook on a flat rock in the fire. Make a soup in an old tin can. Lots of things kids can have fun learning to do.
Roasting a chicken buried in a pit full of hot coals. Best chicken I ever ate!
I bet that was a great chicken. I like squrrels done that way. Moist and tender.
Mmmm yes
Thank you
A few “tricks” that I have picked up over the years might help. First if your Poncho or material has no holes (grommets) to tie the para-cord or rope through- get a small stone (approx 1/2″ -1″ diameter and place under the area where you want to tie the cord. Gather the material around the base of the stone and tie your cord around that-keeps the cord from slipping off in winds. Also I wrap a length approx 20 feet of of 550 Para Cord around my poncho or roll it up in the Poncho when packing so that you always have your cord with you to make a shelter. Then again I keep several hundred feet of Para Cord in my bag along with some Duct Tape to repair ponchos or even make a raft out of your poncho and Ruck Sack if necessary for lake or river crossing (ONLY IF NECESSARY).
You can avoid most knots, just learn trucker’s hitch and bowline. These cover most (90%) of any knots you’ll need. Also, if you carry 6 military camouflaged bungee cords, you can eliminate most all knots for a poncho shelter. They are fast (real fast) to use and provide flexibility in the wind – very important to save your grommets. 14 years of light infantry taught me the lessons.
Old and gray me too airborne infantry but only 6years definitely learned to survive just about everything.
Hello Airborne! Nice to get some input from those who did and lived the life and for the right reasons. I don’t post much to the “Ask A Prepper” blogs anymore. I started out trying to help a lot of the young and inexperienced ones, but too many know-it-all legs out there that couldn’t find their way out of a paper bag, even with dead reckoning. They deny and distort the good info and peddle their own war-gaming COA’s, which only confuses the unknowing and untrained.
But darn good to have one of the brothers check in on me. I appreciate that! You doing okay with everything since you left the desert and got back to the world? Hope so. You know this stuff, I know this stuff and WE know this stuff – To bad so few listen and will never learn this stuff….until maybe it’s to late.
Oh by the way, I hardly ever put up a poncho shelter. 98% of the time I just rolled up in my poncho and liner and found a hole or ravine to prop myself into. Didn’t want to be a target or put up a billboard welcoming the wrong parties.
Nice chatting – Stay Strong!
Another brother in arms watching and occasionally commenting. You are sure right about the high number of people who have to find fault with anything. That kind of attitude keeps a lot of good advice and knowledge away.
Take the high ground!
Hi Troubadore9,
Yep, There are those that write a books worth of song and dance on this blog and try to dominate every single discussion to influence the naive and uniformed. They feel the more words they type, the better their credentials will be.
People like us use many fewer words, relied on our “actions” and have credentials with very few words. I just hope these young kids can sort out the wannabes and oxygen thieves from those of us that lived and loved it, for our own reasons.
High ground always, roads and paths – never!
I did a lot of “camping” in 1968, came back in 1969 instead of Infantry I went into Hueys as a Gunner then Crew Chief. My hooch had a BED with a MATTRESS, PILLOW AND BLANKET! 1st tour I agree with Old and Gray as I didn’t want to stand out, my poncho and liner did the trick for me. The ground was cold and hard mostly but you had to carry what you needed and a air mattress was just too heavy. This is a good article and I’m extremely happy to see that most replies so far are on topic! WELCOME HOME to the Vets on this site!
Have to agree. A few good knots that you know well are always the best ones.
Having served as a combat engr. for 9 years I have to say that what I learned in the military has stuck with me. Living something has a way of giving you a built in BS detector when reading things posted by want-a be pretenders. To All vets and active duty personal I send my best wishes and thanks for also thanks for your service.
Are there websites you would recommend with advice from vets? My dad was in Korea and I’d rather learn from the people who lived it . However, Dad passed when I was young plus he was Air Force so I wouldn’t have any idea what he knew about survival like you guys are talking about . From a very young age, I was taught to respect all veterans, appreciate their sacrifices, and learn from them when possible. Thank you.
Use of “figure 9s” have also made knot tying almost obsolete. But I’ve taught my son and daughter how to tie several knots that are useful in survival and prepping scenarios.
20 years of firefighting and teaching rescue….. learn your knots.
These are some amazing looking shelters; after all, it is incredible what you can build if you have the right materials. I particularly like the fourth shelter that you show off in your article here. After all, it looks like it can provide plenty of room while also giving you a great place to stay dry and warm.
# 14- The Dead Man’s Bivy.
Lay the poncho so its short size is facing the tree. Using cord, suspend the center grommet above the ground, so the now bottom edges of the poncho just touch the ground. Pull snug and stake down the opposite short side, and also the center of the sides. The finished shelter should look like a doorstop wedge.
Some of us appreciate hints, solutions and examples from military vets way more that self-proclaimed experts.
Thank you to OldandGray and all our vets for their valued information in these forums. I would definitely listen to you first.!! Don’t let the “know it alls” chase you away. We need you!!!!
Thank you for the post. I may never need this, but it sure is nice to know how to make so many shelters with nothing but a poncho! And thank you for the pictures! I usually don’t even look at them as they seem to all be pretty stock pics, but these were valuable as I’m more of a visual learner.
Hi to all military! My daughter is a Marine, served in Iraq. Did 11 years and had to leave as she got fibro, and didn’t want to order her men to to what she couldn’t. She was a gunny when she left.
Where can you get a Military poncho (it looks much larger than regular ponchos I’ve seen), and the military camouflage bungee cords? We used to have an “army” surplus store around, but no more…..