The most powerful thing about being in the wilderness is the idea that there is zero concern about your wellbeing. Whether you live or die or get eaten alive by a black bear the leaves still dance in the wind and the squirrels still jump from limb to limb.
In today’s world we have become so accustomed to a world that is truly concerned about the condition of others. It’s a beautiful thing but can often times leave us unprepared for the reality of our adventure
More people are hitting the woods now than ever before. There is a movement towards adventure and exploration.
My theory is that people are so inundated with the electronic world that nature is providing a decompression. Our minds are tangled in diodes and Ethernet cables but forests give us the chance to disconnect.
People get lost in the woods. People need shelter to survive in the unforgiving environment that is nature.
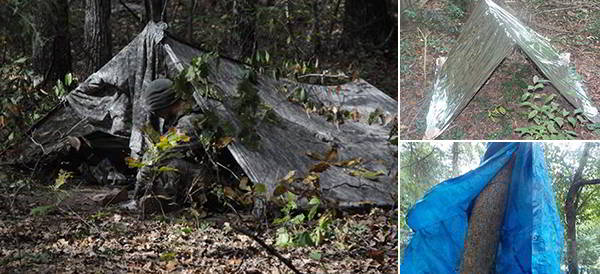
This article will offer up three very easy shelters to put together. These shelters are all made using tarps and emergency blankets. They will offer you solutions a survival situation where you will need shelter.
Emergency Blanket Shelter
All of these shelters will require paracord and some form of anchor i.e. rocks, bricks, stakes or something along those lines.
You will want to start this shelter with two good and sturdy trees. Check the area for any dead trees that could fall onto your shelter. That would mean certain death and we are talking about survival here, right? Tie a strong knot and assure that your line is taut between the two trees as this will hold up your emergency blanket.
You will want your line to be about 2 feet off the ground which will allow you enough room to anchor the blanket to the floor of your location.
Once you have the line tied and taut unpack your emergency blanket. The desire will be to width wise over the cord as that will appear to provide you a larger shelter area. These emergency blankets are not big enough for this. You will want to fold it over the cord lengthwise and anchor it with some sort of weight or stakes. I prefer weight for these thin blankets because they tear easily and that creates issues with stakes.
If you have two emergency blankets you will have a very comfortable shelter. Using just one is very minimalist but this will keep you dry and conserve heat which is the point of all shelters. That said this shelter will not hold up to high winds. The material is simply not durable enough. It is also a great shelter for storing clothes, food or other things you want to stay dry as well.
Poncho Shelter
The poncho shelter is part of standard operating procedure in the military. This is a step up from the previously discuss shelter. For many of us when we travel we do so with a poncho or two in the car or in the bag. This shelter will also require some paracord and anchors as well. The material is much stronger and will stand up better to the elements.
Begin by using the same setup as mentioned above. We want two sturdy trees and a safe area to overnight. When you setup your paracord this time, however, make sure instead of a taut line that runs parallel with the ground you want the line to be tied and slope down slightly. I have also seen these shelters built with sticks using an A frame design. Since we are talking quick and shelters I would rather use the paracord method.
Once you drape the poncho over your line your will need to anchor the four corners of your shelter. For the wider front opening of this shelter you will want stakes or sticks sharpened down to be such. The front of this shelter will want to slide down as it will be sloped. Your stakes will keep that from happening. The back of the tent could also be staked or anchor weighted.
This shelter is time tested. It’s in the manuals of our military and has proven itself to be the most powerful quick shelter you can make from a poncho. You can store your belongings and yourself inside one of these and be comfortable. Of course my advice is the same as above. Carry two ponchos and you will have even more to work with.
The “JW” Tree Trunk Shelter
This is my answer to a quick shelter using a tarp. I wanted to offer something very easy here that could be used as shelter and as concealment. It will require a large tarp without holes. The best tarp would be colored brown or camo. I used this blue tarp because it was a good size and at arm length. It also helps you to differentiate from where the tree end and tarp begins very easily.
You need to find a tree with a low hanging branch like the one you see here.
Wrap the tarp around the tree and tight a tight knot in both ends that meet at the branch. This branch will keep the tarp up and basically hold the shelter up. If you find the right tree this will be an easy step.
The tree will essentially work as a tent pole in the center of your shelter. Depending on the size of your tarp this could be a very comfortable shelter. You will want to inspect the base of your tree for things like ant nests. It would be terrible to setup your shelter only to find out through the night that you are covered in carpenter ants.
Wrap your tarp around to meet the other side. The holes in the tarp can be sewn together by using a piece of paracord. I will sew them around the top and leave the bottom open. Then shape the bottom of your tarp to resemble the root system of a tree.Make sure the shelter tapers out the way a tree’s base would in nature. Once you have achieved the perfect shape anchor the bottom of your shelter in several places.

Now imagine this image with a brown or camo tarp. In the dark of night you could walk right by this thing and not even realize it was a shelter.
My intent was to create a shelter that would blend in with nature. This shelter does just that and with the proper use of color would be nearly indistinguishable at a distance even in daylight.
MOD: You will want to wrap a few lengths of paracord around the top of the shelter just below where the knot is tied. This will keep the rain out. Otherwise it will let moisture in.
Fire, Water and Shelter are the basics of survival and I hope you give some of these quick shelters a go on your next trip out into the wilderness. Like I said they may not be a Coleman but if you find yourself in a pinch these shelters will greatly increase the likelihood of your survival and hopefully provide you with a decent night’s sleep.
You may also like:
Earthbag Homes: The Ultimate Bullet-Proof Retreat Cheap and Easy to Build!
This Bug Will Kill Most of the Americans during the Next Crisis (Video)


You want to make sure you have some kind of opening at the top of the structure to allow moisture from your sweat and breathing to escape, otherwise you will feel as though it has rained inside the plastic. That is why all tents have an opening near the top, to allow moisture from your body to escape the enclosure.
This is a well written article, especially the first paragraph. (Took me and wife a while to stop laughing to finish reading after reading the first few words).
I can’t wait to try the “tree shelter” .
I’ve used the other two before and both are good but the “emergency blanket” type will fly away at the slightest breeze (which will come while you are asleep). The poncho type is time tested and we used it in the Air Force.
I agree with the previous comment about a vent for sweat in the “tree type” shelter.
Interesting shelters. Can you give an general size of tarp that would be needed to create the last shelter?
stubbie; wow stubbie,,, I hope you survive with that question. lol JUST GET the biggest tarp you can afford.
Best shelter of all: get an ultralight (but still fully functional) tent like a tarptent, at http://www.tarptent.com. I have spent over 50 nights in the woods in these. They keep out the bugs and practically all of the rain, yet let your exhaled/body water escape. Of, and they’re easy to set up.
If you care a short piece of 1″ pvc, 6-8″ is enough. It can provide a controlled vent that is hard for even rain to get in in any quantity and with a 90 degree elbow on the end even rain is kept out.
Only poncho tent is time-tested and reliable. Terrain is important for any on-ground shelter; distinctly ungood to have groundwater flowing through and vermin (e.g., rats, snakes, spiders, and scorpions) visiting.
Carry (or pre-position with other materiel) at least two (2) equal-size durable tarps as large as you can afford (you’ll need other items too, so don’t think about getting materials for building a foldable cabin).
Tarps must have grommet rings (metal-lined holes) placed at 12″ intervals or so around all four edges. (4″ to 6″ even better.) One tarp will be ‘roof’, the other ground cover and/or to finish closing off a windward end.
Supporting ‘roof’ tarp you need cordage; cheapest nylon works. (If you don’t mind replacing cordage after each teardown, polyethylene may work, and it’s much lighter to carry.) Get a diameter-strength which easily fits through grommets. You will need also: real tent pegs (like mountain-climber pitons), a digging tool; an old-style foldable trenching shovel works and isn’t heavy, a camping axe or a real machete (has a real handle, not some plastic bits). A real Kukri (Gurkha short sword) also works. And some sharpening tools, such as a flat metal file and a stone – nothing worse than dulled cutting tools.
Scenario assumes you may need/want to have a fire for heat and/or cooking. Incidentally, it can get cold at night in deserts, and temperatures really cold in high-latitude and -altitude places.
In temperate zones, there are usually trees around. Choose two living trees which are approximately same distance apart as your largest / strongest tarp. A little closer unimportant – tarps may be folded back. Ensure there aren’t any really large dead trees overshadowing site.
Clean ground of all vegetation and loose/diggable stones to an extent as wide as your widest tarp. (Pile larger and flat stones to side for later fireplace.) This the time to cut down any dead trees which overshadow your prospective site.
Each end of a strong cord is tied (bowline knot best, or a long series of half-hitches), one at around eyesight height to the leeward tree (downwind) and the other end to a tree near ground level to the windward. ‘Roof’ tarp gets suspended with 1/2 on each side from tied line. Pegs get used with short cords to secure bottom edges out as far as that 1/2 portion will stretch. (Taut but not tight as a drumhead on both sides. so rain can flow off.) Since one tie point higher, resultant shape will be irregular and there will be wrinkles.
If there are conifer trees, lower green limbs may be cut, stripped of needle bunches, and those bunches used to pad the bared ground. Second tarp gets spread inside atop bared ground or conifer needles. Its final config will also be irregular; this is where more short cords get used to secure ground tarp to ‘roof’ one on the three near-ground sides. Small gaps unimportant.
With trenching tool, dig (where possible, there may be roots) a 6″ to 12″ deep ditch around the entire structure casting the dirt on the ground join between the two tarps. Ideally, initially chosen ground will slope down from windward to lee tree. Point is, if there’s rain, nigh all water will follow your ditch off somewhere else. Time also to dig latrine trench someplace to lee.
Stones and/or dug earth may be used to construct a fireplace nigh higher end of the tent. Use any dead limbs and deadfalls first; green wood burns badly and throws sparks. A small fire at least 36″ (meter) away from ground tarp and any padding may work.
Don’t burn down your happy new home.